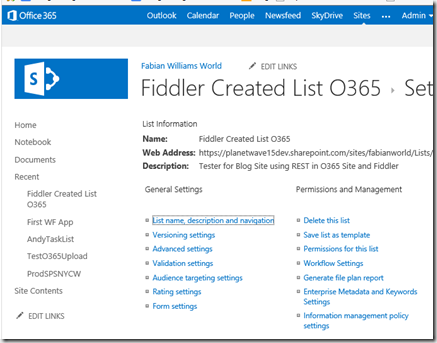
Wrap-up on my SPSDC Workflow Session
Thanks
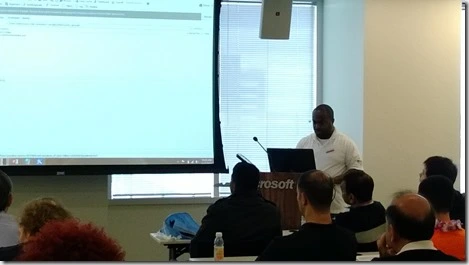
Another year and another successful even by the Organizers (Dan, Adam, Rachel) and all the Volunteers at SharePoint Saturday Washington D.C. – Reston. I was honored to be an accepted speaker and I delivered this session “The Evolution of Workflows in SharePoint 2013 – A Story about External Calls with REST & JSON”. This was truly a magnificent event with a great turn out, good mix of attendees, and they were very engaged, asked serious and deliberate questions , and didn’t even mind as yet again i go a little bit over in my Live Demos.
Appreciation
Its always great to meet face to face the folks that you interact with daily on social media in our SharePoint community, foster new relationships, maintain old ones, and Share a Pint at the end of a day where we all walk away with a bit more knowledge in this technology we all share. I was very please for all the attendees that made my session ‘standing room only’ and if any of you all have pics, please email them to me, i would really appreciate them for my blog post.
My Slide deck may be picked up here
What’s Next
Make sure to attend the inaugural #SharePoint Saturday, the one that started it all SharePoint Saturday Virginia Beach on January 11th 2014 & of course stop by my session (well after you register here) on Optimizing your SharePoint 2013 with BCS an External Data where we will discuss strategies, security and all the various models to interact with your LOB systems.
As well, I will be delivering three (3) Sessions at SharePoint Conference 2014 March 3rd through 6th 2014 (#SPC14 or @SPConf) in Vegas check out this link for my sessions.
I hope to see you there.
See oonuh latah
Why it pays to have Smart Friends to Encourage you
Why write this blog post?
Sure its late and YES I could be rotting my brain away on the Idiot Box, but what started off as a Taunt by Ram turned out to consume my life for 2 days straight but with useful results, challenges that were overcome, and a better appreciation for not just Cloud, but the integration of Cloud and On-Prem using Windows Azure. Let me tell you what I did, and how easy it was… in the end, plus the real implications of it.
First a little history – Pre Taunt
So, as I prepare for my sessions at #SPLive in Orlando in 3 weeks, I wanted to knock out a few Demos and make sure that I could showcase just about anything anyone asked of me based on the Session Abstract/Topic. In furtherance of that, I decided to do the following, build out solutions employing
SharePoint Designer 2013
- External Content Type using a Native SQL Data Connection
- External Content Type using an On-Prem (i.e. Hosted on one of my Dev Rig VMs) Windows Communications Foundation [WCF] Data Connection – JSON enabled
- External Content Type using a .NET Assembly (built on my Visual Studio 2012, Deployed as a Farm Solution to my On-Prem SP2013) Data Connection
- Workflow using the same On-Prem WCF above in my On-Prem Farm
Visual Studio 2012
- A Locally IIS hosted WCF Service Library that exposes Northwind data from a Local SQL Server 2012 Box
- A Locally IIS hosted OData Service Endpoint that exposes Northwind data from a Local SQL Server 2012 Box
- External Content Type built as a .NET Assembly to be deployed to my ON-Prem SharePoint 2013 Farm
- External Content Type AND External List SharePoint 2013 App built as an OData Sourced Application deployed to my ON-Prem SharePoint 2013 Farm
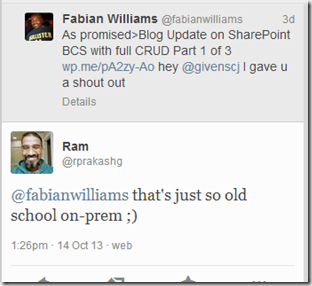
For every Instance of the WCF and the App Model External Content Type, I also targeted my Office 365 Tennant to surface the Data as well. I was pretty satisfied with myself until my good friend sent this tweet, and I know it was in jest…
but… I took it as a challenge and, I rarely back down from a challenge 🙂 so, since I have a MSDN subscription, there was “really” nothing holding me back besides my inexperience creating Azure Web Roles, which is what you need to do in order to have the requisite Data Access Points (URI) to create External Content Types and potentially Workflows.
What Next you say…
So, with a little research on Google scratch that, I mean Bing, I found a few MSDN, and TechNet blogs on how to create Web Roles, although not many of them “accurately” showed you how to use Visual Studio to DEPLOY your solution back to Azure. Anyway, it was surprisingly easy, although initially it was somewhat intimidating and i did get snagged on a GOTCHA which i will blog about later when doing a ASP.NET Web Role where it requires you to lower your version of the System.Data.Client assembly from 5.0 to 4.something in order for it work in Azure, i say that because it worked perfectly when I debugged it locally on my Visual Studio IIS. I also had to create an Azure SQL Instance and used a script I downloaded from CodePlex to restore a Northwind Database to my Azure SQL Instance and then I set up firewall rules to allow me to access it over the internet.
But with quick turn around and because i could just Refactor my original On-Prem code logic, I was able to create the following
Visual Studio 2012
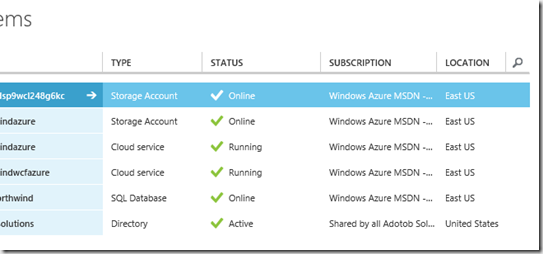
- Azure ASP.NET Web Role that published as a Cloud Service which used OData via ADO.NET Entity Framework to get a Cloud based URI that i can do CRUD operations on
- Azure WCF Web Role that published as a Cloud Service which used WCF via ADO.NET Entity Framework to get a Cloud based URI that i can do CRUD operations on as well
Now I can really Mix and Match, I can
- Use Azure (Cloud) Hosted Data via an ON-Prem WCF or OData End Point and surface that information both on my ON-Prem SharePoint or my Office 365 Instance
- Use Azure (Cloud) Hosted Data via an Azure Cloud Service WCF or OData End Point and surface that information both on my ON-Prem SharePoint or my Office 365 Instance
- Plus everything I had when I started off
The takeaway here is that with very little investments in time and effort I extended my solution to a “MODERN” approach. I had Cloud in the sentence 🙂
Other Positive Implications
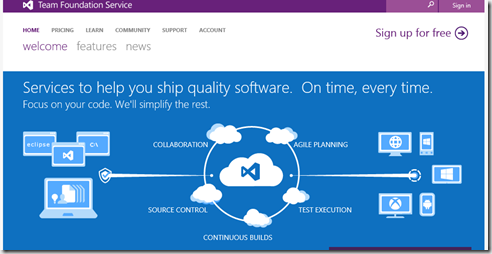
So, what made this so easy for me was I signed up for TFS Online here http://tfs.visualstudio.com/en-us/tfs-welcome.aspx and EVEN WITHOUT a MSDN Subscription you can sign up for FREE and get 5 accounts in one instance.
What I think is GOLD is…
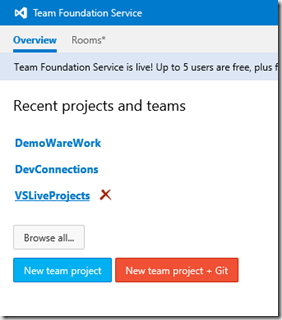
- You have a place to store all your CODE/ Work and before you ask, it supports different formats (see image below)
- Your Code/Work is accessible from Anywhere you have an Internet Connection now
- You can reliably share your Code/Work with anyone now, rather than Zipping it up and Email it
- Need Help with some of you work… Invite people as smart or smarter than you to review our code, many hands make light load 🙂
- Most beneficial of all is that you can configure Continual Integration. I know my good friend Jeremy Thake always talk about Application Lifecycle Management (ALM) and you can employ some of those techniques from Azure through TFS Online and your Visual Studio with multiple Team Member… and guess what… FOR FREE
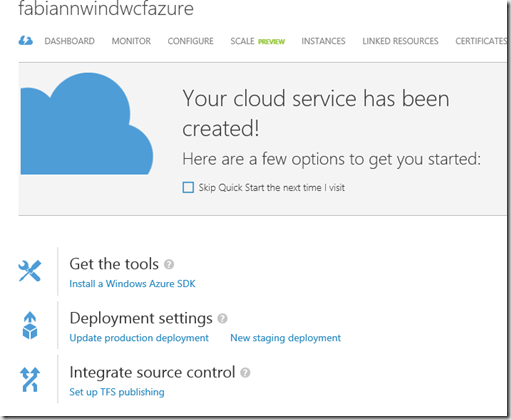
So that’s all I have to say, I guess we really Paid It Forward RAM, you encouraged me to do this, I in turn, documented my efforts and hope that someone else can take it from here.
Cheers all, have a great night. Oh yeah, VS 2013 is out now. GO get it.
Blog Update on SharePoint BCS with full CRUD Part 1 of 3
Précis
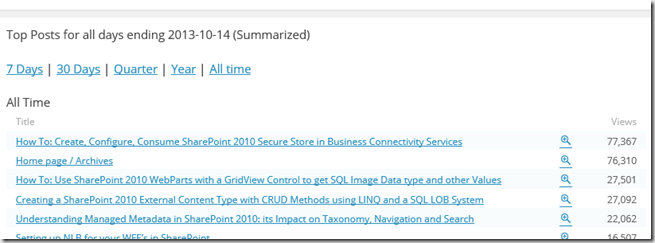
Consistently two of my most heavily viewed/visited post based on WordPress Metrics is the one highlighted below, see the image for the top 5 all
- How To: Create, Configure, Consume SharePoint 2010 Secure Store in Business Connectivity Services
- Creating a SharePoint 2010 External Content Type with CRUD Methods using LINQ and a SQL LOB System
Since I have already done this in SharePoint 2010 using Secure Store and a SQL Server Native Line of Business (LOB) System, as well as a Visual Studio 2010 .Net Assembly, I figured I can offer value by updating this post to include the following Scenarios
- BCS Full CRUD using SharePoint Designer with a Windows Communications Foundation (WCF) Data Connection [I will actually show you how to build the WCF, otherwise why even bother :-)] using the Users Identity as the Auth (YOU ARE HERE!)
- BCS Full CRUD with Visual Studio 2012 .Net Assembly using Secure Store [I will put in Code Snippets this time rather than Images :-)]
- BCS Full CRUD with Visual Studio 2012 OData LOB System Type SharePoint App [Yes App Model] to include the External List Instantiation
There are tons of examples (the #1 viewed blog above uses that as an example) on how to use SharePoint Designer to do a SQL Native Connection, so i wont bother beating that horse to death, and I would like to also point out to this excellent post by my good friend Chris Givens on how he extended the third bullet point example above to include Notification and Subscriptions Alert, so i will not be doing that either.
Approach
As this is an update, I am specifically leaving out the precursor activities that are needed before you begin to create the External Content Type (ECT), I will just pick up at the point of Creating the ECT and as for cases where I introduce new methodologies, I will ofcourse showcase those aspects.
In this blog, specifically I will be showing the following
- Creating a WCF Source
- Basically, creating the WCF Service Library
- Moving the Service App DLL & Hosting the WCF in IIS (since automatically it is hosted in the local virtual Visual Studio IIS app)
- Using SharePoint Designer 2013 and that WCF Data Connection to do Full CRUD Operations, CRUD-Q infact
Lets Begin – Creating the WCF Service Library
My thought process for this since I am going to be exposing data in an underlying SQL Server is to use Visual Studio Entity Framework 5 to create my access to the Data Store. I will then (I don’t have to but because I want to extrapolate the Entity and manipulate it as my own object) I will create my own class(object) to represent the Northwind Employee and then create my Visual Studio Interface and then my Service Contract. If all of this sounds like gibberish to you, here is a beginners tutorial on how to create a WCF Service Library (its too involved for this post and will take away from my objective) NOW… I am not going to implement it totally the way the post describes it, as i said above, but I WILL show you the code of my
- Connecting to the Northwind Database
- My Northwind Employee Entity (Data Contract)
- Service Contract (Interface)
- Service Itself(Implementation of the Interface)
New Project & Connecting to the Database
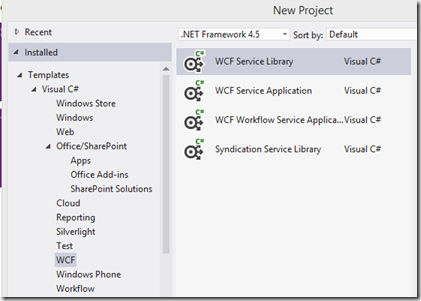
First you will start Visual Studio as Administrator and create a new Project as such
Project > New Project > Dub CF > WCF Service Library – Then name it appropriately
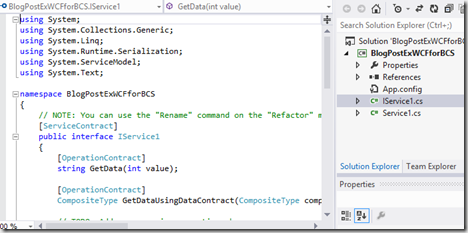
Now by default you will get a Service Contract called (IService1.cs) and a Service Implementation (SErvice1.cs) – I don’t like using the OOB templates that are provided although hey say you can Rename/Refactor it; i just never trust it. So, you can go ahead and delete those, because we will create our own classes for our Data Contract, Service Contract and Service Implementation.
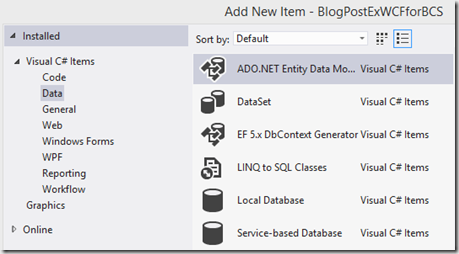
Once you have deleted those two files, then next we will do is add an ADO.NET Entity Data Model item to our project, name it appropriately for the Data you are modeling after and click Add.
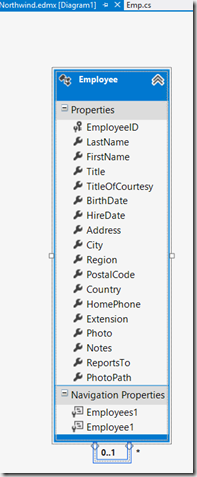
Follow the Wizard by doing “Generate from Database”, make a new connection or select from one already there, because I am using SQL Server Authentication and I want to have this persisted in my project I also select the option for “Yes, include the sensitive data in the connection string” which is basically your Uname and PW along with Data Source and Initial Catalogue. Under Tables I am selecting my Northwind Employee Table, and following the rest of the wizard to the end. When you are done, you should have an entity as i do below as well as a “NameYouChose”.edmx file which shows you the below
Once you have done that, now I am actually going to create my own Data Contact class which abstracts from the ADO.NET Employee entity. You do that by adding a new class to your project. I am calling mine “Emp.cs” as seen below in the code snippet
- namespace NorthwindServiceLib
- {
- [DataContract]
- public class Emp
- {
- [DataMember]
- public Int32 EmployeeID;
- [DataMember]
- public string LastName;
- [DataMember]
- public string FirstName;
- [DataMember]
- public string Title;
- [DataMember]
- public string TitleOfCourtesy;
- [DataMember]
- public DateTime BirthDate;
- [DataMember]
- public DateTime HireDate;
- [DataMember]
- public string Address;
- [DataMember]
- public string City;
- [DataMember]
- public string Region;
- [DataMember]
- public string PostalCode;
- [DataMember]
- public string Country;
- [DataMember]
- public string HomePhone;
- [DataMember]
- public string Extension;
- [DataMember]
- public string Notes;
- [DataMember]
- public string ReportsTo;
- [DataMember]
- public string PhotoPath;
- }
- }
You will notice that i am decorating the class with the [DataContract] attribute and also setting the fields that i want as [DataMember] then next thing I do is create my Service Contract which as I said before is a Interface; I do that by adding another class called IEmpService.cs as seen in the code snippet below
- namespace NorthwindServiceLib
- {
- [ServiceContract]
- public interface IEmpService
- {
- [OperationContract]
- void CreateEmployee(Emp emp);
- [OperationContract]
- List<Emp> GetAllEmp();
- [OperationContract]
- List<Emp> GetSpecificEmp(Int32 empId);
- [OperationContract]
- void RemoveEmp(Int32 empId);
- [OperationContract]
- void UpdateEmp(Emp emp);
- }
- }
Here we decorate the interface with the attribute [ServiceContract] and this is the fist part where we have an eye towards what SharePoint BCS needs. As you can see above we have a the following
- Create Method called “CreateEmployee” which takes the data contract as a input parameter
- Read List Method called “GetAllEmp” which returns a list of all the Employees
- Read Item (Specific Finder) Method called “GetSpecificEmp” which takes the employee Id as an input parameter
- Delete Method called “RemoveEmp” which also takes employee Id as an input parameter
- Updater Method called “UpdateEmp” which takes the data contract as an input parameter
We also decorate these as Operation Contract what we MUST implement to use our Interface. Next we will create the service that will implment the Interface and this is done by creating another class called EmpService.cs
- namespace NorthwindServiceLib
- {
- [AspNetCompatibilityRequirements(RequirementsMode = AspNetCompatibilityRequirementsMode.Allowed)]
- public class EmpService : IEmpService
- {
- public void CreateEmployee(Emp emp)
- {
- using (var ctx = new NorthwindEntities())
- {
- List<Employee> empnew = new List<Employee>();
- Employee e = new Employee();
- e.EmployeeID = emp.EmployeeID;
- e.FirstName = emp.FirstName;
- e.LastName = emp.LastName;
- e.Title = emp.Title;
- e.TitleOfCourtesy = emp.TitleOfCourtesy;
- e.BirthDate = DateTime.Parse(emp.BirthDate.ToString());
- e.HireDate = DateTime.Parse(emp.HireDate.ToString());
- e.Address = emp.Address;
- e.City = emp.City;
- e.Region = emp.Region;
- e.PostalCode = emp.PostalCode;
- e.Country = emp.Country;
- e.HomePhone = emp.HomePhone;
- e.Extension = emp.Extension;
- e.ReportsTo = int.Parse(emp.ReportsTo);
- e.PhotoPath = emp.PhotoPath;
- e.Notes = emp.Notes;
- empnew.Add(e);
- ctx.Employees.Add(e);
- ctx.SaveChanges();
- }
- }
- public List<Emp> GetAllEmp()
- {
- using (var ctx = new NorthwindEntities())
- {
- var currEmp = (from c in ctx.Employees
- select c).ToList();
- List<Emp> emp = new List<Emp>();
- for (int i = 0; i < currEmp.Count(); i++)
- {
- {
- Emp e = new Emp();
- e.EmployeeID = currEmp.ElementAt(i).EmployeeID;
- e.FirstName = currEmp.ElementAt(i).FirstName;
- e.LastName = currEmp.ElementAt(i).LastName;
- e.Title = currEmp.ElementAt(i).Title;
- e.TitleOfCourtesy = currEmp.ElementAt(i).TitleOfCourtesy;
- e.BirthDate = DateTime.Parse(currEmp.ElementAt(i).BirthDate.ToString());
- e.HireDate = DateTime.Parse(currEmp.ElementAt(i).HireDate.ToString());
- e.Address = currEmp.ElementAt(i).Address;
- e.City = currEmp.ElementAt(i).City;
- e.Region = currEmp.ElementAt(i).Region;
- e.PostalCode = currEmp.ElementAt(i).PostalCode;
- e.Country = currEmp.ElementAt(i).Country;
- e.HomePhone = currEmp.ElementAt(i).HomePhone;
- e.Extension = currEmp.ElementAt(i).Extension;
- e.ReportsTo = currEmp.ElementAt(i).ReportsTo.ToString();
- e.PhotoPath = currEmp.ElementAt(i).PhotoPath;
- e.Notes = currEmp.ElementAt(i).Notes;
- emp.Add(e);
- }
- }
- return emp;
- }
- }
- public List<Emp> GetSpecificEmp(int empId)
- {
- using (var ctx = new NorthwindEntities())
- {
- var currEmp = (from c in ctx.Employees
- where c.EmployeeID == empId
- select c).ToList();
- List<Emp> emp = new List<Emp>();
- for (int i = 0; i < currEmp.Count(); i++)
- {
- {
- Emp e = new Emp();
- e.EmployeeID = currEmp.ElementAt(i).EmployeeID;
- e.FirstName = currEmp.ElementAt(i).FirstName;
- e.LastName = currEmp.ElementAt(i).LastName;
- e.Title = currEmp.ElementAt(i).Title;
- e.TitleOfCourtesy = currEmp.ElementAt(i).TitleOfCourtesy;
- e.BirthDate = DateTime.Parse(currEmp.ElementAt(i).BirthDate.ToString());
- e.HireDate = DateTime.Parse(currEmp.ElementAt(i).HireDate.ToString());
- e.Address = currEmp.ElementAt(i).Address;
- e.City = currEmp.ElementAt(i).City;
- e.Region = currEmp.ElementAt(i).Region;
- e.PostalCode = currEmp.ElementAt(i).PostalCode;
- e.Country = currEmp.ElementAt(i).Country;
- e.HomePhone = currEmp.ElementAt(i).HomePhone;
- e.Extension = currEmp.ElementAt(i).Extension;
- e.ReportsTo = currEmp.ElementAt(i).ReportsTo.ToString();
- e.PhotoPath = currEmp.ElementAt(i).PhotoPath;
- e.Notes = currEmp.ElementAt(i).Notes;
- emp.Add(e);
- }
- }
- return emp;
- }
- }
- public void RemoveEmp(int empId)
- {
- using (var ctx = new NorthwindEntities())
- {
- Employee empToDel = ctx.Employees.Where(d => d.EmployeeID == empId).Single();
- ctx.Employees.Remove(empToDel);
- ctx.SaveChanges();
- }
- }
- public void UpdateEmp(Emp emp)
- {
- using (var ctx = new NorthwindEntities())
- {
- var currEmp = (from c in ctx.Employees
- where c.EmployeeID == emp.EmployeeID
- select c).Single();
- currEmp.FirstName = emp.FirstName;
- currEmp.LastName = emp.LastName;
- currEmp.Title = emp.Title;
- currEmp.TitleOfCourtesy = emp.TitleOfCourtesy;
- currEmp.BirthDate = emp.BirthDate;
- currEmp.HireDate = emp.HireDate;
- currEmp.Address = emp.Address;
- currEmp.City = emp.City;
- currEmp.Region = emp.Region;
- currEmp.PostalCode = emp.PostalCode;
- currEmp.Country = emp.Country;
- currEmp.HomePhone = emp.HomePhone;
- currEmp.Extension = emp.Extension;
- currEmp.ReportsTo = int.Parse(emp.ReportsTo);
- currEmp.PhotoPath = emp.PhotoPath;
- currEmp.Notes = emp.Notes;
- ctx.SaveChanges();
- }
- }
- }
- }
Thats a heap a code I know, and there are other ways to do this, Im sure, this is just “my way”, you will notice I am employing the Using Statement to encapsulate the Context of the Data Connection then Im either Creating, Updating, Deleting and as in the case of Reading I have one that returns everything and one that returns just one.
THATS IT for the Code part of this!!!
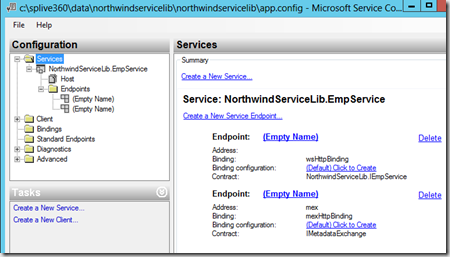
Once all of that is done, you will NEED, YES NEED, to modify the App.config file because it still thinks that the Service Contract is tied to IService1.cs that we deleted earlier. We can also create other endpoiints, yada yada, but thats anotehr story. So here is what you need to do for your App.Config. Right click on it, and click “Edit WCF Configuration”, when you do you will need to change the Service to your EmpService by browsing to the Bin Directory and clicking the Dll & you will also need to set the Contract to IEmpService by doing the same. You will notice I have two endpoints as well, one for the Service Contract endpoint and the other is MEX for the announcement of the Service.
This GUI is just and abstract of the .config file so here is the full code for that below
- <?xml version="1.0" encoding="utf-8"?>
- <configuration>
- <configSections>
- <!– For more information on Entity Framework configuration, visit http://go.microsoft.com/fwlink/?LinkID=237468 –>
- <section name="entityFramework" type="System.Data.Entity.Internal.ConfigFile.EntityFrameworkSection, EntityFramework, Version=5.0.0.0, Culture=neutral, PublicKeyToken=b77a5c561934e089" requirePermission="false" />
- </configSections>
- <appSettings>
- <add key="aspnet:UseTaskFriendlySynchronizationContext" value="true" />
- </appSettings>
- <system.web>
- <compilation debug="true" />
- </system.web>
- <!– When deploying the service library project, the content of the config file must be added to the host's
- app.config file. System.Configuration does not support config files for libraries. –>
- <system.serviceModel>
- <services>
- <service name="NorthwindServiceLib.EmpService">
- <endpoint address="" binding="wsHttpBinding" bindingConfiguration=""
- contract="NorthwindServiceLib.IEmpService">
- <identity>
- <dns value="localhost" />
- </identity>
- </endpoint>
- <endpoint address="mex" binding="mexHttpBinding" contract="IMetadataExchange" />
- <host>
- <baseAddresses>
- <add baseAddress="http://localhost:8733/Design_Time_Addresses/NorthwindServiceLib/Service1/" />
- </baseAddresses>
- </host>
- </service>
- </services>
- <behaviors>
- <serviceBehaviors>
- <behavior>
- <!– To avoid disclosing metadata information,
- set the values below to false before deployment –>
- <serviceMetadata httpGetEnabled="True" httpsGetEnabled="True" />
- <!– To receive exception details in faults for debugging purposes,
- set the value below to true. Set to false before deployment
- to avoid disclosing exception information –>
- <serviceDebug includeExceptionDetailInFaults="False" />
- </behavior>
- </serviceBehaviors>
- </behaviors>
- </system.serviceModel>
- <connectionStrings>
- <add name="NorthwindEntities" connectionString="metadata=res://*/Northwind.csdl|res://*/Northwind.ssdl|res://*/Northwind.msl;provider=System.Data.SqlClient;provider connection string="data source=Farm1Server1ADSQL;initial catalog=Northwind;persist security info=True;user id=oDataSU1;password=P@ssword1;MultipleActiveResultSets=True;App=EntityFramework"" providerName="System.Data.EntityClient" />
- </connectionStrings>
- <entityFramework>
- <defaultConnectionFactory type="System.Data.Entity.Infrastructure.LocalDbConnectionFactory, EntityFramework">
- <parameters>
- <parameter value="v11.0" />
- </parameters>
- </defaultConnectionFactory>
- </entityFramework>
- </configuration>
Test your Work
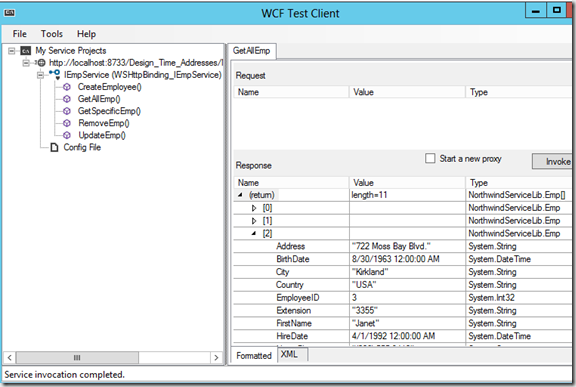
Now that you have done all that you can certainly test your work even before it goes into IIS to be hosted outside of Visual Studio. You can do that by using a nifty tool inside your Visual Studio Command Promt called “WCFTestClient.exe” and passing it the URI of your Service, but the easiest way is just Press F5 in Visual Studio and it will do all that for you LOL, we will use the tool later on when we move it to IIS. Just for giggles sake, I will just test the GetAllEmp for this blog. IF you want to see more come see my VS Live 360 Session that i spoke about on my blog here.
As you can see above, we have the Service exposed and all the methods, and we invoked one them and we can see the results there.
Move this to IIS – Hosting this Service in IIS
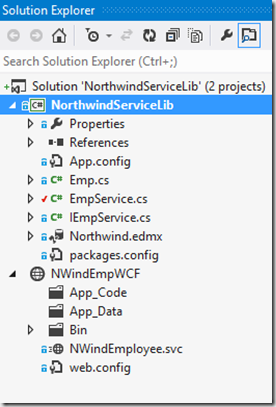
Now unless you want to have to start up Visual Studio every time you need to use this WCF, what you need to do is host this in IIS or you can do TCP or NetBinding but We are all working in SharePoint for this blog so we need IIS. Its simple, just add a new Web Site Project to this Visual Studio Solution; for this we will use the WCF Service Template. This too will add a sample implementation again in the App_Code folder which includes Service1.cs and ISerivce1.cs. Delete those again & and set a reference to the WCF Service Library DLL from the first project. If you are asking why we deleted both those files again its because we will be using the files from our first project referenced in our .svc page. Your solution may look like this now.
You will also have a file called Service.svc, that we will rename to something more descriptive of our Service we are trying to expose, I name mine NWindEmployee.svc Once you have renamed it, you will need to set the Service to the Project Namespace and remove the codebehind attribute since we wont need it.
- <%@ ServiceHost Language="C#" Debug="true" Service="NorthwindServiceLib.EmpService" %>
Save your file, and now its time to modify the Web.config file this time to point to our Service Reference, this is JUST like we did for the App.config so I wont bother going into detail here, Ill just include the code snippet for the web.config
- <?xml version="1.0" encoding="utf-8"?>
- <configuration>
- <configSections>
- <!– For more information on Entity Framework configuration, visit http://go.microsoft.com/fwlink/?LinkID=237468 –>
- <section name="entityFramework" type="System.Data.Entity.Internal.ConfigFile.EntityFrameworkSection, EntityFramework, Version=5.0.0.0, Culture=neutral, PublicKeyToken=b77a5c561934e089" requirePermission="false" />
- </configSections>
- <appSettings>
- <add key="aspnet:UseTaskFriendlySynchronizationContext" value="true" />
- </appSettings>
- <system.web>
- <compilation debug="true" />
- </system.web>
- <!– When deploying the service library project, the content of the config file must be added to the host's
- app.config file. System.Configuration does not support config files for libraries. –>
- <system.serviceModel>
- <services>
- <service name="NorthwindServiceLib.EmpService">
- <endpoint address="" binding="wsHttpBinding" bindingConfiguration=""
- contract="NorthwindServiceLib.IEmpService">
- <identity>
- <dns value="localhost" />
- </identity>
- </endpoint>
- <endpoint address="mex" binding="mexHttpBinding" contract="IMetadataExchange" />
- <host>
- <baseAddresses>
- <add baseAddress="http://localhost:57757/Design_Time_Addresses/NorthwindServiceLib/Service1/" />
- </baseAddresses>
- </host>
- </service>
- </services>
- <behaviors>
- <serviceBehaviors>
- <behavior>
- <!– To avoid disclosing metadata information,
- set the values below to false before deployment –>
- <serviceMetadata httpGetEnabled="True" httpsGetEnabled="True" />
- <!– To receive exception details in faults for debugging purposes,
- set the value below to true. Set to false before deployment
- to avoid disclosing exception information –>
- <serviceDebug includeExceptionDetailInFaults="False" />
- </behavior>
- </serviceBehaviors>
- </behaviors>
- </system.serviceModel>
- <connectionStrings>
- <add name="NorthwindEntities" connectionString="metadata=res://*/Northwind.csdl|res://*/Northwind.ssdl|res://*/Northwind.msl;provider=System.Data.SqlClient;provider connection string="data source=Farm1Server1ADSQL;initial catalog=Northwind;persist security info=True;user id=oDataSU1;password=P@ssword1;MultipleActiveResultSets=True;App=EntityFramework"" providerName="System.Data.EntityClient" />
- </connectionStrings>
- <entityFramework>
- <defaultConnectionFactory type="System.Data.Entity.Infrastructure.LocalDbConnectionFactory, EntityFramework">
- <parameters>
- <parameter value="v11.0" />
- </parameters>
- </defaultConnectionFactory>
- </entityFramework>
- </configuration>
Make this available in IIS
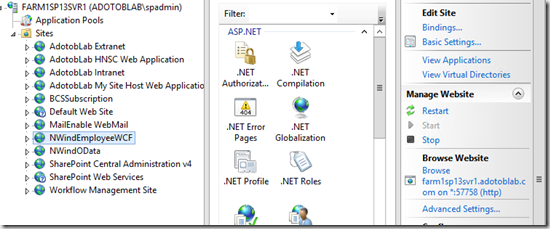
Now you can test this guy again using the Test Client, but the hosting into IIS Is quite simple and Ill just show you that. All you have to do is either (1) Publish the site into a new Directory for PROD consumption (2) just copy and paste the folder where you want on a box running IIS and create a new Web App / Site pointing to that location and setting a FQDN and as in my case a port number where it can be consumed.
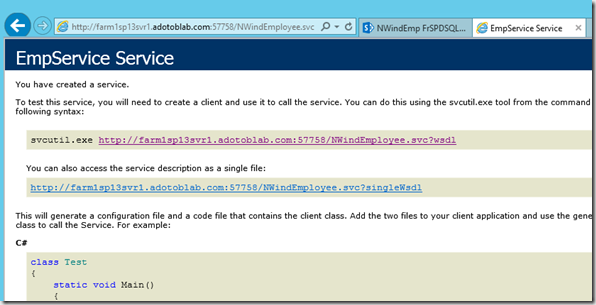
As you can see from the image above, I have a site with my FQDN port 57758 where it is located. Navigating to that site will yield
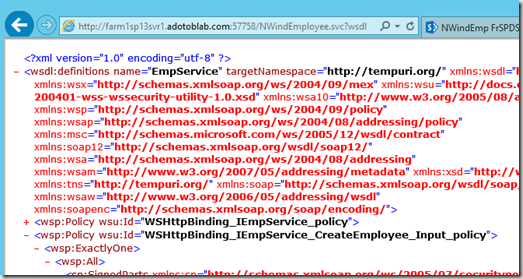
and clicking on the end point will show the WSDL
The Finale
Now we will use SharePoint Designer to Create an External Content Type (ECT) that will consume this WCF.
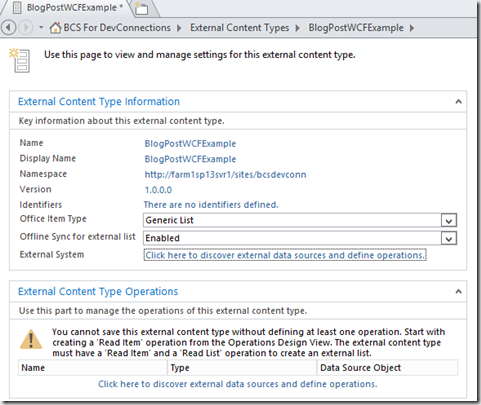
Open up SPD2013 and create a NEW ECT, Name it apprpriately, as Ive done here calling it BlogPostWCFExample, Next click on “External SYtems” link to discover, its the last link on imabe below
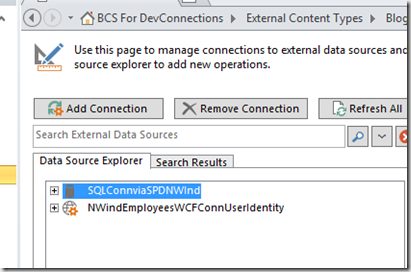
Once you have done that click Add Connecation
Then Select WCF from the Drop Down…and click OK then
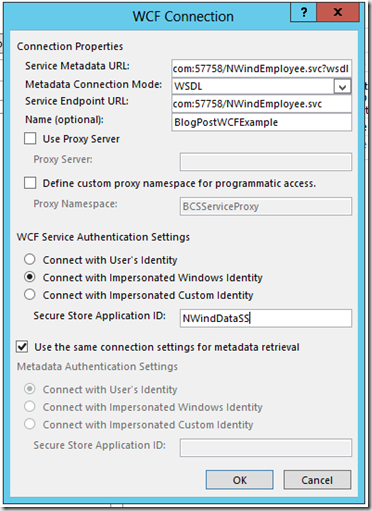
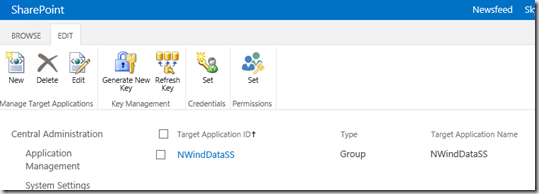
As a reminder we are using User Identity but i wanted to point out we just as easlily could be using Secure Store, if we were we would use the Target App ID as seen here
but for my example you will see it is more like this
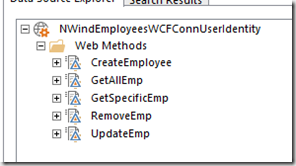
When all of that is complete you will be able to see all the methods exposed, see below
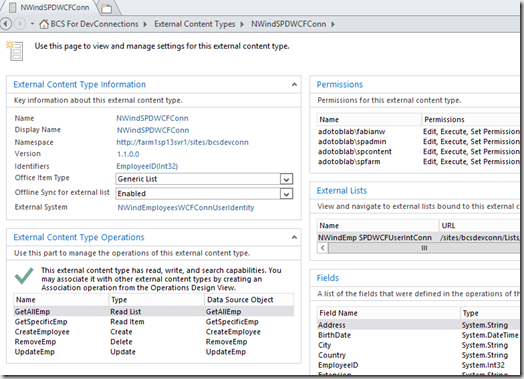
Next you can right click on them individually and create the respective Methods, this has been done many times so i wont belabor it. But once you are complete you should have an ECT like so
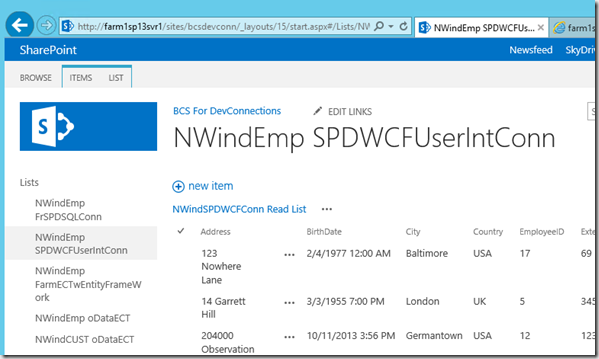
and you should be able to create a List like so…
Summary
So, that is it for my Part 1 of 3, I will tackle the next one later tonight or tomorrow. Cheers, hope this helps, let me know your thoughts, critiques, etc.
Come see my three session at SPLive360 in Orlando
What am I speaking on
I am honored to be accepted to speak at this auspicious event led by co-Chairs Andrew Connell and Dan Holme this November 18th through 22nd, at the Royal Pacific Resort at Universal in Orlando, Florida. I will be delivering three sessions
- SPH14 Case Study: When Should I Use SharePoint 2013 Business Connectivity Services (BCS) and When Should I Use SharePoint 2013 Workflows to Interact with External
- SPW11 No-Code CRUD Business Connectivity Services (BCS) Solutions Using SharePoint Designer 2013
- SPW02 What’s New with SharePoint Business Connectivity Services (BCS) and OData Services
SAVE MORE when your REGISTER by using PromoCode: SPLSP21
What to expect?
if you have ever been to any of my sessions before, you will know it is highly interactive, and we remain in dialog for the entire time. My demos will incorporate your ideas and challenges, therefore we all walk away winners!
Indeed, there is a good mix for just about everybody over these three sessions; Im actually getting back to my BCS roots after spending the last few months, maybe a year now i think focusing in large part on Workflows and External Data. Infact, the Case Study session is all about how to make the decision of using a Workflow v/s using BCS.
Emphasis on External Data
All these sessions have a common theme…External Data… and in that vein, we will begin the sessions by discussing various types of External Data, their entry point to SharePoint and also how to manipulate them in the browser and Fiddler. I feel it is important for us to get/set our expectations of what our desired results should be before we get too far into the technical weeds of how SharePoint can expose/surface this data.
At this very moment of blog authorship [October, 10, 2013 1721 hrs] Im actually building out my Data Services, different flavors (Native SQL, oData, WCF) so we can have a few interaction points and see full CRUD-Q capacities between SharePoint Designer and Visual Studio.
Takeaway
As we work in a world consumed by data, we are often challenged to make sense out of it, i.e. get INFORMATION from DATA, and the speed to which you can accomplish that usually will determine your success over another. My job in these sessions is to demonstrate various techniques to that end (the HOW), and also in the case of the Case Study Session, engage you in conversation as to the WHY.
ACTUALLY RESOLVED: Unable to Create List using SharePoint 2013 REST API in SPD2013
Are you ready for this?
Im never satisfied with the answer “No you cant do that”, not as a Developer 🙂 So, i began to read through some TechNet and MSDN articles for Workflow and found this Gem. http://msdn.microsoft.com/en-us/library/jj822159.aspx
What this Gem does is EXACTLY what Chris Givens found out and did in his PowerShell but as we discussed in my “Resolved post”, we cant run those scripts inside Office 365 SharePoint Online. So, it seems that you have to activate a Site Feature in your Site that you need this “elevated permission” then you need to copy the App Principal ID from the one you want elevated then take that to a “hidden” link inside the App Catalog Site http://{hostname}/{catalog site}/_layouts/15/appinv.aspx and then work your magic to elevate the permissions via an XML node copy / paste magic.
Anyway the GOOD NEWS is that I have tested this in SharePoint Online, and it works like a champ, see below for screenshots.
If you would like the full history of this, see the following post in chronology
- https://fabiangwilliams.wordpress.com/2013/09/06/help-unable-to-create-list-using-sharepoint-2013-rest-api-in-spd2013/
- https://fabiangwilliams.wordpress.com/2013/09/07/resolved-unable-to-create-list-using-sharepoint-2013-rest-api-in-spd2013/
Proving it out
First me activating the Feature
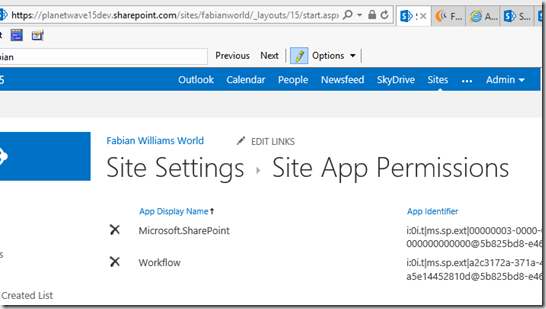
Next grabbing the App Principal ID needed for the Workflow in question. Now i purposely cut off all of the ID, i dont want some crafty person out there using it. Just realize that this is the same account that Chris and I talked about in the PowerShell
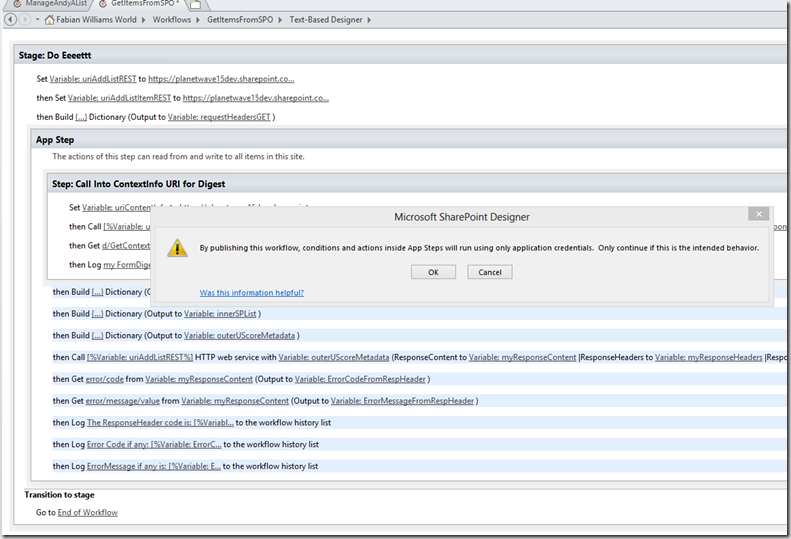
then moving the piece of Workflow logic that does the List Creation inside the App Step inside SharePoint Designer
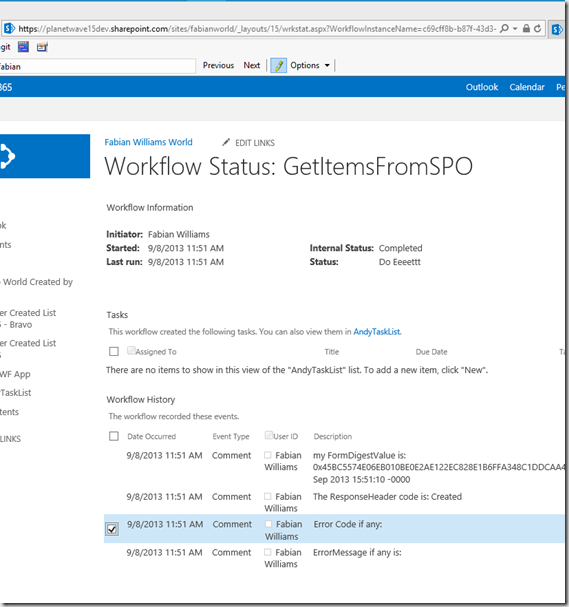
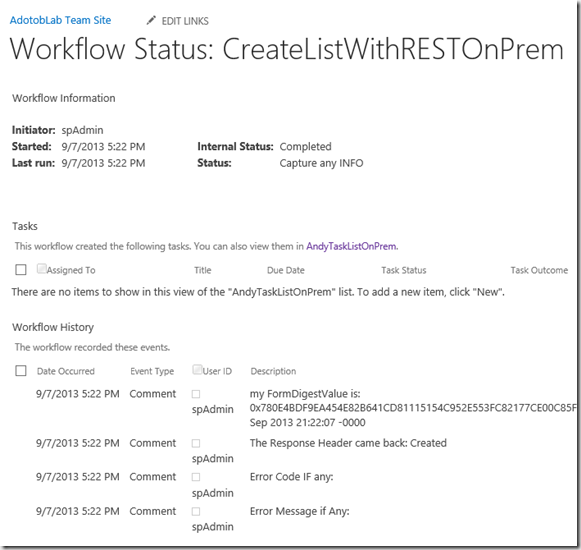
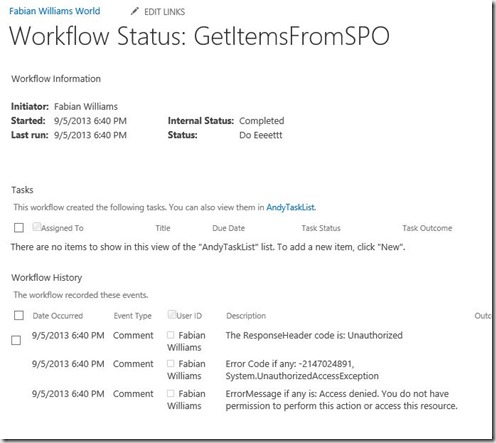
and finally re-running the Workflow will yield the below in the Workflow History
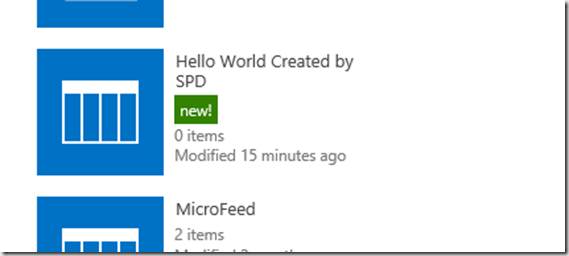
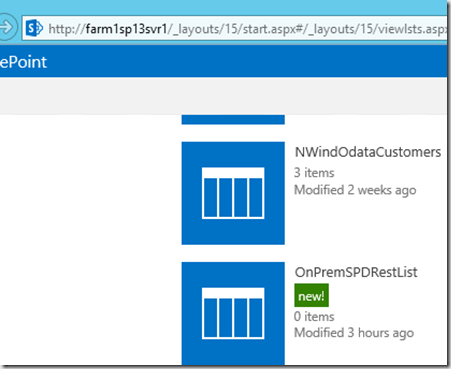
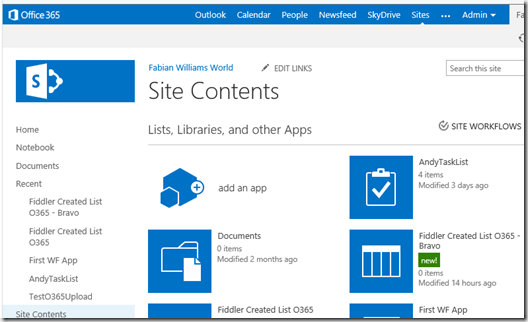
and just to bring it home, here is the new List or (App i guess) Created
Cheers FGW
RESOLVED: Unable to Create List using SharePoint 2013 REST API in SPD2013
Summation
Ill start this post out by saying that this is why i so LOVE the SharePoint Community. It is a true example of "many hands make light work”, first Jim Bob Howard @jbhoward one of my @PlanetTech work colleagues faced a problem, since it was a topic of interest to me, I decided to put some time into it as well. I was able to prove out most of the issues, but there was this last one (see blog post to what this is referring to in a link below) that just didnt make sense. What do i do when that happens, well I’ve never been ashamed to reach out to my friends in the SharePoint Community so I blogged the issue, showed what we did so far, and without tagging anyone in the tweet we had folks from the UK joining in the conversation, folks from all Time Zones here in the United States chiming in as well. Late Friday night I emailed a copy of the Workflow to my good buddy @givenscj Chris Givens. I really wasn’t surprised when even on a Saturday, Chris called me up on the phone, and we spent like 2 hours on a Screen Share looking at ULS logs, then he went off on his own, and within an hour, he came back with a solution.
The original problem was posted on the forums here
My Plea for help on my blog which gives more details than the forum post allows is here. This post is basically closing the loop on the problem
Findings
Chris blogged his findings here, go look at it, but the main point ill just borrow from is blog…
“…The main issue of Fabian’s was that when he made the Web Service call he would pass a pre-created FedAuth token (yeah I told him he would have to figure out how to generate this in the future) which established a context for him. This context was as his SharePoint admin account, but the actual running account (the "actor") was the Workflow service. Of course the SP Admin account can do whatever it wants, but the workflow service cannot. This workflow service account is NOT the account that the actual workflow manager backend window service is running under.”
Screen Shots form what Chris and I worked on
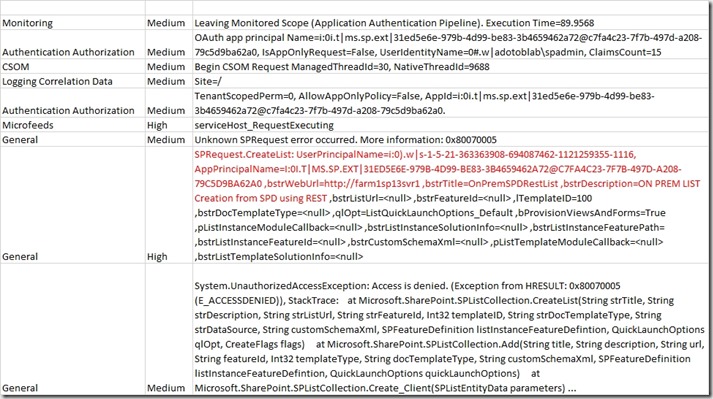
First we wanted to see what was happening ON Prem with this both from a Fiddler standpoint as well as SharePoint Designer 2013, here is what we saw. The offending item was the account it is running under MS.SP.EXT which is the App Principal for the Workflow from Workflow Manager. Further down you will see this inside the Content Database and the permission it is set to run under.
with a little more detail below
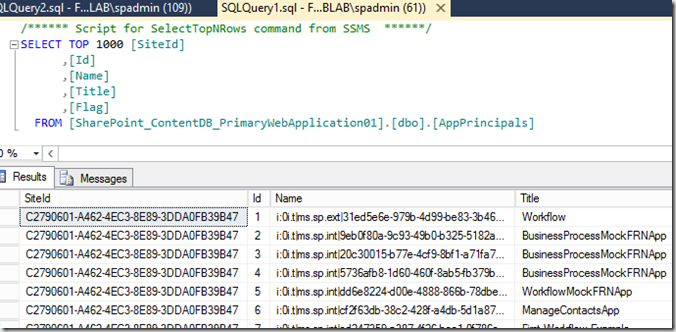
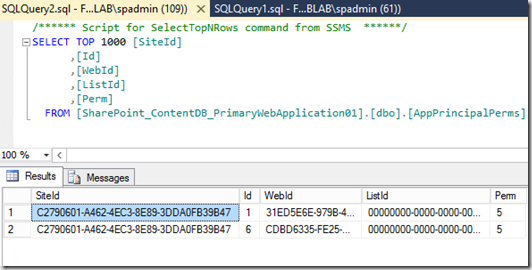
Below is a peek into the App Principal Table. This table as Chris describes is where the App Principal Accounts live, you can see that i have a few that are Titled as my Workflow Apps and one called just “Workflow” and it is that one if you look under “Name” has MS.SP.EXT 🙂
Now, lets go look at the permissions, now mind you, if you look at permission it is set to “5” right now for the ID 1, that was set to “3” before i ran the PowerShell that Chris has on his web site and i will put below for complexness.
Here is the PowerShell below
PS C:\Users\spadmin> $web = Get-SPWeb http://farm1sp13svr1 PS C:\Users\spadmin> $appworkflow = Get-SPAppPrincipal -site http://farm1sp13svr1 -nameidentifier 31ed5e6e-979b-redacted PS C:\Users\spadmin> Set-SPAppPrincipalPermission -AppPrincipal $appworkflow -site $web -right fullcontrol -scope site PS C:\Users\spadmin> |
Once I did that, all we did next was re-Run the workflow, NO other changes, here was our result
and in All Site Contents
Finally
So, all is well in the world of SharePoint again. I hope Chris goes and puts his solution as the answer to the question in the @Office365 Forums so we can have a record out there as well. I hope this helps someone else that falls prey to this, I agree with Chris, this is the first time I have ever seen anyone blog or talk about this in a public setting.
Cheers
Fabian Williams with contributions from Chris Givens
UPDATE SECTION
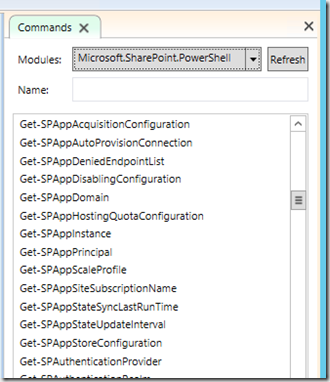
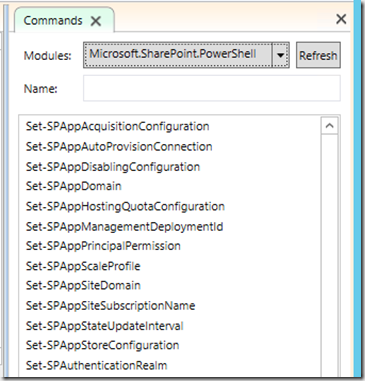
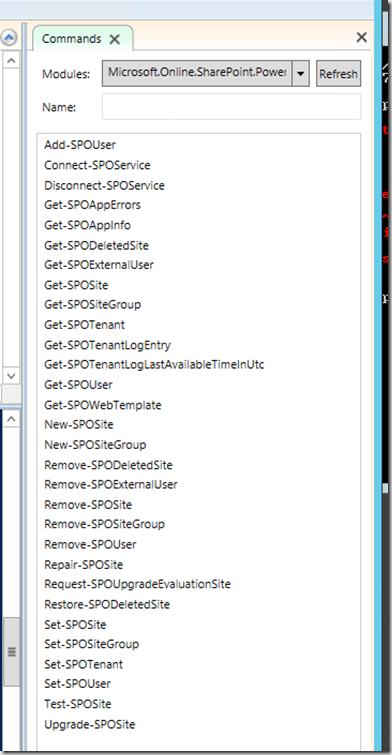
So, because i wanted this to work in Office 365 as well, we needed to find out if these PowerShell options are available there too. For completeness I loaded up the ISE and I have here all the options that you can do with the App Model for GETS and SETS, both for On Prem and OnLine, you can see that the Online version is very limited
ON PREM
and sad to say I could get EVERYTHING from ONLINE in one screenshot. 😦 sad panda
If you want to know more about Powershell for SharePoint Online regarding how to set it up in your environment, see Patrick @pcfromdc Currans blog post here.
END UPDATE SECTION
HELP: Unable to Create List using SharePoint 2013 REST API in SPD2013
Précis
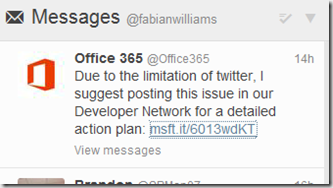
So, I am took up @Office365 on their offer of help, but then they directed me to the forums because they said the limitation of twitter made it difficult to respond to my tweet for help
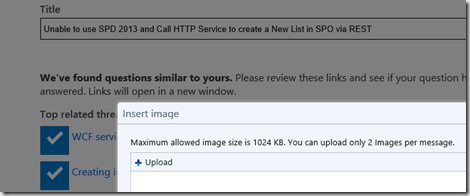
So i set about doing that this morning, however even the forums have limits when you try to paint a thorough picture of your problem using screen shots due to image sizes. see here
So, i will just blog it and point back to this blog post using the Forum as the initial pointer for anyone who wants to help, fortunately WordPress give me more freedom in images and i can be verbose. So here goes…
Problem Stated
The objective is to Create a new List in SharePoint Online Wave 15 via REST https://site/_api/web/lists and then passing the necessary headers. Also, if I do a GET using the same headers, IT WORKS, this only happens on POST with the addition payload of Request Content(Body) that I am sending, but in Fiddler "using" the same payload, I can create my list. I’ve blogged about this topic and how I go about doing REST via SPD and Fiddler here and here and here, the first and last are probably most appropriate for this line of question. Below are some screen shots of what I am experiencing now. I thank you in advance for any assistance you can provide.
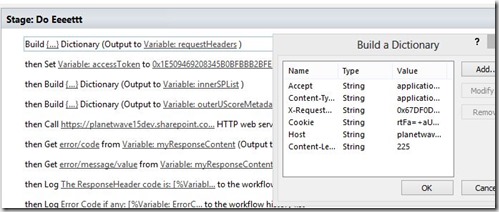
Below are the Request Headers
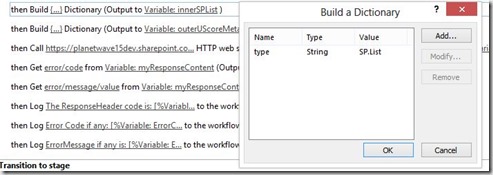
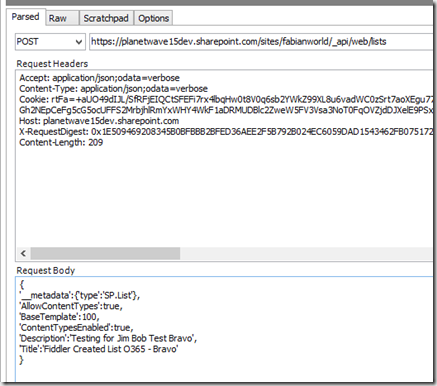
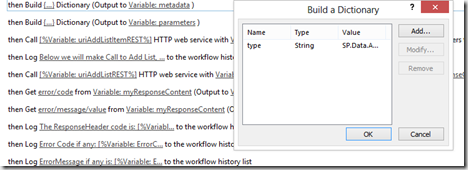
Below is me constructing what will be the Request Content (Body) but to get the desired feel, I had to put the __metadata property inside its own dictionary object to get the curly braces and key value pair, you will see below
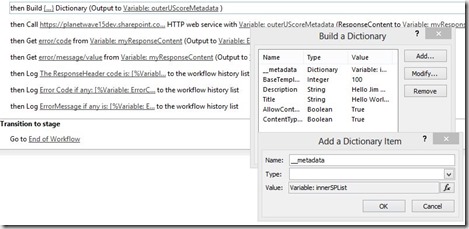
Below you will see me wrapping this variable inside another to get {‘__metadata’:{‘type’:’SP.List’} to come out properly
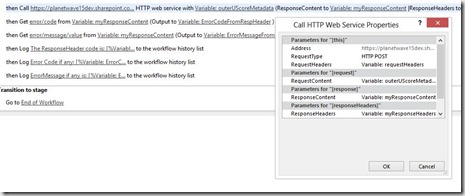
Next you will see my call to HTTP web Service properties
Next you will see my results. this is my parsing the JSON returned in the Response Code and Response Body
Proof that the same thing works in Fiddler
Here is me doing the same thing in Fiddler. and i also updated my Digest so that it would be current because i know it expires after a while
and
and the list in O365 is created here
Update Section
This section will be filled with things I have tried either on my own or on suggestions.
The first thing i will do is take Hugh @hughajwood Wood suggestions and use a simple example on a post I actually praised earlier and do just a simple Add of a List Item in Office 365, i will dubb it TryAlpha
Try Alpha – 09/06/2013 1212 HRS
So the first thing I did was to make the headers as the post describe, to keep things simple i used the exact nomenclature
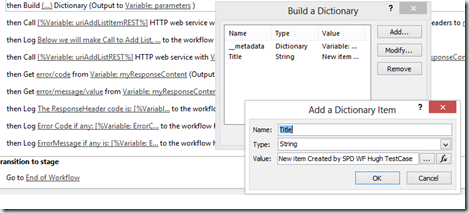
now wrap that header into a Dictionary header named __metadata and add a Title field
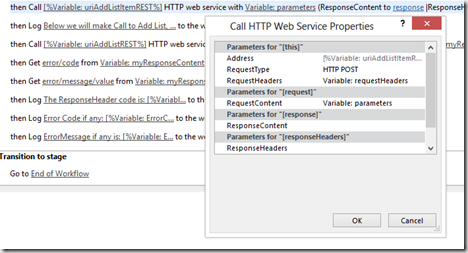
next use those headers to make my REST call
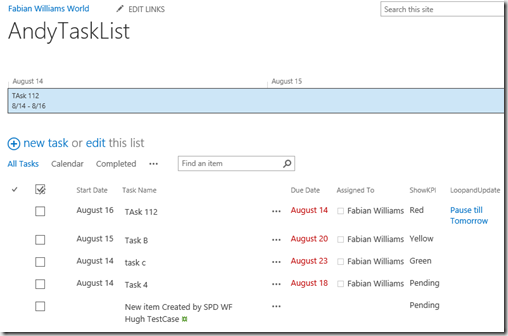
and we can safely say that using the REST API for List Items work. Let me also make some qualifiers
- Before doing this, I updated my X-RequestDigest to get a new value and I updated my requestHeaders variable, that was the only thing i did
End TestAlpha
Begin Test Bravo
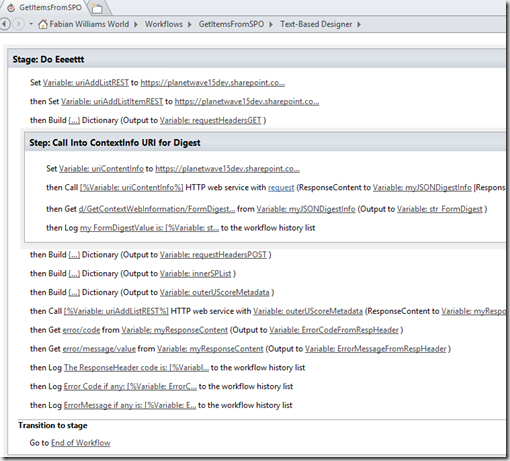
So, I got some information from Paul Schaeflein @paulschaeflein He suggested that rather than hardcoding the Digest Information [which I know also expires after a while, and that is why whenever I run the WF, I redo the contextinfo URI and get a new one] I should do a POST insider my Workflow to get the Digest Information and THEN extract the X-RequestHeader value inside a variable and use it. The thought being, it will be more current than hard coding it, and Pauls Point was that it is safer from a security standpoint if SPD was preventing ‘malicious’ usages or hardcoded values.
Well In the end, it didnt work either. here is the story
Big Picture
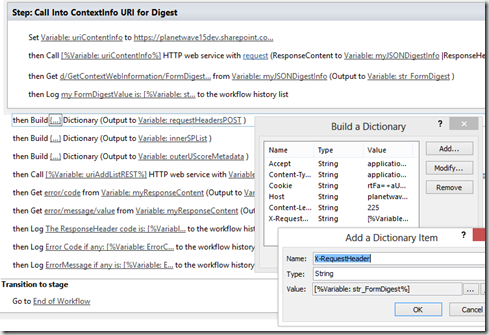
In more detail I created one header to get the ContextInfo Information i.e. No Digest information was used in that one, and then I set the value coming from the JSON WebContextInformation object mapping to the Digest into a Variable called str_FormDigest. I then used that Variable in another Header that I have specifically for the POST that I will use to create the List Item. See below
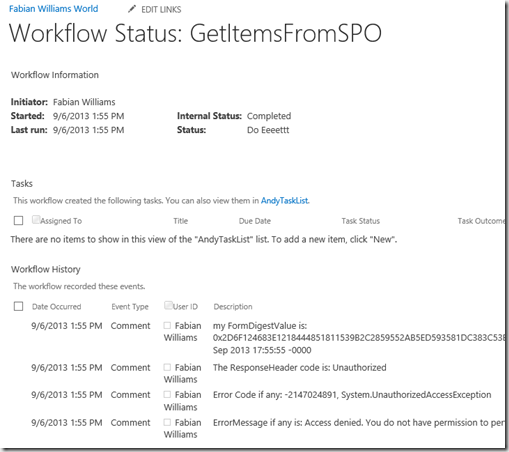
And for good measure I logged the output of the Digest so i know it works. here is the Digest Info and another failed attempt
End TestBravo
Summary
Any help is appreciated, I will ask that you post your feedback in the comments on this blog and i will update the Ticket in the Forum pointing back to this blog post.
Here is the Forum Thread: http://social.msdn.microsoft.com/Forums/en-US/dd9932f5-1e3f-416f-8f0b-e8ab2b792ba1/unable-to-use-spd-2013-and-call-http-service-to-create-a-new-list-in-spo-via-rest
Thanks in advance
Using the Call HTTP Web Service REST Calls in SharePoint Online using SPD
Précis
So I’ve had folks say that they still cant make the leap and get my examples to work in Office 365 SharePoint Online, so this post is to Prove out that IT can be done, there is no smoke and mirrors, I just wanted folks to take what I have and use that to go to the next level. This is not like a live session where I have an interactive audience, so I am putting the info out there in his blog.
This post builds on a few out there that I have done explaining how to use SharePoint Designer 2013 with the Dictionary Object to data in JSON Format to be used inside Workflows. Now, I do admit that there are VERY FEW examples out there, if any, that show you, how to do what I am about to tackle in Office 365 SharePoint Online. So here goes.
Approach
As usual we have an Initialization Stage and a Workhorse Stage, in the Init stage we will set our variables and make our REST call, we will parse it and limit our dataset to what we need for our results. I think folks are getting tripped up on what is needed in the Headers, as what I am getting as feedback is that the Workflow Starts but it stalls with a message like “Retrying last request. Next attempt scheduled after…” with a correlation ID, it also gives you a Retry Now Link.
So the first thing i will show you is of course what is in my List NOW, I will show it to you via the browser and in Fiddler.
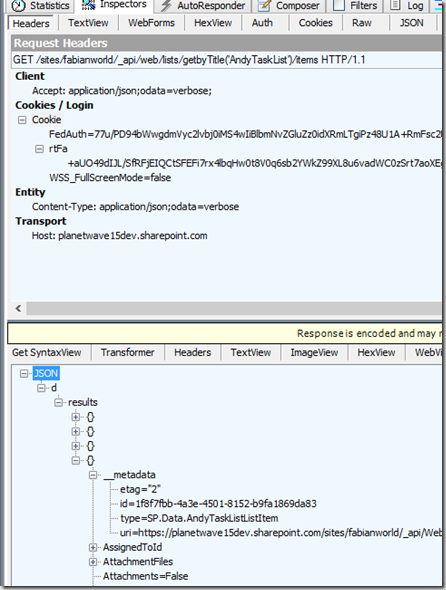
now here is the items in Fiddler, i do this so you can appreciate the actions I will take later on in SPD when parsing the JSON data.
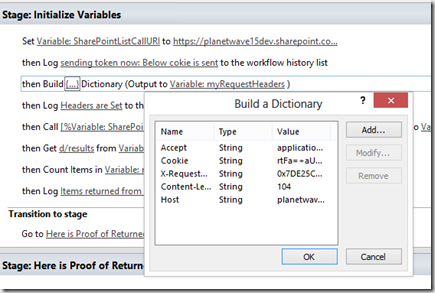
Now lets look at how we construct the Header, in this post, i have explained why you need certain Headers, so i wont go into it here, the only difference is that I am extrapolating what I did in Fiddler and using it in SharePoint Designer… now for obvious reasons, I am NOT showing you all the Header Information since it is my Valid Token to O365.
Now with that done, I have constructed a Site Workflow that will loop through the items and Log it to History, what you do with it for your Use Case can be quite elaborate, you essentially can
- Communicate with any Office 365 SharePoint Online Tennant you want from a Single Workflow
- Cross Communicate between an On Prem Farm and a Cloud Farm in one Workflow
- Create List, Libraries, List Items, and do full CRUD operations
If you go and look at the REST API endpoints from that link i gave you before by Kirk Evans, you can see that its quite a bunch of things that are available now.
So. back to the story.
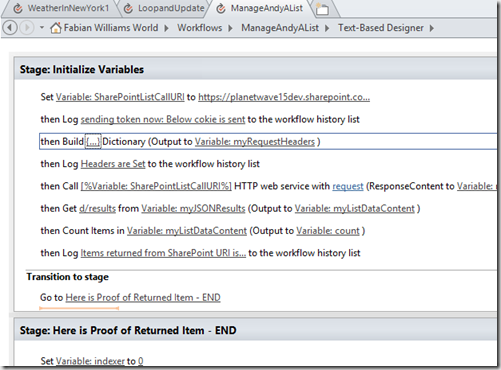
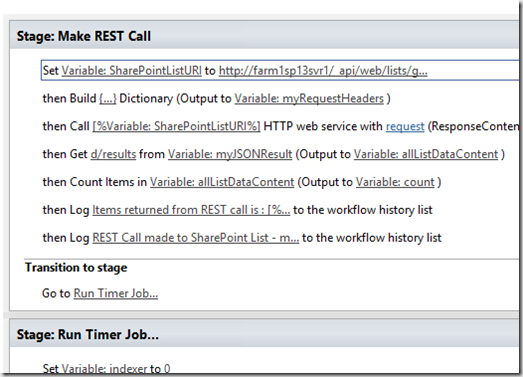
First Part of the Workflow
Second Pare of the Workflow
Next lets fire off this Workflow and look at the results.
Proof
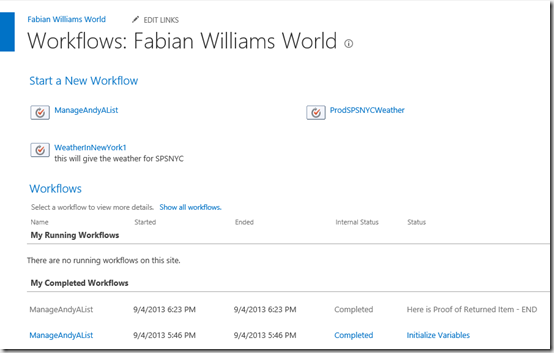
Next we go to Site Contents, Site Workflows and click the one we just created after publishing
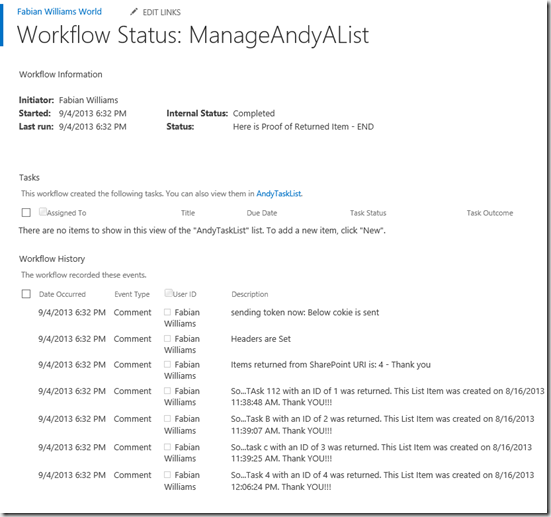
We should expect to see the below in our History List
and upon closer inspection of the Workflow
Summary
Now what I will say because I have worked quite a bit with SharePoint Online Wave 15 is that it can get squirrely and can crap out on you for no good apparent reason, it gives you obscure feedback when it does and often times it just says “something bad has happened..” and if you Refresh the browser, its back to normal. I don’t pretend to understand why, I don’t have eyes into the Data Centre nor access to the ULS Logs, so I am as much as in the blind as you are. BUT this is the reason why i do Fiddler first then SPD after…visibility.
I hope this helps! Cheers.
Creating a SharePoint Timer Job using SharePoint Designer 2013
What do i really mean?
Now that I have got your attention with that eye catching title, let me expand and qualify it. So, what I will be doing exactly is
- Inspecting a List (a Task List actually) for Tasks that are Due and Overdue.
- I will be checking them nightly (every 24 hours to be exact)
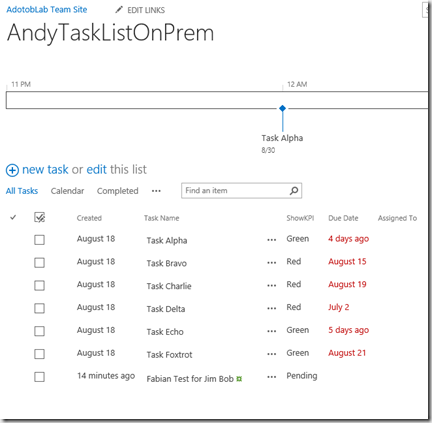
- If task are Over Due, then I will take ‘some’ action on them, in this instance, I will be changing a KPI field but this can be quite exhaustive based on your own particular use case. see below for one i have in mind.
- Pause the Workflow for 24 hours and Repeat.
By the way, this CAN also be used in SharePoint Online
Use Case
In this use case I have been charged to monitor a Task list (multiple task list from varying SharePoint Sites/ Site Collections) and aggregating them. Once complete, then we need to serve up the tasks that are overdue into a KPI dashboard and send the email link to managers of those offending taskees.
For my POC demo here I will show how to get 1 Site Collection but to get multiple all you have to do is make a separate REST call to that particular Lists API, and the rest is easy.
Pre-Requisites and Technologies Used
In this example I am using an On Premises SharePoint 2013 with Workflows enabled, I am also using SharePoint Designer 2013 as well, that is if for tooling. i.e. NO CODE. I will be using the SharePoint 2013 REST API to read the SharePoint Task Lists as my Entry Point URI. The generic url will be /_api/web/lists/getListByTitle(‘’)/items">/_api/web/lists/getListByTitle(‘’)/items">http://<sitename>/_api/web/lists/getListByTitle(‘<listNameHere>’)/items which fetches List Items from a Named list using oData. Now by default this will be returned to your in XML, so in order to use this in SharePoint Designer which requires JSON inside the Dictionary Object (see my post here if you need a refresher on that) you will need to modify the headers to accept JSON using the Accept Headers. The rest is a matter of using Loops to iterate through the List Items returned, and pausing for the time allotted.
Approach
As usual I put my URI inside a Variable to obscure the name & any API Keys if any, this time there was no need but it just makes for better programming especially if there are a lot and I want to swap them out from time to time without affecting the core program
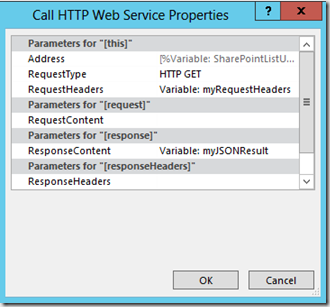
the full list of properties from the Call HTTP web service is located below since it is truncated in the image
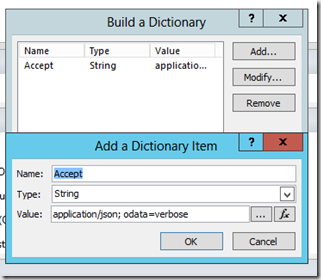
The Request Headers are “Accept: application/json; odata=verbose” and you can place that into a string type as well and call it into the HTTP Web Service Properties as well inside a Workflow Dictionary Variable
Once you have done that, then as seen in the first image and in my previous blog post on the same topic, you parse the JSON results to get the part of the dataset that you want, in this case i want what is under the “d/results” node and to do that I use the Get Item from Dictionary and parse out what i need then i count the items for good measure, save the “Count” as a variable to be used as my upper bound in my Loop Counter and log it out.
Do Business Logic
After setting up the stage to get the URI, return the JSON data, Parse It to the Node you want, and get a Count, the next thing is to do the business logic.
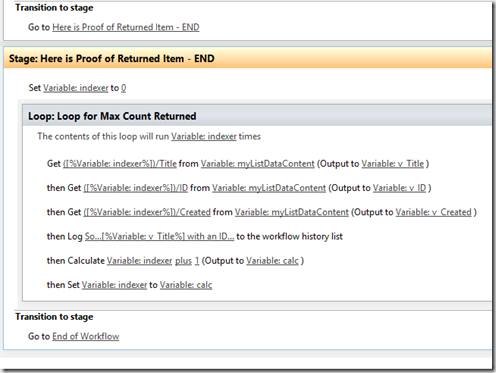
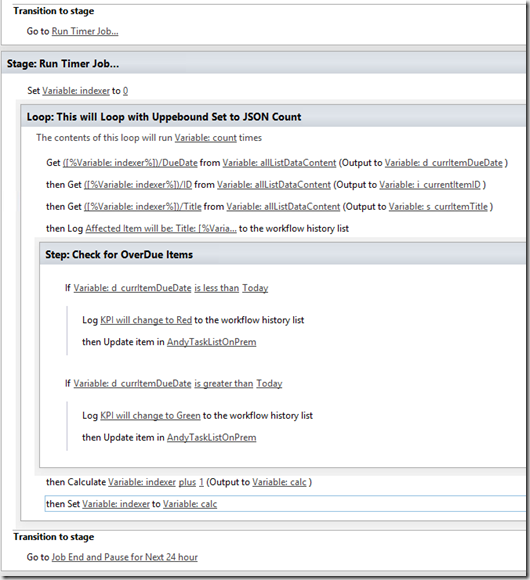
What you will see below in the image is us using the Variable Count as the upperbound in our Loop and then getting the JSON data into Local Variables to be manipulated in the Workflow Logic.
//MY SOAPBOX
So, i have been talking about this for a while as most people who have known me for a long time, know be because of my work and efforts in SharePoint BCS. But i have actually moved my thoughts in some aspects to what BCS allows (even in 2013) and what Workflows gives you interms of interacting with External Data. You see my point is, if you do not need to look at that data, i.e. External List, or need to Search on that Data i.e. External Content Type as a Content Source, I THINK that it is to your best interest from a simplicity standpoint, a performance standpoint, best of breed standpoint… to do this as a Workflow calling External Web Services and manipulate the data how you want and then get rid of it (i.e. the Variables) when done. That way the data is only used for its intended purposes then goes away.
//END SOAPBOX
Back to our story, what we do next is inspect the Due Date and use Conditional Statements to affect changes to the Fields for what you need. in this instance I am updating a KPI field based on how far along or how overdue a Due date is on a Task List. Now the Use case here is that I can do this on Any Amount of List both On PREM and in Office 365 in the same logic, I have Scale and Scope down to a Tee 🙂
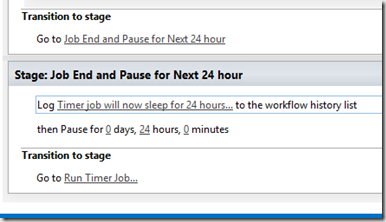
The logic loops through each item does a Check and then updates the loop counter until it hits the “Count” variable number then exits. Since this is a Timer Job then the next thing we need to do is Pause it and wait, see below
Now, this workflow was designed as a Site Workflow so it can be ran independently of any Library or Lists and this guy can run forever.
Summary
So the next time someone ask you to Do a Timer Job for them, especially if they say they want it on Office 365 (SharePoint Online) and it involves a use case similar to mine or at the very least is looking at affecting changes to a List/Library, consider doing a Site Workflow with Conditional Logic and Pause Duration. Its really is that simple.
If this was being done in SharePoint Online, you would also need to capture and pass along the oAuth Tokens FedAuth and rfTa in your dictionary object.
Cheers and Happy SharePointing
More on SharePoint 2013 REST API with Fiddler and SPD
Précis
So, as of lately when it comes to SharePoint 2013 Workflow, CSOM with Managed Code, REST API, I have been trying to see how far down the rabbit hole i can go, and talking about what I find. As a result, I have been fielding quite a few questions on the topic; although there is quite a bit of information out there by Kirk (@kaevans) Evans here on MSDN and others, what i have find is that they discuss a lot of the Reading Data, usages in C# and JavaScript and they elude to debugging with Fiddler. I on the other hand, like to test my work in Fiddler then take it into SPD (SharePoint Designer 2013) or Visual Studio 2012 for either work with Console Apps, Workflows, Event Receivers etc. It also gives me the opportunity to see what is happening under the layers of SPD, or obscured by Visual Studio Activities. Now there are times when that door will get slammed shut in you face especially around SharePoint Online Office365 and then i just rely on Wictor (@wictor )Wilens MSO Helper in a Console App to peruse around. This post will show you how to Add data into a SharePoint List (i.e. ListItem) using the REST API via Fiddler and How to Create a SharePoint LIST as i couldn’t find a decent example out there after suggesting to a work colleague that they use Fiddler to map out their work then do it in SPD. On the other hand, there is a great post here by Borislav Grgic on how to use Add an Item to a SharePoint List using the REST API and POST Method in SharePoint Designer 2013.
What Major Obstacles you will need to Overcome
This is what I found lacking when I did research on how to achieve the stated objectives above. Most of the examples just told you to either “..type this” or “create a dictionary object to to that…”, and some just omitted major steps that you will get tripped up in and no way to circumvent it. So, taking this by the numbers, lets first assume that you want to get back some List data from SharePoint 2013, we will do this first On-Prem then In-Cloud (Office 365).
On Prem
- You will need to construct a Uri representing your target list such as : //_api/lists/getListByTitle(‘’)/items">http://<site>/<web>/_api/lists/getListByTitle(‘<listNameHere>’)/items in a browser (preferably Chrome) or Fiddler
- You will need to set some Headers, specifically the (a) Accept and (b) Content-Type Headers to accept ‘application/json;odata=verbose’ inorder to work with the return items in JSON format which if you are using this in SPD, you MUST do in order to use the Dictionary Object, or if you want to read the data in some logical hierarchy.
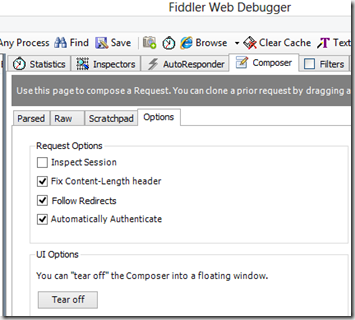
- If you are ON Prem, and using Fiddler inside “Composer” under Options, i usually set the Automatically Authenticate Flag like so, you will see me talk about Decrypting HTTPS Traffic later on in the Cloud or HTTPS targets later on. In doing so your Cookie header will be automatically set.
- Next ensure your Verb is set to GET and fire away.
In Da Cloud
- Well steps one (1) and two (2) are the same from the above, however step three (3) is a bit different.
- You will need to pass your Cookie Token for the Office 365 Site here, and simply put you will log into the Target Office 365 Site and using using Fiddler you set it to “Capture Traffic” after you log in. If/when you click on a List or Library as an example, inspect your Headers returned (assuming you have already gone under Tools / Fiddler Options and selected to Decrypt HTTPS Traffic) like so
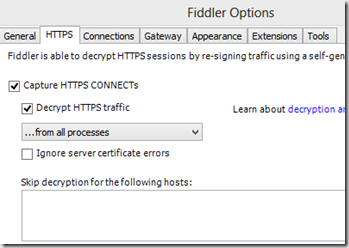
- Once you do and inspect the Headers you will find cookies for FedAuth and rtFa under the “Cookie” header. Go ahead and copy and paste that in the Request Headers section of Fiddler
- Next ensure your Verb is set to GET and fire away.
What if i want to POST (Add) Data to my SharePoint List?
Well, if you do, you have to do a few more things before you can actually POST that data.
- You will need to get the X-RequestDigest Header to send along with your POST, notice this is “not” a GET anymore. Now referencing the post again above by Kirk Evans if you look almost 3/4’s away down on the page or just Cntrl-F to find the word “contextinfo” you will find a description on how to get that Header Information in the d:FormDigestValue node.
- Essentially you will need to change your Fiddler VERB from a GET to a POST and send along an empty Request Body, you may need to set a “Content-Length” Request Header as well, and i usually do 104 for that length.
- You will get back the information that you will need to add to your Fiddler statement.
- In addition you will need to construct a Key/Value Pair (hence working in JSON) to pass along in the Request Content that you want to Add
- Now there is one more obscure piece of information that ususally trips people up that you will also need to do, and this information will form a part of your Request Content that holds your Data you are trying to add.
- When you did your GET for the site, there was a Node called (underscore undescore metadata) __metadata. You will need to take that value and pass it first ahead of any data you are trying to add. You will see this example below
- Once you do all the above, you ensure that your Verb is set to POST and fire away.
Lets look at a few Examples
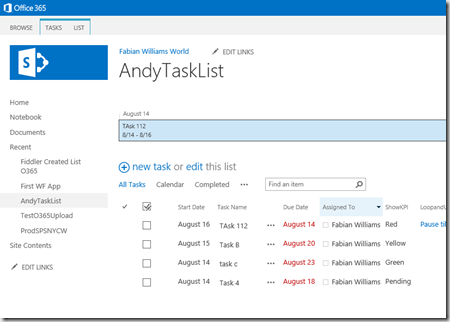
So taking this from the beginning we will use a use case of a List i have called “AndyTaskListOnPrem” and we will first do some Gets, then a Post and then finally verify our work. Here is an example of the list before the exercise.
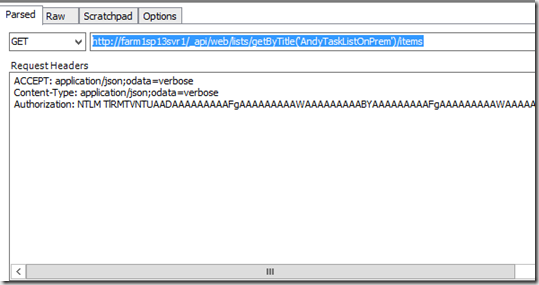
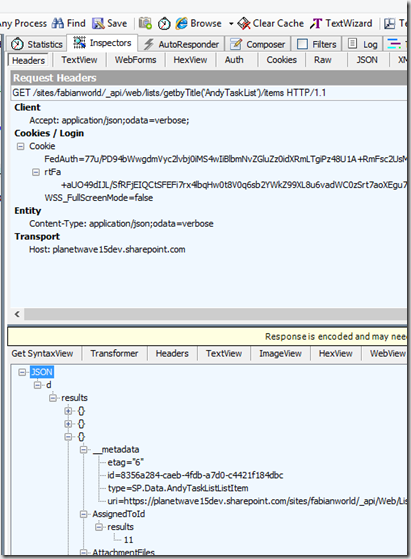
Next lets look at how you need to construct the GET to look at the data in JSON format in Fiddler
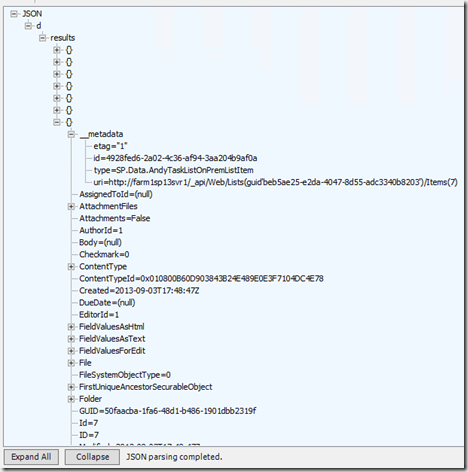
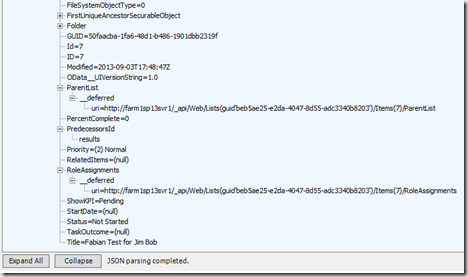
And our Outcome. Pay attention to the Metadata Node and the type = SP.Data.AndyTAskListOnPremListItem value. you will need this later on for the Adding of List Item.
continued
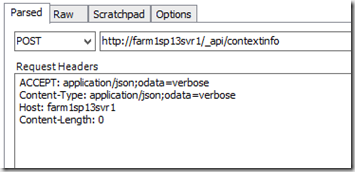
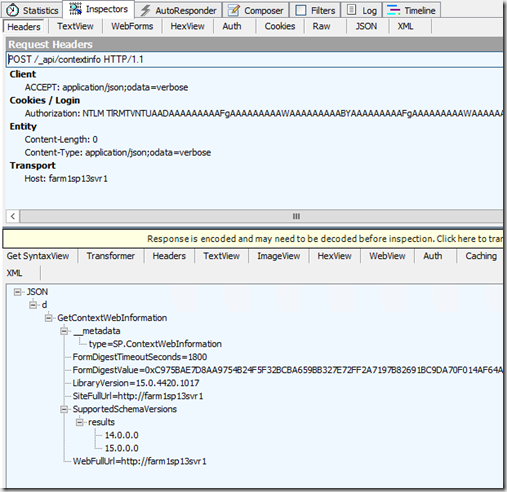
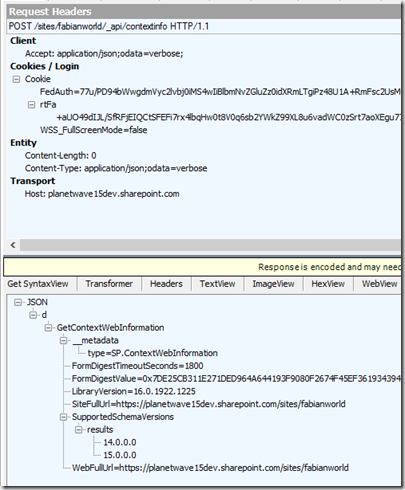
Next lets look at how to get the ContextData information.
Create a POST with the URI of /_api/contextinfo">http://<site>/_api/contextinfo as i have below
Ensure the Response Content is blank and execute that, your results should look like mine below. You will need to capture the “FormDigestValue” information for later on in your POST.
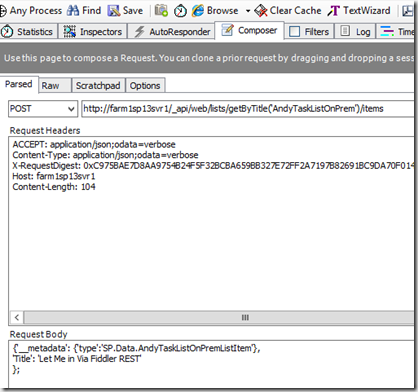
Next lets Create a List Item
Armed with that information we have enough to create a List Item in this SharePoint List using the
REST API and Fiddler and using the same information plug this into Dictionary Objects in SharePoint Designer along with the Make a HTTP Call to do the same, here’s how…
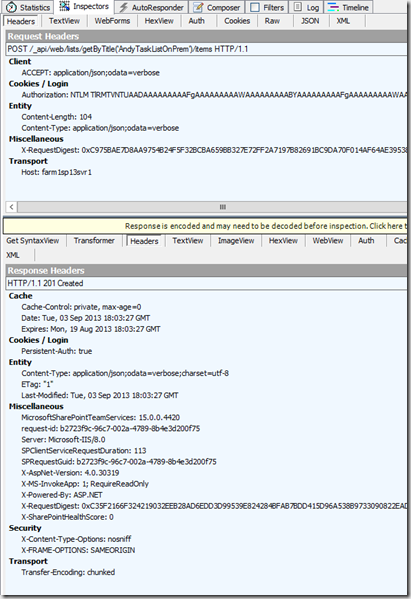
Paying attention to the POST Verb, the X-RequestDigest “Request Headers” and the __Metadata and Addition in the “Request Body” after execution the above you should get
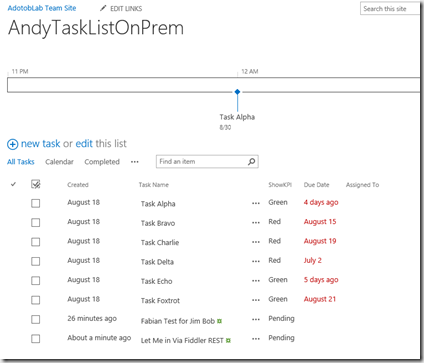
a HTTP/1.1 201 Created response. and if we inspect the list we should expect to see
To round things off, lets assume our Target was Office 365 SharePoint Online, then we would expect to see our Headers contain our Auth Tokens. I will take this to a next level by using an example someone just asked me about. I will Create a List in Office 365 “not list ITEM, an actual LIST” using the same methods described above. the KEY takeaway here is I need to Pass my Auth Tokens and ofcourse I am using a different REST API Call
Lets Create a SharePoint List using REST and Fiddler
So, in the spirit of openness, here is the REST call to get my Auth Token… well some of the token, I wasnt born yesterday 🙂
Here is the Context Info, key here is remember its not HTTPS and you need pass the Token as well.
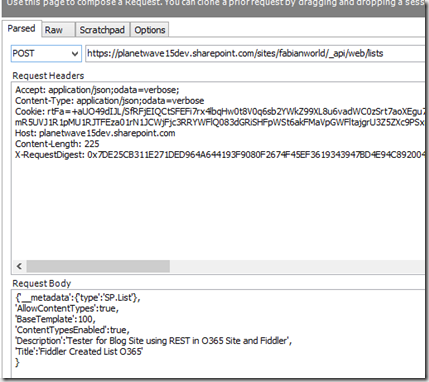
Finally here is me creating A NEW LIST in the Web
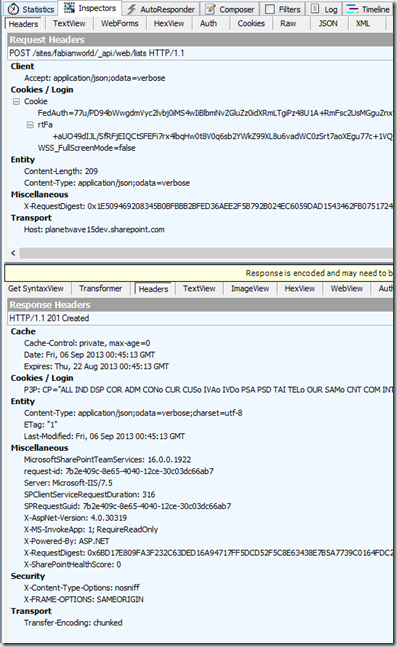
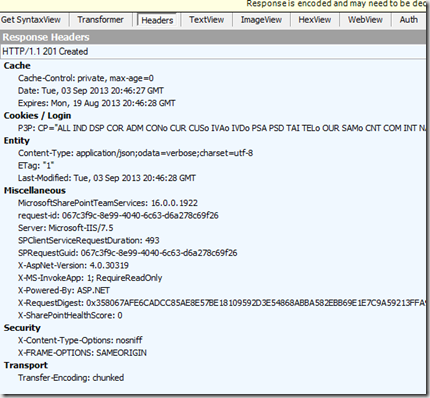
and with all the confidence in the world [well this is O365 so we also cross our fingers] we expect to get a 201 Create Response back from HTTP Header
and visually in the browser we should expect to see
Summary
So, in this exercise we accomplished the following
- Understanding of some of the SharePoint 2013 REST API
- Usages of that API in Fiddler and the Browser
- How to Add a SharePoint List Item using the REST API
- How to create a new LIST using the REST API
This should translate VERY easily into SharePoint Designer 2013 and Visual Studio 2012, that is the point of the exercise. Thats why I am NOT showing how to do it there, I have other post that talk about the Dictionary Object and how to create Headers, just use what I have here and apply it to one of those post and you should be golden. This is me teaching to fish.. 🙂 Cheers.
