Answered: Leave request for SharePoint O365 Sample on MSDN
Précis
So, I as a cure for insomnia, decided to troll the CODE.MSDN site for questions that interested me. I found this request and figured it was something i could knock out, so i did. There was not much to go on interms of HARD requirements so i posed a question, I assumed if Im up and about, the person making the request must be up too 🙂 but alas no. So, i went ahead and did the sample as I would envision it. In fact, internally at work, we have something On Prem that is similar so this actually made it more appealing.
I can and will make this example more robust and may submit it up on the MarketPlace, I dont know, just to say that I have, but it seems something that Im sure must already be there, Ill just endeavor to make mine better 🙂
THIS CODE IS AVAILALE ON MSDN: Here
Requirements
As this is an Office 365 SharePoint Online example, you basically don’t need anything as you would for an On-Prem solution, all you need really is:
- A Office 365 SharePoint Online Site to build against
- Visual Studio [for completeness I am using 2013 but others will do]
- Your Brain & some Idle time
What this example will set out to do in this version is the following
- Permit an End User to Request Leave off Work/ Holiday/ Vacation etc.
- Send a Request for Approval to the End Users Manager/ or the person On Behalf Of
- Permit the Approver to Adjudicate the request in an Approval Workflow in SharePoint 2013
- Send a ‘Contract of Sorts” to the Requester alerting them of the decision for their acknowledgement
- Notification includes a process to Accept the decision or Appeal it
- If Approved, update a Leave/Out of Office (OOF) Calendar with the relevant information to show the person being OOF
I plan to extend this example later on to flesh out the Appeals Process, make pretty App Icon and put some more bells and whistles on it. Sexy it up so to speak 🙂
Approach
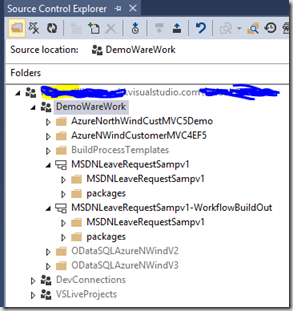
As with all my work when I set out to do a SharePoint project that involves List/Libraries, Content Types, Workflows/Event Receivers, etc, I often will create my own Site Columns, Content Types, List Definition and Instance (see post here on how to do that). Once I complete that process I typically will Branch my Project (in TFS Online) and start to Dev out the Unit of work/ Story (Agile). I created a branch for Workflows and set up folders for what I will build out now and later on
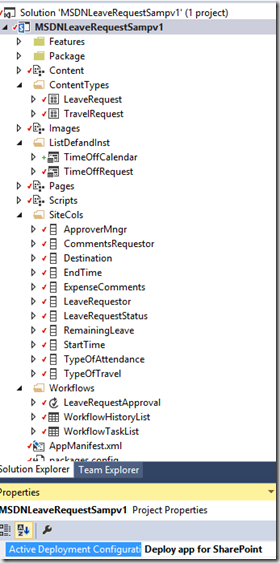
This is what my Visual Studio Solution looks like now
So, with that heavy lifting complete, lets focus on the Workflow.
Workflow Build out
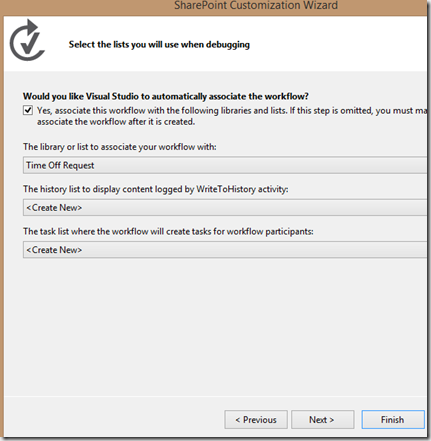
First, you add a Workflow to your project and associate it with your List, in my case I am associating it with the “TimeOffRequest” list instance. I also set the Workflow to Start on “On Item Created” and have New Task List and Workflow History List created. Basically this…
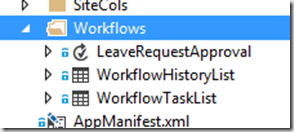
Once you do that, you will get a few assets created for you
- The Workflow itself
- A History List
- A Task List
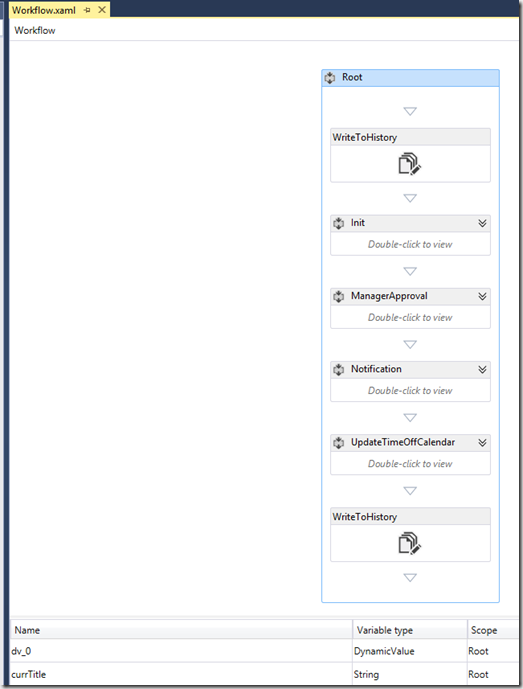
The canvas will open up and you will a blank slate with one Sequence added. What I typically do here and I learned this from Andrew Connell in all his Demos/ Preso is to change that Default Sequence to “Root” and then embed your other abstracted logic flow buckets inside that sequences as nested Sequences. I do this for the following reason
- It makes the code much more readable and manageable
- It allows you to scope your Variables etc to its own sequence
- Helps me troubleshoot if/when I get issues
So mine looks like this now
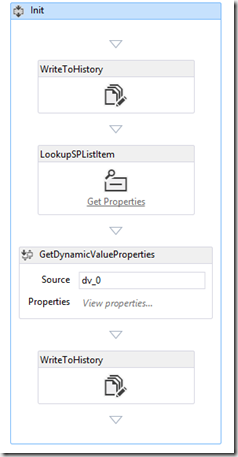
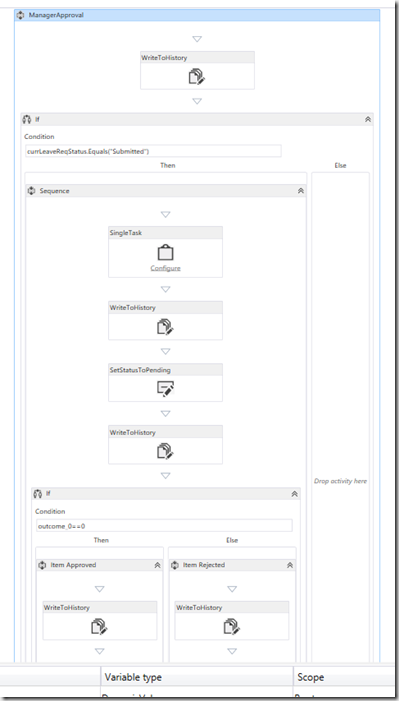
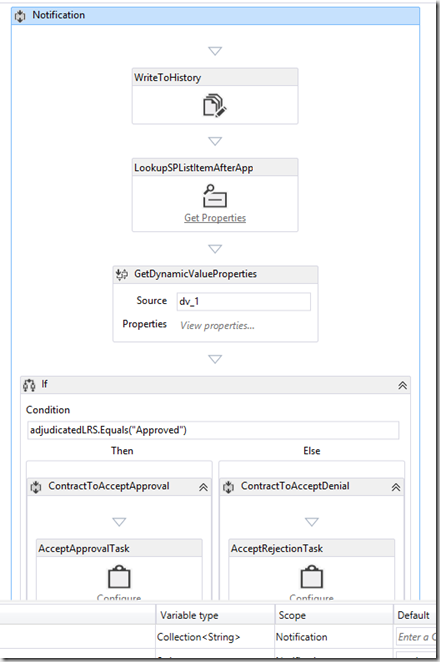
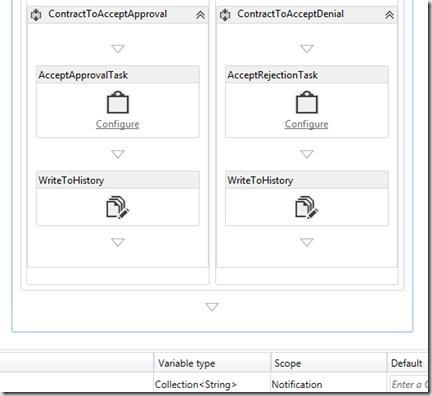
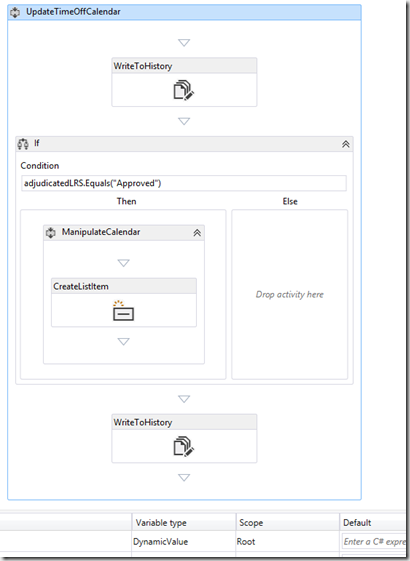
and you can drill down into each section like so
Init
Manager Approval
Notification
Update Time Off Calendar
Other Important items not so obvious
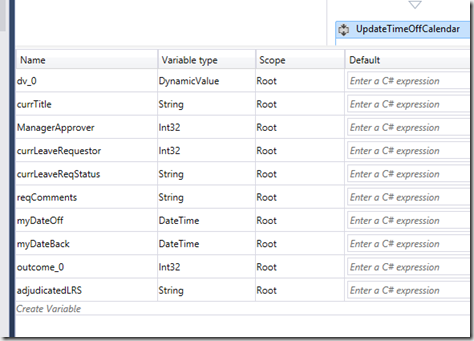
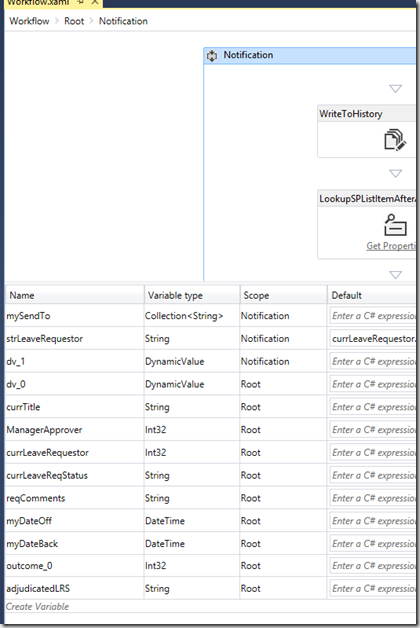
So, there are variables that are crated along the way either by an objects Return Type or Auto Loaded by Variable Declaration in SPLookupItem Object, etc
For example here is what is in scope for “Root” Sequence
here is what is inscope for “Notification”
How it Works
So, when you get everything working you publish it to your Office 365 SharePoint Tennant. Were I paid for this I would mock up the Default.aspx page to show links for the Time Off Request and the Calendar with an Appropriate View, but for now we will just use Different Tabs in the Browser
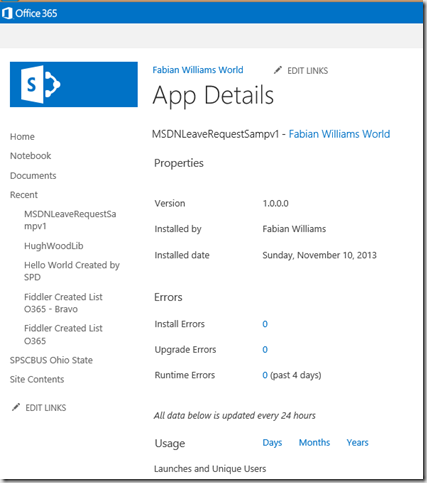
You will have a new App in your Site Contents like so
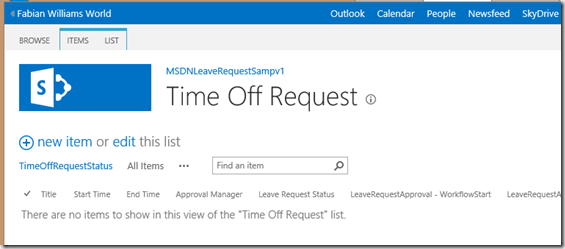
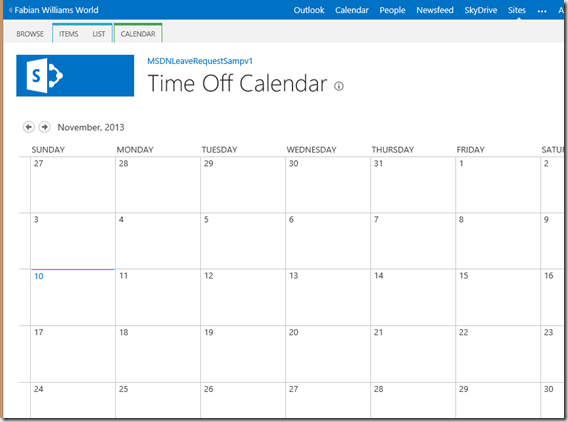
Here are the Tabs
First the TimeOffRequest
Second the TimeOffCalendar
Dev Testing
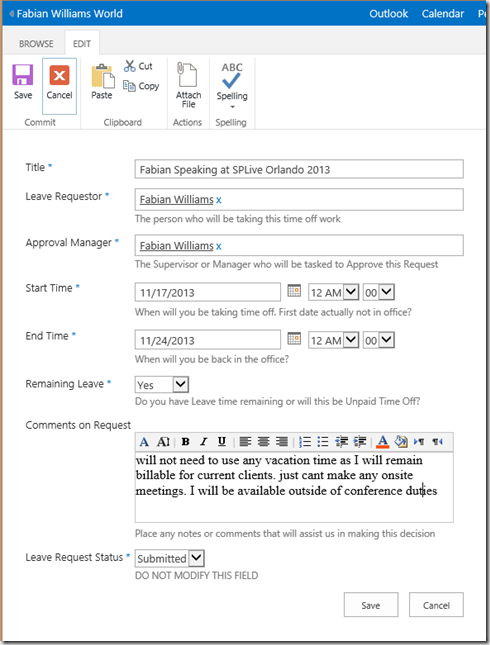
Lets put it through the paces now.
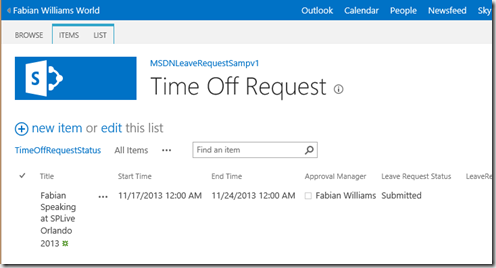
Now lets submit this Form
Now we have a form submitted
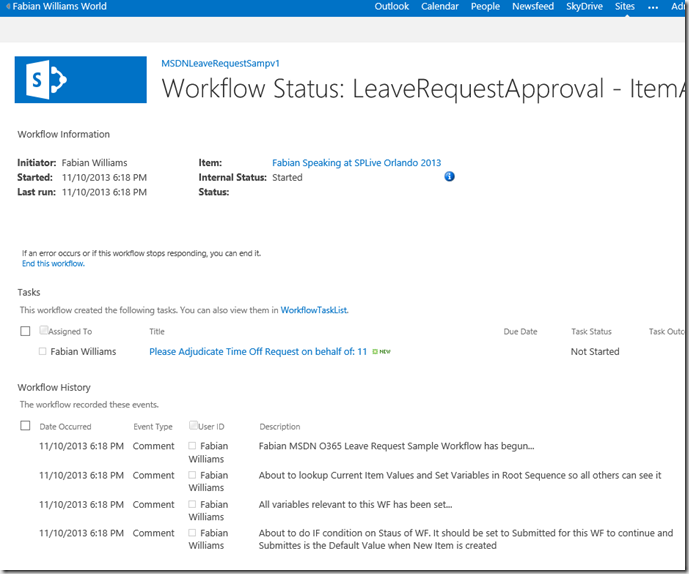
lets check the Status of the Workflow, and we can see below we have one already going
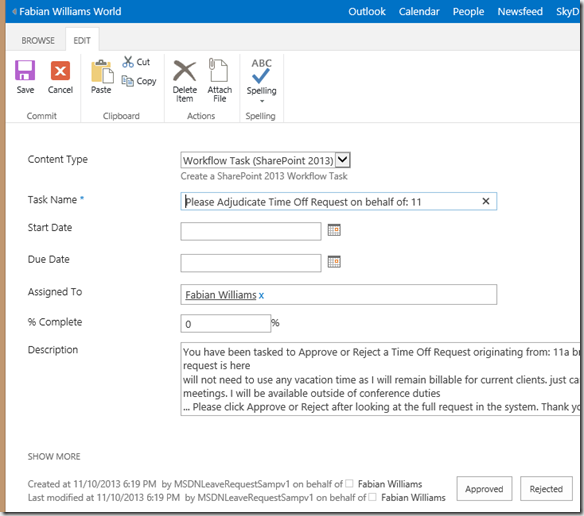
We even got an email in Outlook. for now, lets adjudicate this as Approved so it will appear in the calendar eventually
Here you can see that we have buttons to Approve and Reject and we have meaningful information in the Email Body. Finally you can see that the Workflow is running in the Context of the App Principal at the bottom, look to the left of the buttons.
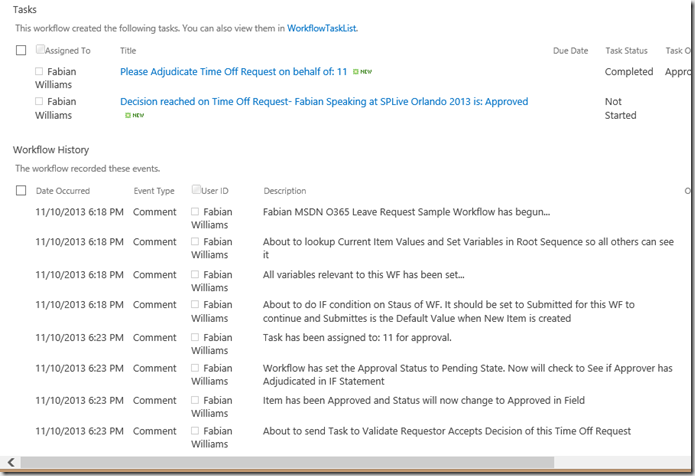
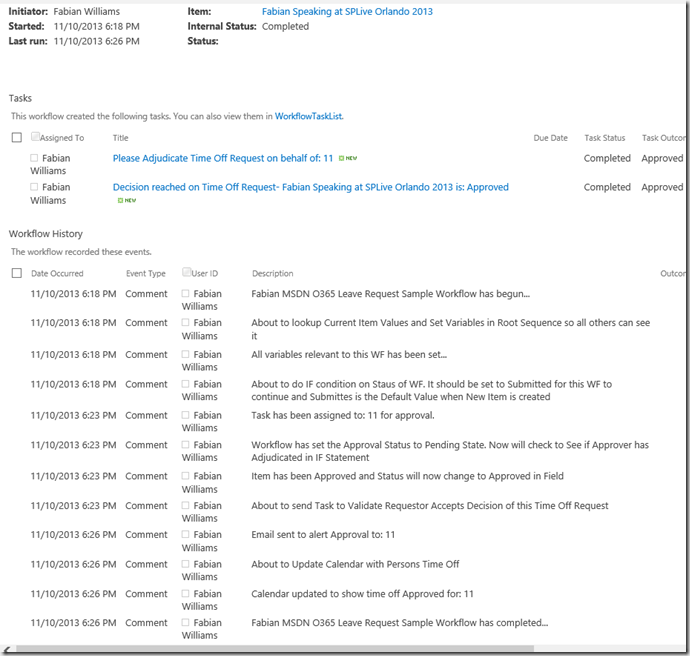
Next, and just showing the Task and History Log we can see now that a Contract has been sent back to the Requestor after the decision has been made
lets go ahead and do that, this time I wont do a screen shot as its similar to the same Approve Reject one earlier.
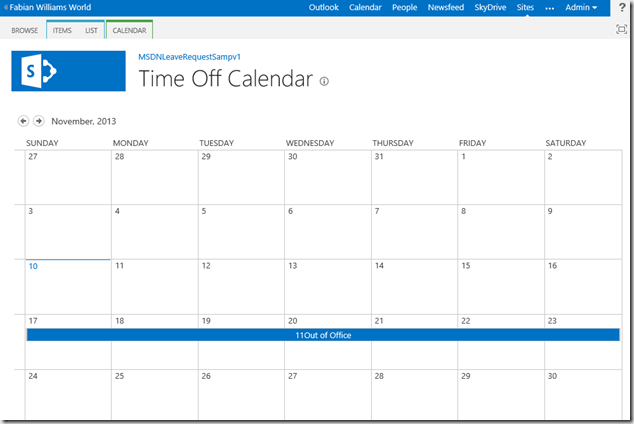
Finally you can see everything done, and the only thing we need to do is check the Calendar to see if the Item has been added.
and sure enough it is….
Summary
So, i hope this was helpful, if so, drop me a comment, share this online, etc.. hook a brotha up 🙂
RESOLVED: Unable to Create List using SharePoint 2013 REST API in SPD2013
Summation
Ill start this post out by saying that this is why i so LOVE the SharePoint Community. It is a true example of "many hands make light work”, first Jim Bob Howard @jbhoward one of my @PlanetTech work colleagues faced a problem, since it was a topic of interest to me, I decided to put some time into it as well. I was able to prove out most of the issues, but there was this last one (see blog post to what this is referring to in a link below) that just didnt make sense. What do i do when that happens, well I’ve never been ashamed to reach out to my friends in the SharePoint Community so I blogged the issue, showed what we did so far, and without tagging anyone in the tweet we had folks from the UK joining in the conversation, folks from all Time Zones here in the United States chiming in as well. Late Friday night I emailed a copy of the Workflow to my good buddy @givenscj Chris Givens. I really wasn’t surprised when even on a Saturday, Chris called me up on the phone, and we spent like 2 hours on a Screen Share looking at ULS logs, then he went off on his own, and within an hour, he came back with a solution.
The original problem was posted on the forums here
My Plea for help on my blog which gives more details than the forum post allows is here. This post is basically closing the loop on the problem
Findings
Chris blogged his findings here, go look at it, but the main point ill just borrow from is blog…
“…The main issue of Fabian’s was that when he made the Web Service call he would pass a pre-created FedAuth token (yeah I told him he would have to figure out how to generate this in the future) which established a context for him. This context was as his SharePoint admin account, but the actual running account (the "actor") was the Workflow service. Of course the SP Admin account can do whatever it wants, but the workflow service cannot. This workflow service account is NOT the account that the actual workflow manager backend window service is running under.”
Screen Shots form what Chris and I worked on
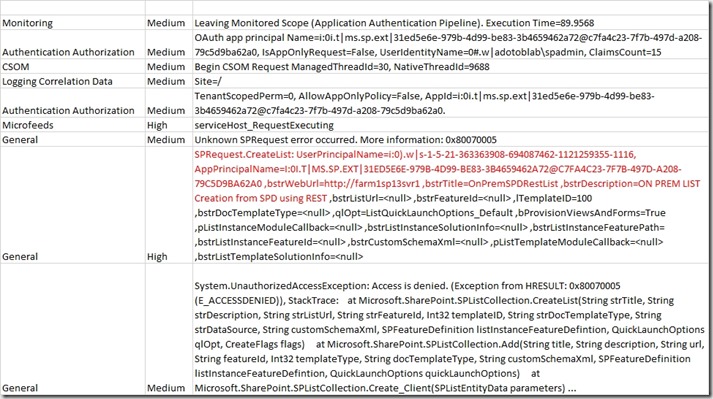
First we wanted to see what was happening ON Prem with this both from a Fiddler standpoint as well as SharePoint Designer 2013, here is what we saw. The offending item was the account it is running under MS.SP.EXT which is the App Principal for the Workflow from Workflow Manager. Further down you will see this inside the Content Database and the permission it is set to run under.
with a little more detail below
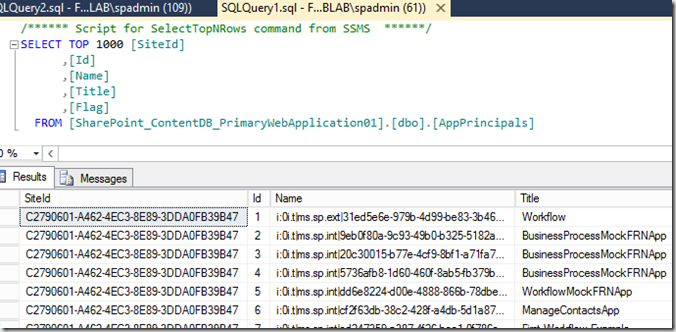
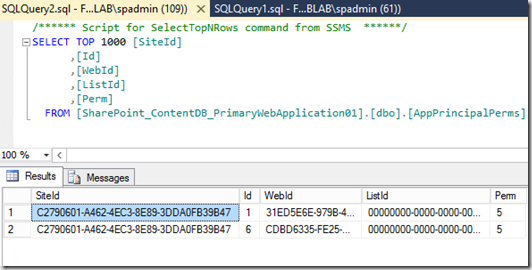
Below is a peek into the App Principal Table. This table as Chris describes is where the App Principal Accounts live, you can see that i have a few that are Titled as my Workflow Apps and one called just “Workflow” and it is that one if you look under “Name” has MS.SP.EXT 🙂
Now, lets go look at the permissions, now mind you, if you look at permission it is set to “5” right now for the ID 1, that was set to “3” before i ran the PowerShell that Chris has on his web site and i will put below for complexness.
Here is the PowerShell below
PS C:\Users\spadmin> $web = Get-SPWeb http://farm1sp13svr1 PS C:\Users\spadmin> $appworkflow = Get-SPAppPrincipal -site http://farm1sp13svr1 -nameidentifier 31ed5e6e-979b-redacted PS C:\Users\spadmin> Set-SPAppPrincipalPermission -AppPrincipal $appworkflow -site $web -right fullcontrol -scope site PS C:\Users\spadmin> |
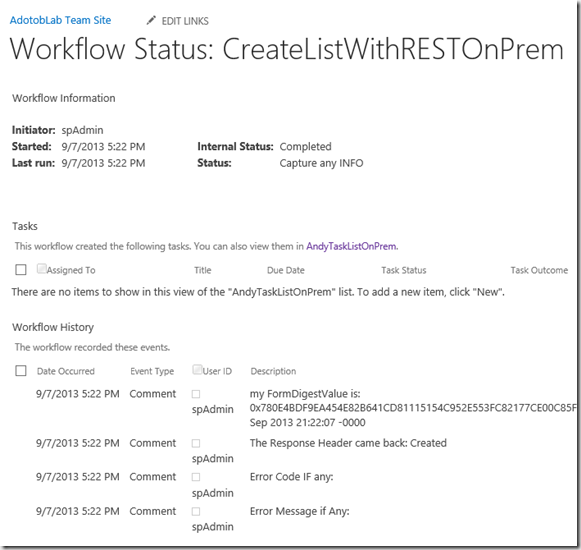
Once I did that, all we did next was re-Run the workflow, NO other changes, here was our result
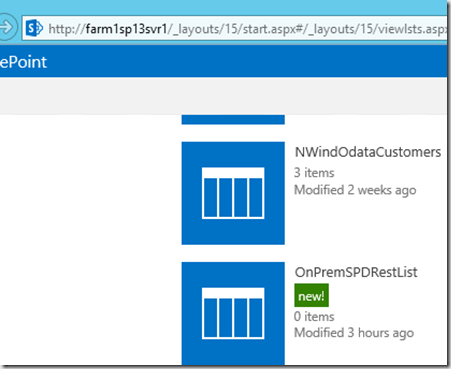
and in All Site Contents
Finally
So, all is well in the world of SharePoint again. I hope Chris goes and puts his solution as the answer to the question in the @Office365 Forums so we can have a record out there as well. I hope this helps someone else that falls prey to this, I agree with Chris, this is the first time I have ever seen anyone blog or talk about this in a public setting.
Cheers
Fabian Williams with contributions from Chris Givens
UPDATE SECTION
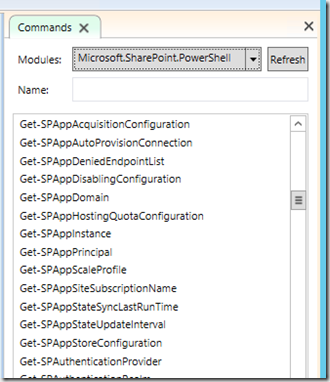
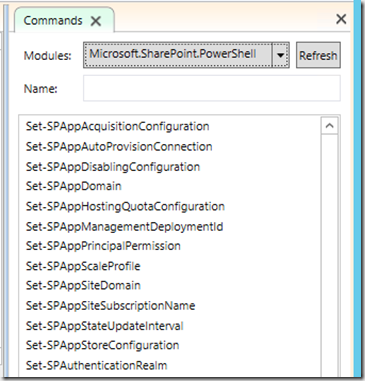
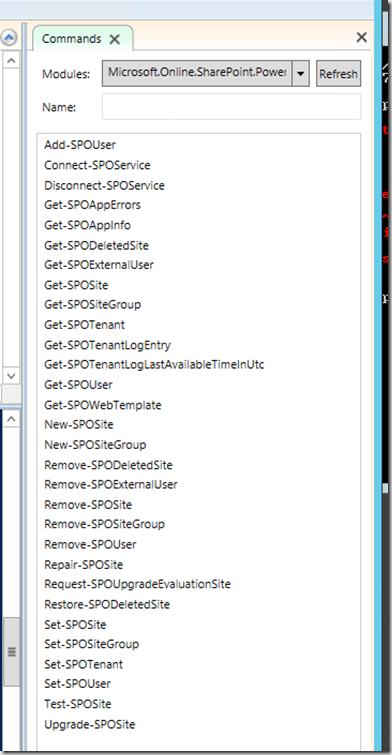
So, because i wanted this to work in Office 365 as well, we needed to find out if these PowerShell options are available there too. For completeness I loaded up the ISE and I have here all the options that you can do with the App Model for GETS and SETS, both for On Prem and OnLine, you can see that the Online version is very limited
ON PREM
and sad to say I could get EVERYTHING from ONLINE in one screenshot. 😦 sad panda
If you want to know more about Powershell for SharePoint Online regarding how to set it up in your environment, see Patrick @pcfromdc Currans blog post here.
END UPDATE SECTION
Using the Call HTTP Web Service REST Calls in SharePoint Online using SPD
Précis
So I’ve had folks say that they still cant make the leap and get my examples to work in Office 365 SharePoint Online, so this post is to Prove out that IT can be done, there is no smoke and mirrors, I just wanted folks to take what I have and use that to go to the next level. This is not like a live session where I have an interactive audience, so I am putting the info out there in his blog.
This post builds on a few out there that I have done explaining how to use SharePoint Designer 2013 with the Dictionary Object to data in JSON Format to be used inside Workflows. Now, I do admit that there are VERY FEW examples out there, if any, that show you, how to do what I am about to tackle in Office 365 SharePoint Online. So here goes.
Approach
As usual we have an Initialization Stage and a Workhorse Stage, in the Init stage we will set our variables and make our REST call, we will parse it and limit our dataset to what we need for our results. I think folks are getting tripped up on what is needed in the Headers, as what I am getting as feedback is that the Workflow Starts but it stalls with a message like “Retrying last request. Next attempt scheduled after…” with a correlation ID, it also gives you a Retry Now Link.
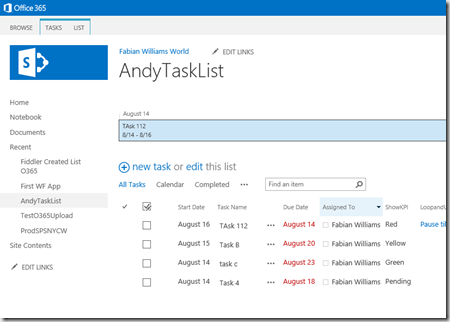
So the first thing i will show you is of course what is in my List NOW, I will show it to you via the browser and in Fiddler.
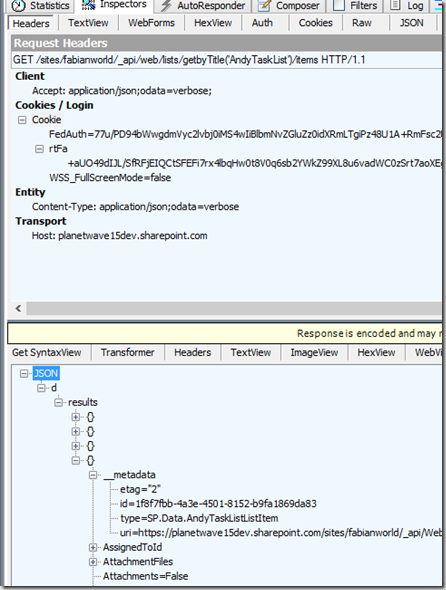
now here is the items in Fiddler, i do this so you can appreciate the actions I will take later on in SPD when parsing the JSON data.
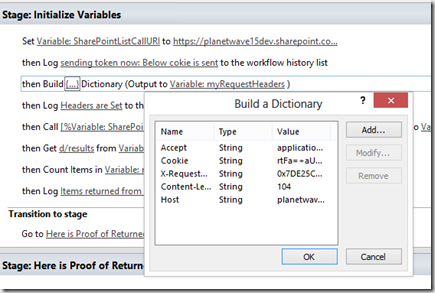
Now lets look at how we construct the Header, in this post, i have explained why you need certain Headers, so i wont go into it here, the only difference is that I am extrapolating what I did in Fiddler and using it in SharePoint Designer… now for obvious reasons, I am NOT showing you all the Header Information since it is my Valid Token to O365.
Now with that done, I have constructed a Site Workflow that will loop through the items and Log it to History, what you do with it for your Use Case can be quite elaborate, you essentially can
- Communicate with any Office 365 SharePoint Online Tennant you want from a Single Workflow
- Cross Communicate between an On Prem Farm and a Cloud Farm in one Workflow
- Create List, Libraries, List Items, and do full CRUD operations
If you go and look at the REST API endpoints from that link i gave you before by Kirk Evans, you can see that its quite a bunch of things that are available now.
So. back to the story.
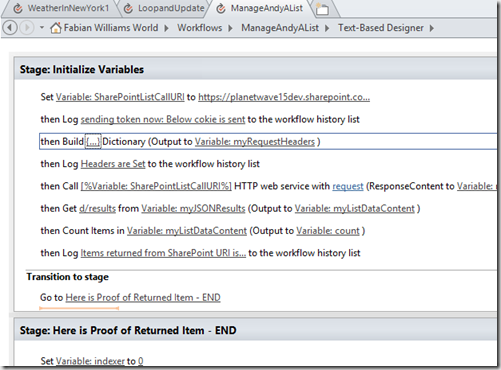
First Part of the Workflow
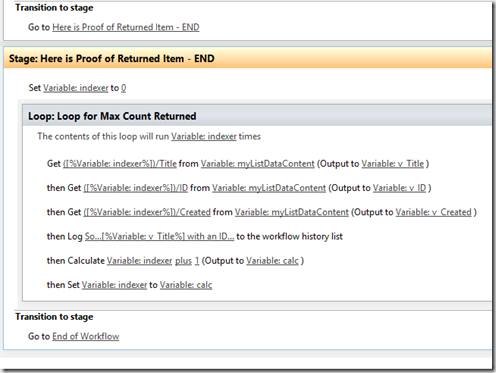
Second Pare of the Workflow
Next lets fire off this Workflow and look at the results.
Proof
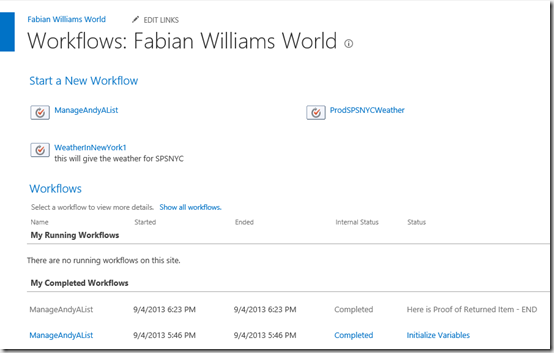
Next we go to Site Contents, Site Workflows and click the one we just created after publishing
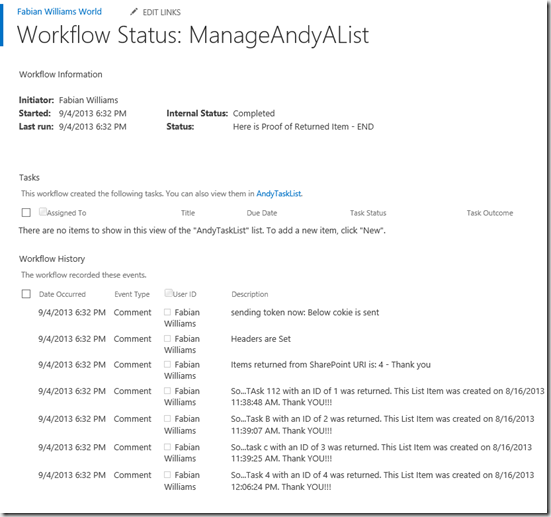
We should expect to see the below in our History List
and upon closer inspection of the Workflow
Summary
Now what I will say because I have worked quite a bit with SharePoint Online Wave 15 is that it can get squirrely and can crap out on you for no good apparent reason, it gives you obscure feedback when it does and often times it just says “something bad has happened..” and if you Refresh the browser, its back to normal. I don’t pretend to understand why, I don’t have eyes into the Data Centre nor access to the ULS Logs, so I am as much as in the blind as you are. BUT this is the reason why i do Fiddler first then SPD after…visibility.
I hope this helps! Cheers.
Creating a SharePoint Timer Job using SharePoint Designer 2013
What do i really mean?
Now that I have got your attention with that eye catching title, let me expand and qualify it. So, what I will be doing exactly is
- Inspecting a List (a Task List actually) for Tasks that are Due and Overdue.
- I will be checking them nightly (every 24 hours to be exact)
- If task are Over Due, then I will take ‘some’ action on them, in this instance, I will be changing a KPI field but this can be quite exhaustive based on your own particular use case. see below for one i have in mind.
- Pause the Workflow for 24 hours and Repeat.
By the way, this CAN also be used in SharePoint Online
Use Case
In this use case I have been charged to monitor a Task list (multiple task list from varying SharePoint Sites/ Site Collections) and aggregating them. Once complete, then we need to serve up the tasks that are overdue into a KPI dashboard and send the email link to managers of those offending taskees.
For my POC demo here I will show how to get 1 Site Collection but to get multiple all you have to do is make a separate REST call to that particular Lists API, and the rest is easy.
Pre-Requisites and Technologies Used
In this example I am using an On Premises SharePoint 2013 with Workflows enabled, I am also using SharePoint Designer 2013 as well, that is if for tooling. i.e. NO CODE. I will be using the SharePoint 2013 REST API to read the SharePoint Task Lists as my Entry Point URI. The generic url will be /_api/web/lists/getListByTitle(‘’)/items">/_api/web/lists/getListByTitle(‘’)/items">http://<sitename>/_api/web/lists/getListByTitle(‘<listNameHere>’)/items which fetches List Items from a Named list using oData. Now by default this will be returned to your in XML, so in order to use this in SharePoint Designer which requires JSON inside the Dictionary Object (see my post here if you need a refresher on that) you will need to modify the headers to accept JSON using the Accept Headers. The rest is a matter of using Loops to iterate through the List Items returned, and pausing for the time allotted.
Approach
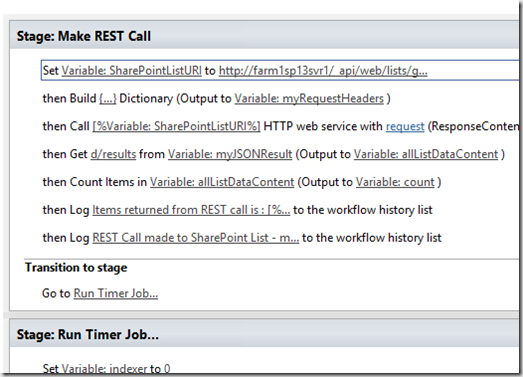
As usual I put my URI inside a Variable to obscure the name & any API Keys if any, this time there was no need but it just makes for better programming especially if there are a lot and I want to swap them out from time to time without affecting the core program
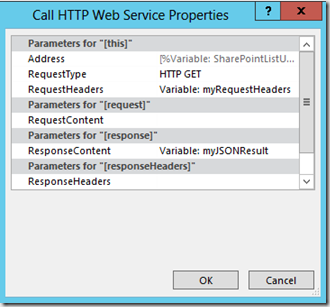
the full list of properties from the Call HTTP web service is located below since it is truncated in the image
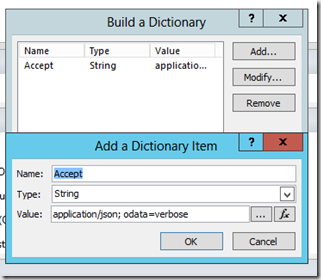
The Request Headers are “Accept: application/json; odata=verbose” and you can place that into a string type as well and call it into the HTTP Web Service Properties as well inside a Workflow Dictionary Variable
Once you have done that, then as seen in the first image and in my previous blog post on the same topic, you parse the JSON results to get the part of the dataset that you want, in this case i want what is under the “d/results” node and to do that I use the Get Item from Dictionary and parse out what i need then i count the items for good measure, save the “Count” as a variable to be used as my upper bound in my Loop Counter and log it out.
Do Business Logic
After setting up the stage to get the URI, return the JSON data, Parse It to the Node you want, and get a Count, the next thing is to do the business logic.
What you will see below in the image is us using the Variable Count as the upperbound in our Loop and then getting the JSON data into Local Variables to be manipulated in the Workflow Logic.
//MY SOAPBOX
So, i have been talking about this for a while as most people who have known me for a long time, know be because of my work and efforts in SharePoint BCS. But i have actually moved my thoughts in some aspects to what BCS allows (even in 2013) and what Workflows gives you interms of interacting with External Data. You see my point is, if you do not need to look at that data, i.e. External List, or need to Search on that Data i.e. External Content Type as a Content Source, I THINK that it is to your best interest from a simplicity standpoint, a performance standpoint, best of breed standpoint… to do this as a Workflow calling External Web Services and manipulate the data how you want and then get rid of it (i.e. the Variables) when done. That way the data is only used for its intended purposes then goes away.
//END SOAPBOX
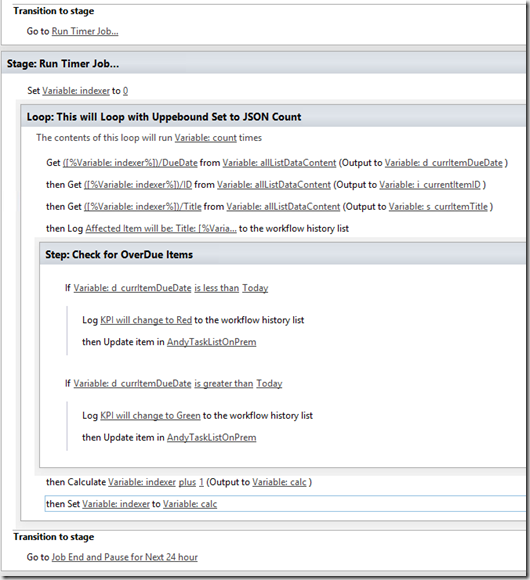
Back to our story, what we do next is inspect the Due Date and use Conditional Statements to affect changes to the Fields for what you need. in this instance I am updating a KPI field based on how far along or how overdue a Due date is on a Task List. Now the Use case here is that I can do this on Any Amount of List both On PREM and in Office 365 in the same logic, I have Scale and Scope down to a Tee 🙂
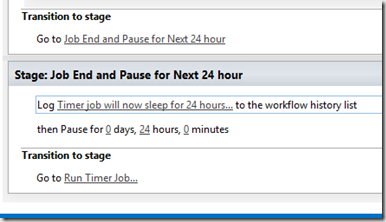
The logic loops through each item does a Check and then updates the loop counter until it hits the “Count” variable number then exits. Since this is a Timer Job then the next thing we need to do is Pause it and wait, see below
Now, this workflow was designed as a Site Workflow so it can be ran independently of any Library or Lists and this guy can run forever.
Summary
So the next time someone ask you to Do a Timer Job for them, especially if they say they want it on Office 365 (SharePoint Online) and it involves a use case similar to mine or at the very least is looking at affecting changes to a List/Library, consider doing a Site Workflow with Conditional Logic and Pause Duration. Its really is that simple.
If this was being done in SharePoint Online, you would also need to capture and pass along the oAuth Tokens FedAuth and rfTa in your dictionary object.
Cheers and Happy SharePointing
How To: Create SharePoint 2013 Workflow App-Site Columns to Fully Deployed App using Visual Studio 2012
Précis
*** Feel free to skip this section unless you want background information on the genesis of this blog post***
Good day all, to appreciate this blog let me set the stage of my day. Two days ago, I put together a PowerShell Script that laid down the SQL Bits, SharePoint Bits, Configured a slew of Service Application, Configured Central Admin, as well as 4 Web Apps for sites, and also deploy Workflow Manger 1.0 and Register my Site collections, needless to say I was very pleased. To put this NEW Dev Rig to the test, decided to live up to my promise of duplicating a previous post done in SharePoint Designer, whereby I demonstrated how to use SPD 2013 to do complex workflows that could only be done in Visual Studio in SharePoint 2010. My spin on it was to do it all as a SharePoint Hosted ALL in ONE App in SharePoint 2013.
So, lets go to the end then Ill work my way back. I found out when I tested my solution in my On Prem environment that it wasn’t working as designed, by that I mean:
- My Assets Deployed
- It installed all my Site Columns
- It installed my Content Type
- It installed my List Instance
- What It didnt do
- I could only get to the App URL by using the Account I used in Visual Studio to create the Solution, even though the other account (my own named fabianwilliams account) which is also a Site Owner in the Site it was Deployed to.. returned “cannot display this page” error
- Even when I created or uploaded a document to the Library under the Content Type, There was NO workflow to fire off… “it” said “no workflow was defined for that Library, Folder, Document, or my Content Type” or something to that effect
So, that struck me as Odd, I tried it a few more times by breaking up the Provisioning of Assets piece into its own solution, and the Workflow in another, didn’t make a difference. SO, I decided to COPY MY CODE VERBATIM to my SharePoint Online Developer Tennant Account and guess what… IT WORKED THERE.
So this blog will chronicle the start from an On Prem solution and eventually copying the code to a new Visual Studio Solution targeting my SharePoint Online Account where it worked as Designed. Ill either try to figure out why it didn’t work, or since I have a PoSH script, just review the script, make changes, Kill my Farm and Redo it.
UPDATE: 5/26/2013 0953HRS – So after a few hours sleep and thinking about why it didnt work, I tried just doing a regular Workflow App in Visual Studio and It worked, so it may NOT BE my Workflow Manger, indeed, my SharePoint Designer 2013 Workflows also work. So perhaps its my App Model Service Application that is Busted!!!, Ill look into it.
Approach
This is going to be a LONG post, especially because as you now I am verbose in my blogs, and I take lots of screen shots. So you may need to do this in a few sittings lol, or maybe it will end up being like a great novel.
Solution Design
- Open Visual Studio and Create a Project using the “App for SharePoint” project template.
- Create Folders to House the following Artifacts I will be creating
- Site Columns
- Content Type
- List Definition
- Create a List/Document Library based on the Assets in #2 above
- Create a Workflow based on the Instance in #3 set to begin manually and on Item Created event
- Point the AppManifest file to the Library Instance
Get your Site Columns squared away
Whenever I deliver solutions for clients, I absolutely always, unless told otherwise, create my own Site Columns, Content Types if necessary, and List/Library Instance when I am using Visual Studio to build and deploying my solution as a WSP. I do that to ensure that my columns and other assets are UNIQUE in the environment firstly, and second, it makes my solution very portable. So, its not surprising that in my example here I will do the same.
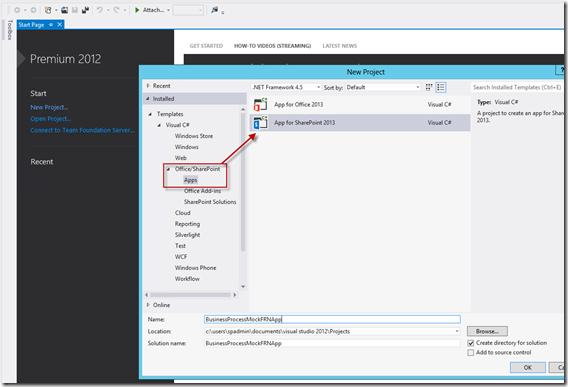
So, open up Visual Studio and Begin a SharePoint Apps “App for SharePoint 2013” project
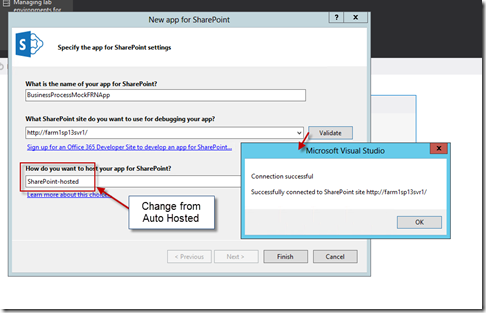
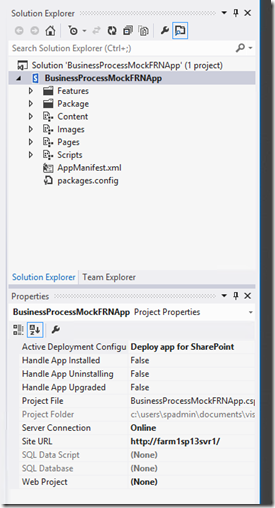
Change your project from Auto Hosted to "SharePoint Hosted” and just validate your Connection for warm fuzzy feeling.
When you are done you should get a brand new shiny project as you see below
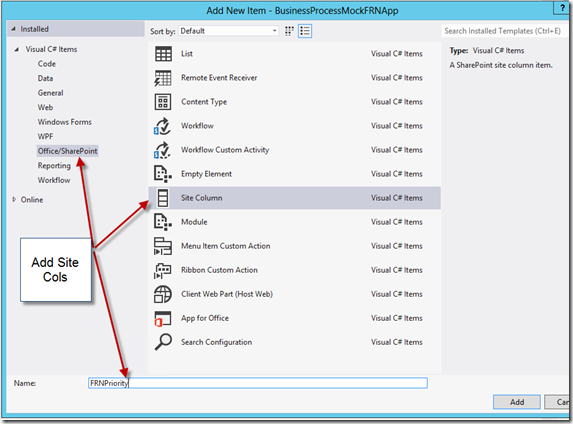
Create your Site Columns
Next I will add a few site columns to aid the process, there are a few these, and what I am trying to illustrate in this blog is the different kinds of Site Columns you can create and what the defaults are, as well as a few customized options you can make.
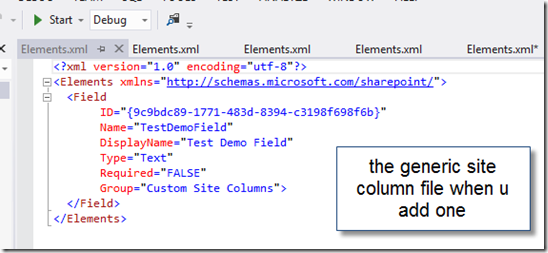
By default when you add a Site Column it adds an Elements.xml file that will set for Text type with limited information, I added more and changed the type to person (User & UserMulti), number, Choice, for a few of them.
Here is an example of what the default added site column looks like
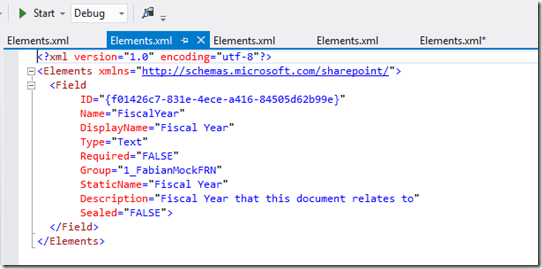
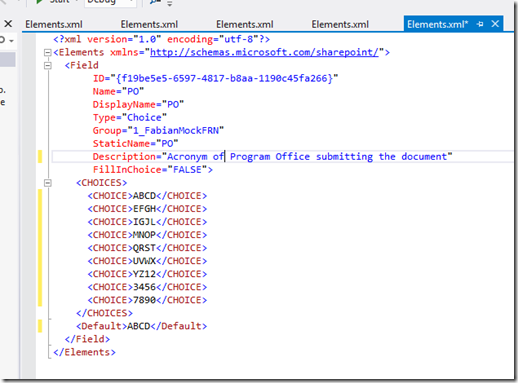
Here is an example of what a few Site Columns look like after I modified it for text entry. You will notice that I have additions for StaticName, Description and whether or not the Field is Sealed, meaning can you edit it in your Site Columns once the solution is deployed.
Here is one that is modified for choice column. You will notice there are options here to allow or dis-allow FillInChoice as well as the available choices and the default one if none is selected.
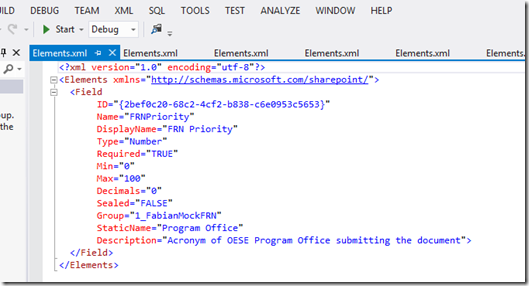
Here is for Number. Key takeaway here is the Minimum and Maximum values, Decimal option. You will notice here that the Required is set to TRUE in this one.
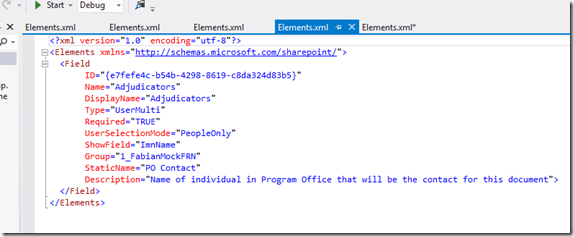
Here is one for People. People is a little different from the rest in that it affects display in many ways. the Type can be (1) User or (2)UserMulti depending if you want to allow for multiple user selection in a single field. This can be because you want to do Parallel or Serial Approval with a bunch of folks denoted in a single field. In addition, the ShowField option there will show Presence Information if Lync/OCS is present.
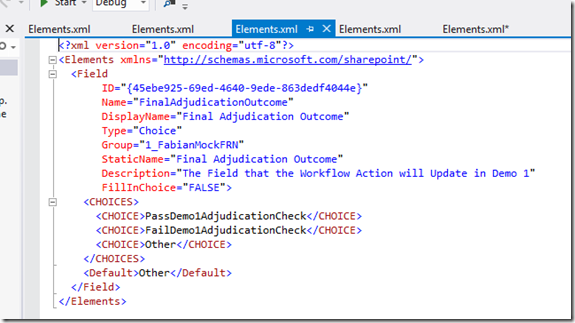
and in the end the field that the Workflow will update when i is approved or rejected is this one, another Choice Field that has some meaning for us in the end.
Create your Content Type
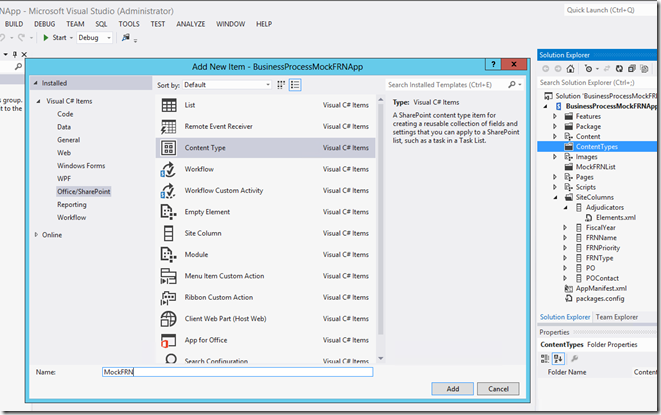
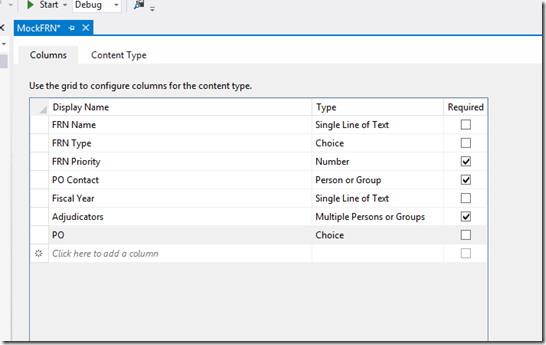
Next you will make a Content Type to house all these Site Columns.
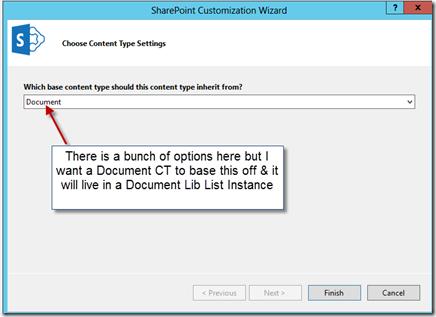
Next choose the template that this content type will be based off
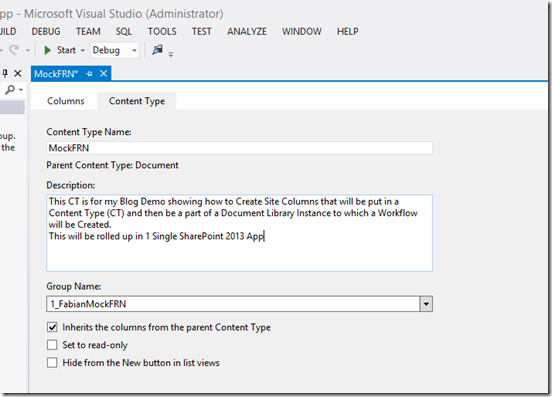
Now you get to define what this Content Type will look like, you add columns from which you previously created as well as define other parameters as you see below. By clicking on the “Content Type” tab, you can set the Name, Description and Group where the CT will be stored as well as a few more options.
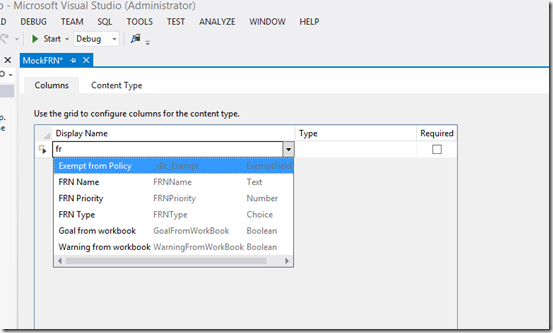
Now an all important step here is how you can add “Additional” columns in to your Content Type in addition to what will be there by default based on the one you inherit from. Here is where you will select from the previously created Site Columns. The task simple, just begin typing and you will see it finding the ones you want.
Finally your finished product will look like below when you have located all the ones you want.
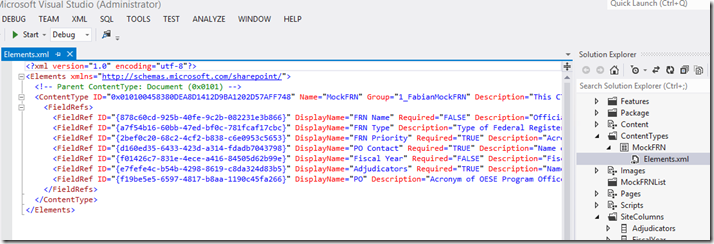
Now you may not see the significance of all the above work, and you discount it as not a ‘big deal’ but If you have EVER done this in previous version of SharePoint you will understand that you had to do this all by hand i.e. now UI Tooling, so the experience was to create all this by XML as you see below, which is still there for you behind the scenes, but now you get to do it in a tool
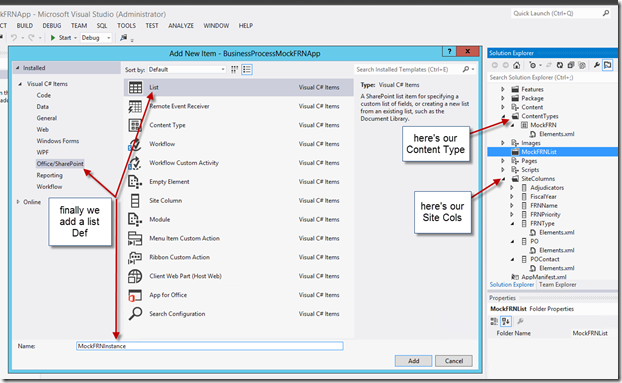
Create your List Definition and List Instance
Finally its time to add the last piece of our artifacts, the List Definition, see below, notice also the creation of our Site Columns and Content Types to the Right in the Project Solution
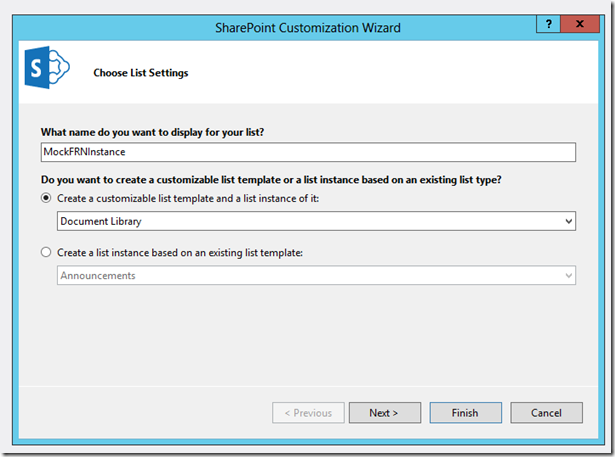
As with the Content Type there are a few configurations we need to do such as telling the Definition what kind of List/Library to inherit from. Normally I would usually do Document Set because usually I find that its NOT just one document asset they have that is a part of the Business Process Re-engineering effort but a slew of them. But for simplicity here i elect Document Library.
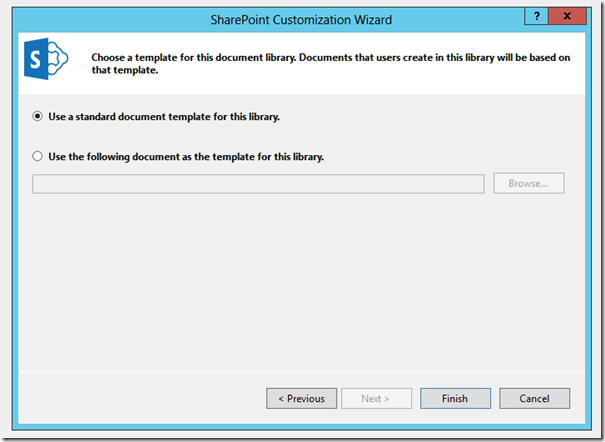
and what template to use. Now again, if you had a template that was already done that had all the information they need you can put it here. Normally, I take the “Paper Document” and make an Electronic version here OR I take the electronic version and either
(1) Strip out the Fields that I will elevate to a Site Column in the Content Type from the document or
(2) Use Word Parts such that when the Document Information Panel (DIP) asks for the Metadata information, it AUTO POPULATES the fields in the document as well. Up to you.
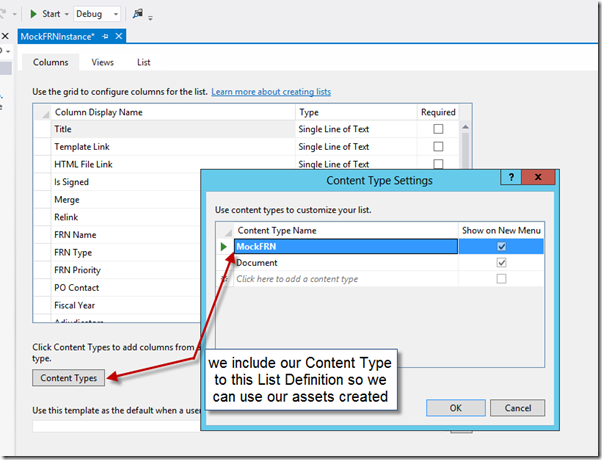
and we finally tell the list definition to use the content type we created earlier which of course has our site columns included. So this is quite easy right and you can see the logical flow here. By clicking on the Content Type button, you select the Content Type you earlier created and it will automatically put in the Fields that you selected.
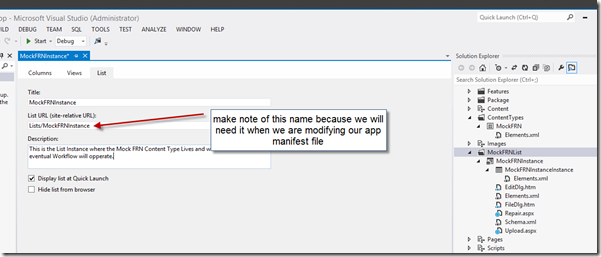
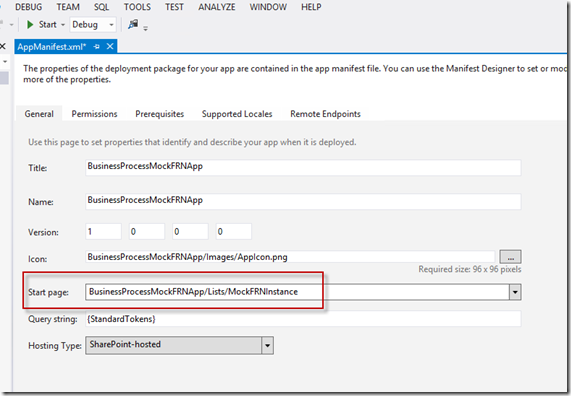
We also need to clean up our List Name and description as well as note the name of the List Instance because that will be the start page for our App Manifest so we can be taken directly to the List to add and item so the workflow can work
Now we almost to the end, we need to add a Workflow to our project and name it accordingly.
Create our Workflow – Finally huh 🙂
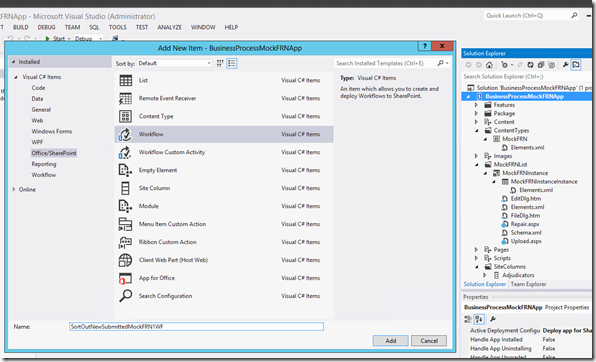
Now we add our Workflow Item to our Project.
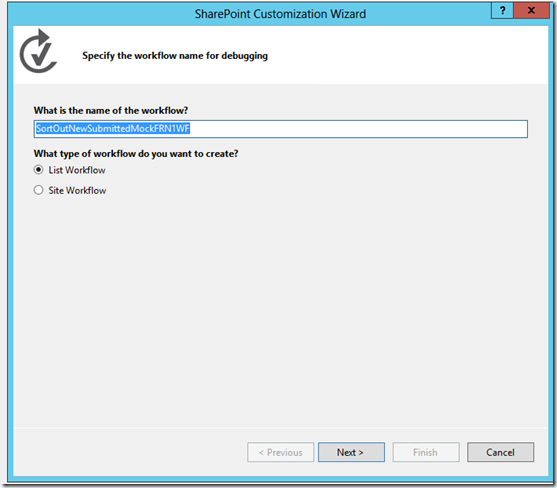
Next again, you will need to configure a few steps such as what kind of workflow. Obviously we want a List Workflow for our project because we just spent all that time creating Site Columns, Content Types, and a List Definition to do it. So name your Workflow and be on your way.
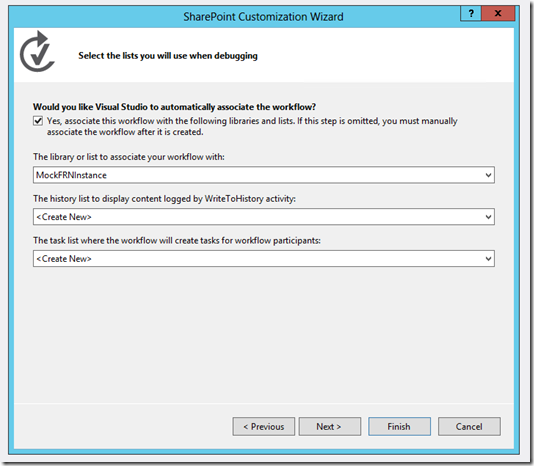
what it will run on, that is the List instance we created earlier from our List Definition. Now the Project knows about our List Instance that we created, so we just select it from the drop down list and in this case we want NEW instances of a Workflow History List as well as its OWN new task List to use.
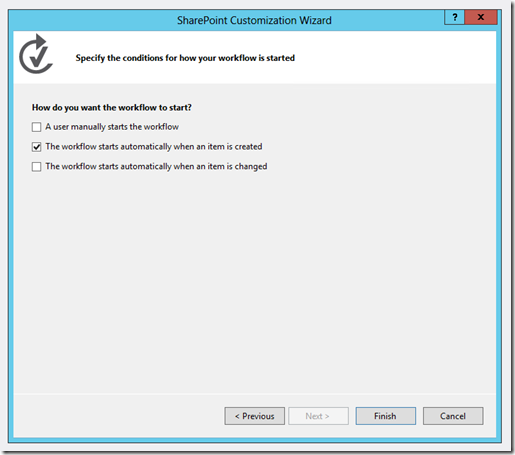
and how it will start. Now for testing purposes, I normally will have Manual as well as Item Created, but will clean that up before Production.
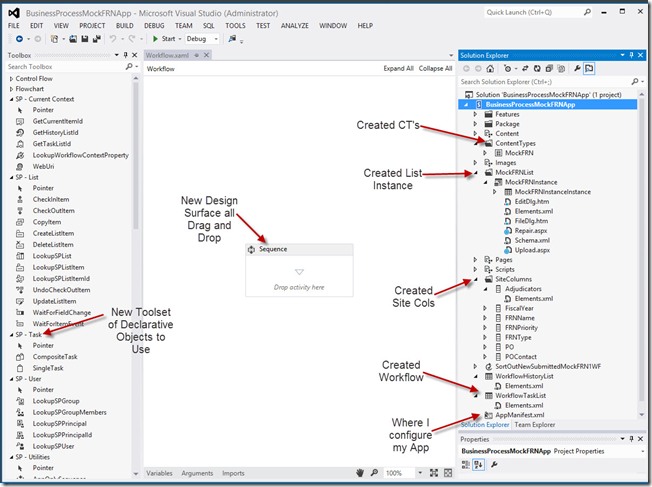
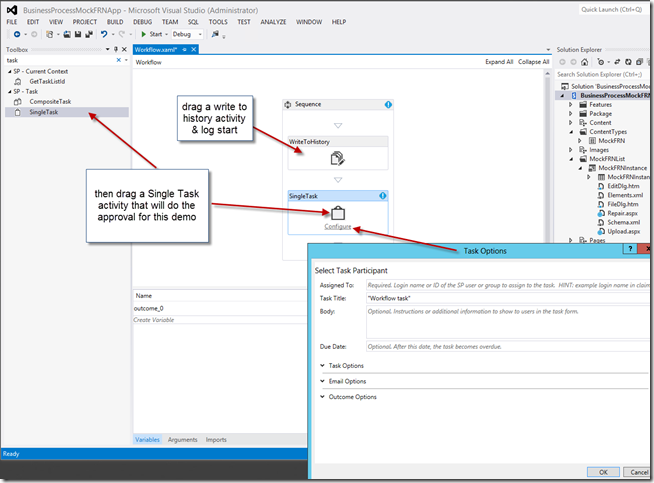
finally you get a solution where you get to design your workflow. I think there are enough call outs in the diagram so that you can get the picture 🙂
Next you get a few Workflow Activity items from the toolbox to design out your Workflow as below
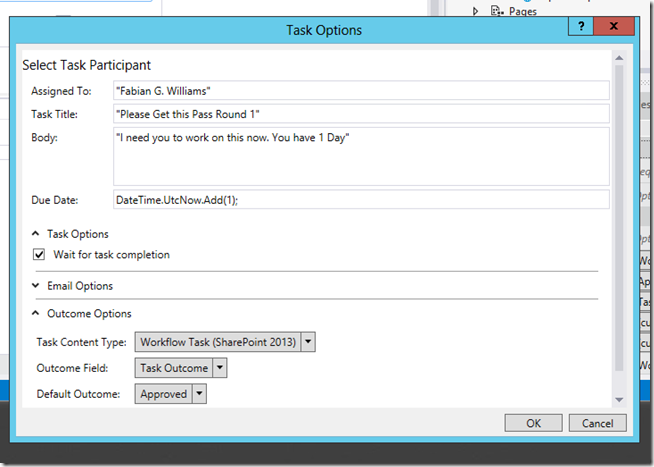
We configure the task option either in the Project Properties window or you can click the configure link in he design surface and configure the options as you see me do below. Now in production you can certainly do business logic for alot of these options which as you see involve C# code that gets translated to XAML when you deploy your project
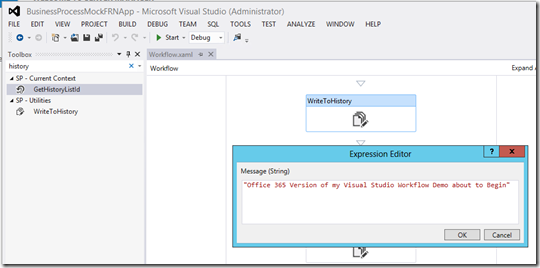
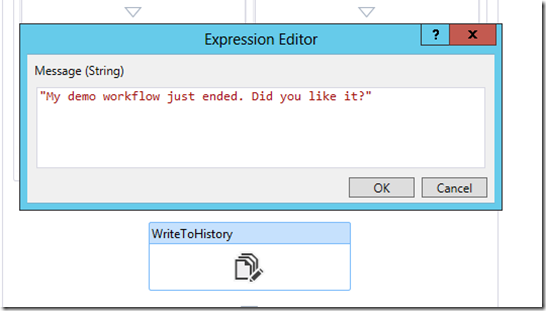
Here are a few more edits made to the project, things that you will see in the Outcome when testing. I am including the Logging as a mans to show you that there is nothing up my sleeves as well as it is good practice to document your workflow and give feedback to the End User/ Workflow Actor. The Logging below will show up in the Workflow History chronology.
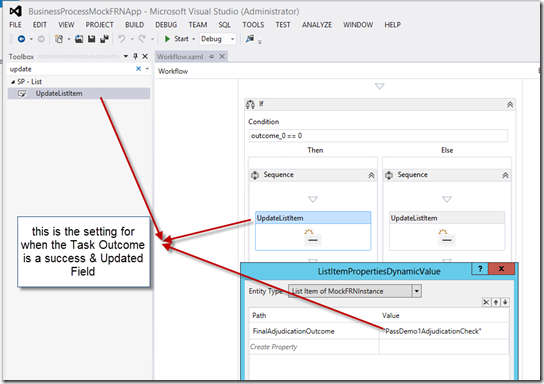
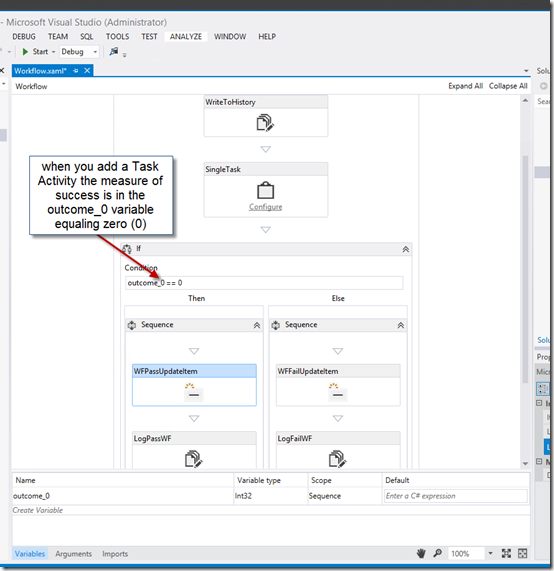
A couple of things to call out here. You notice the “if” section and below it it has the “outcome_0 == 0” so basically, when you use a Task Activity the tooling will create for you a Variable called “outcome_0” and based on the disposition of the Task, it will be either Zero(0) or One(1) to denote the outcome. Zero means it is a Successful Approval.
Above again you will notice the UpdateItem Activity. I am saying here that if the Outcome is a successful Approval I want the Workflow to go ahead and Update the Field “FinalAdjudicationOutcome” to the choice field option you see above. I have the inverse of that applied on the Else side of the Conditional Check.
Below is just another logging to show you when the Workflow ends.
So when you are done, the resulting solution may look like the below
Now you remember when i said that you need to note the name of the List Instance, here is where you will use the name; you see, you want the App to begin on the List Instance you created and modify the Start Page setting
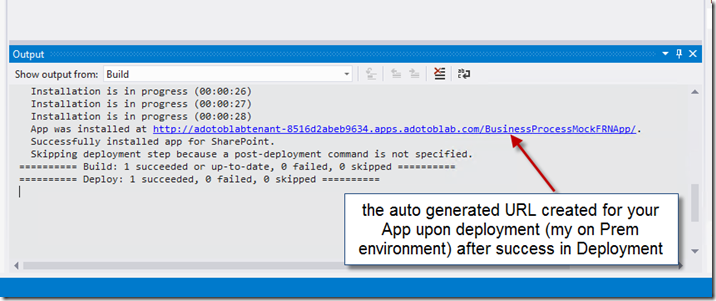
Once that is done, you go ahead and Deploy your solution to your site. The URL below shows the FQDN of the location where the App will be. This reflects the On Prem solution. As you know if you read the Precis, I think my App Model installation is busted which I found out in testing. So we are going to copy my solution to a Cloud SharePoint Instance I have.
A benefit to you the Reader
Now, this is indeed unexpected but it does show you that your Visual Studio Solution
A. Can be used on a Desktop WITHOUT SharePoint being installed AS LONG AS you are pointing to a Cloud Instance of SharePoint. Obviously, you are also not doing a Farm Solution
B. Your solution is Portable, you can move the same code between On Prem and in the Cloud as long again as it is NOT a farm solution
C. You can create a Development Environment in the Cloud, Azure Perhaps and kill it when you are done, no need to install VM’s to do SharePoint work anymore, with the same qualifiers as above
Now Deploy your solution and if you are successful you will see the below.
Testing in my On PREM environment
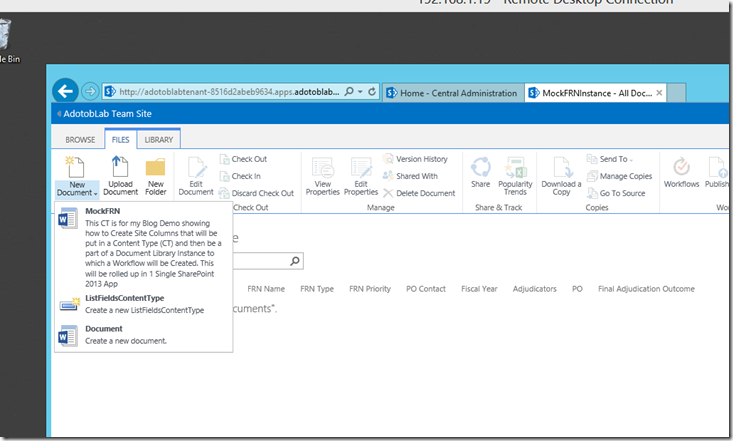
Once you examine the site by clicking on the URL, you can see the results of your Assets deployed inside your List Instance
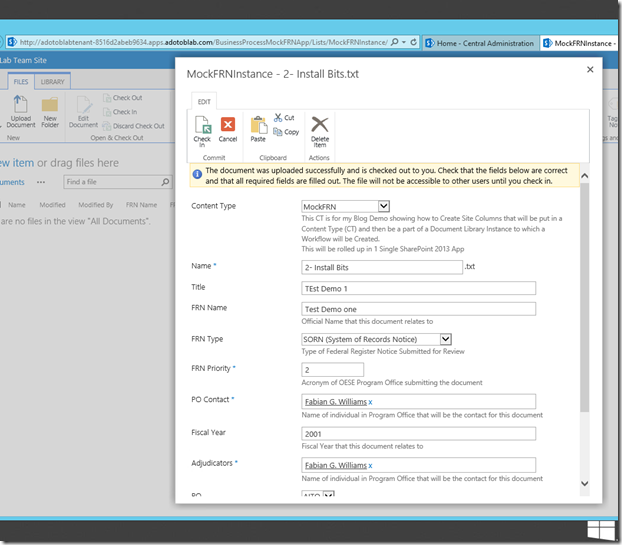
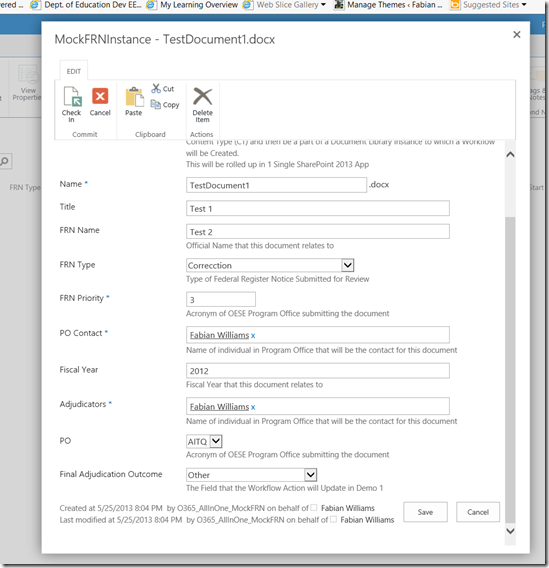
Next create a Item and fill out the Metadata fields
Here is where Testing Failed and I copied my code into a NEW VISUAL STUDIO PROJECT targeted at an Office 365 SharePoint Online Tennant
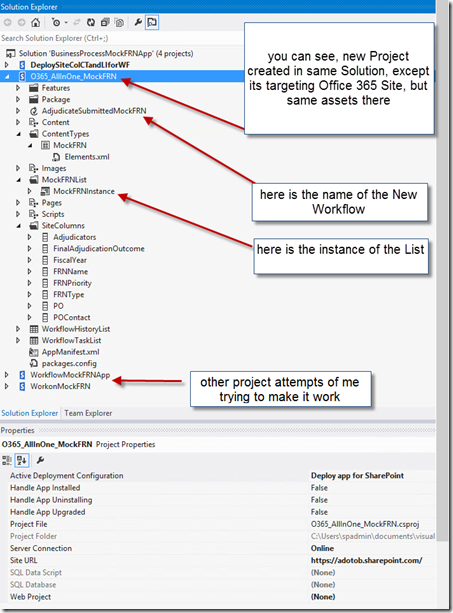
My New Visual Studio Project targeting SharePoint Online
So, I added a new Project to my Visual Studio Solution, see the callouts below
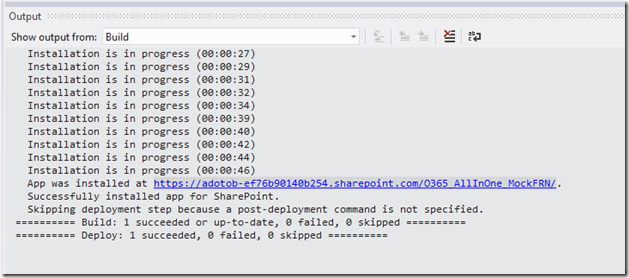
Deploying it gave success as well, see below. This time the URL targets my Office 365 SharePoint Online Instance.
Testing
The testing below occurs in Office 365 SharePoint Online after re-deploying our App targeting this environment.
Testing our Visual Studio Solution in Office 365 SharePoint Online
Now we will test again, this time in Office 365 SharePoint Online. Again we fill out the necessary Metadata fields.
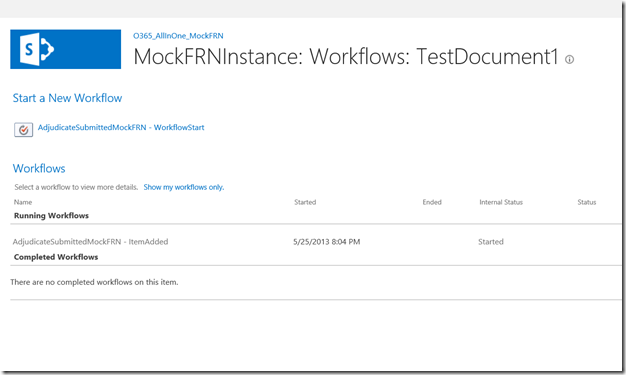
This time we have our Workflow Starting as we can see bwlow
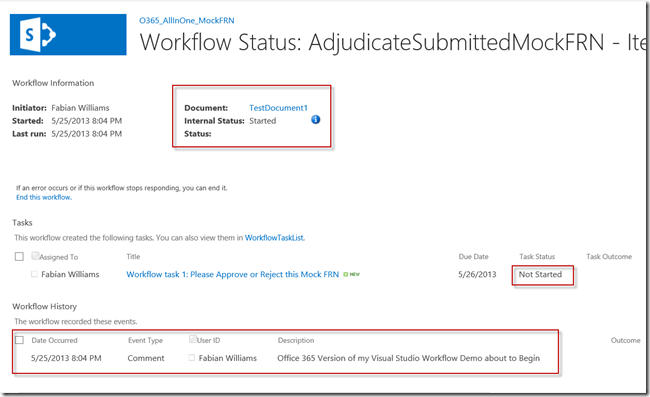
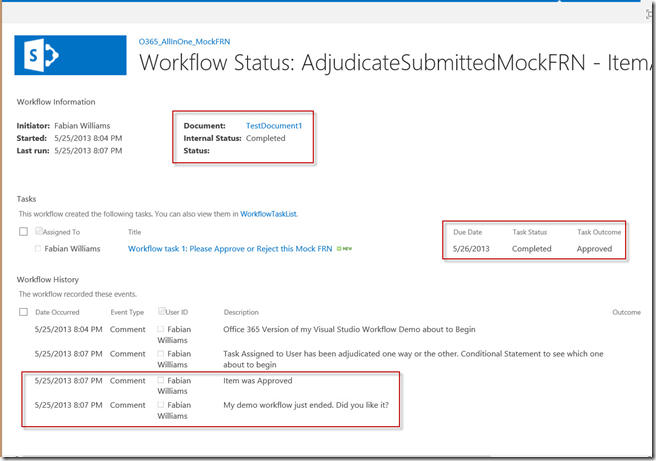
and you can see in the Workflow Status that we are set to go and the Workflow is working
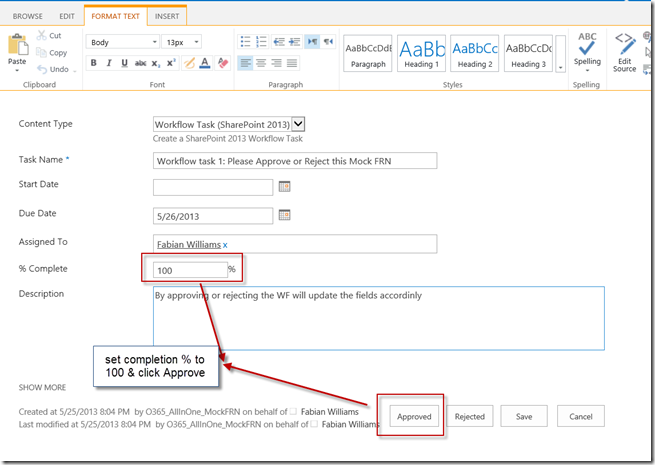
next we adjudicate the Task Assigned
and our result is
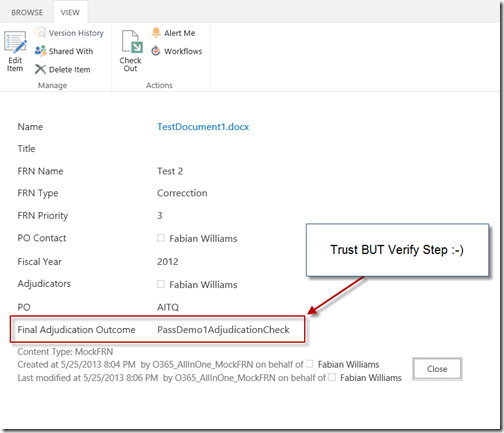
Trust but Verify
Now, indeed, I had a few other steps in my SharePoint Designer 2013 version of this, using Stages, and we can certainly duplicate this in Visual Studio, but this blog post was long enough, and the simple truth is that you basically repeat the steps I have above and the Designer is built to show the FLOW that the workflow will take, so its “monkey with a wrench” work, the examples in this blog post shows you how to do it once, you now take that knowledge and repeat it as much as you need for a holistic solution.
Back to our workflow at hand. If you recall, if the person approved the Item, the Workflow should Update the List Item by changing the field of the “FinalAdjudicationOutcome” to what you see below, which it did. Furthermore, the images in the Testing Section shows some of the Logging we did so you can infer the path that it is taking.
Summary
So in the end, we still have our solution, our blog, and WE both learned a few things in this process. Have fun y’all. Irie.
