How To: Part 2: Create Content Sources, Search Scope and Use the MOSS Object Model for Search
Part 2 of a 5 Part Series:
Part 1: How to Setup a Content Source, Search Scope in the SSP and Consume that Scope in a Site Collection
Part 2: Coding Enterprise Search – Coding a Content Source, Coding a Crawl Schedule (Full and Incremental)
Part 3: Coding Enterprise Search – Coding Scopes, Crawl Rules, File Types (Inclusion and Exclusions) and Crawled Properties (Managed and Crawled)
Part 4: Coding Federated Search –
Part 5: Coding and Using the Web Service Query Object Model –
Scenario:
In this blog we will go about how to create a Content Source in the Shared Services Provider, we will create a File Share Content Source and a SSP Search Scope that may be consumed by Site Collection Administrators. Once we complete that we will take a look into how one could enhance their search experience by a using the MOSS Object Model and Search Objects to further customize that experience. This will be a 5 Part Series and this Part 2 will cover how to Code what we did through the Central Administration in Part 1. So we will begin by creating the Content Source, create a Crawl Plan for Full and Incremental Crawl and to test this we will create a Windows Forms Application in C# to walk through the process. Sit back have fun..
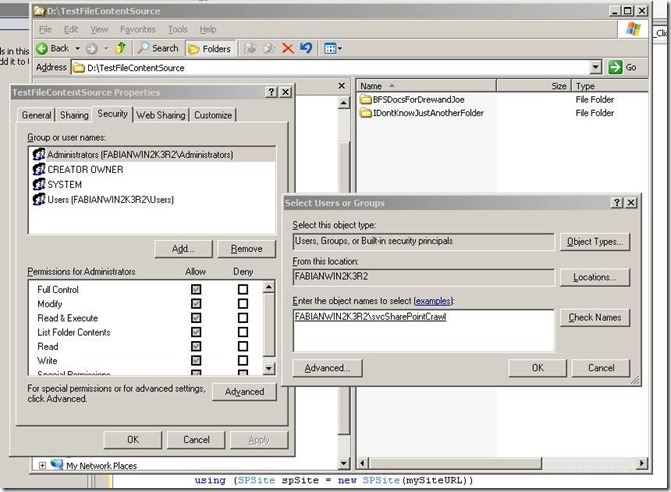
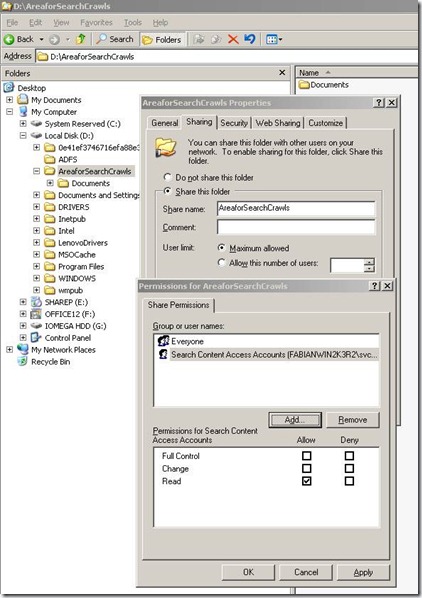
Step 1: We need to have a location to actually use as the Content Source, so we will create a folder on the Hard Drive, Share it out and ensure again that we give NTFS “Read Permission” to the SharePoint Crawl Account for that shared location
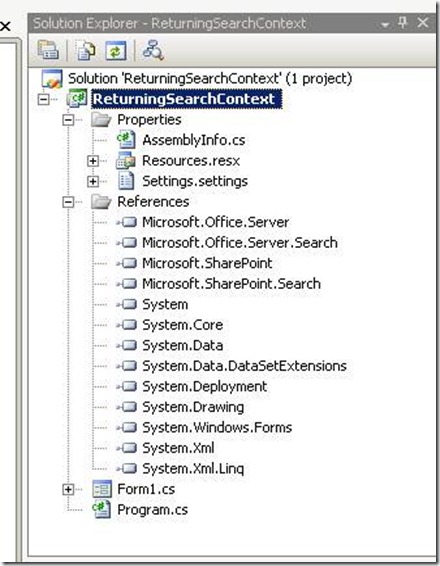
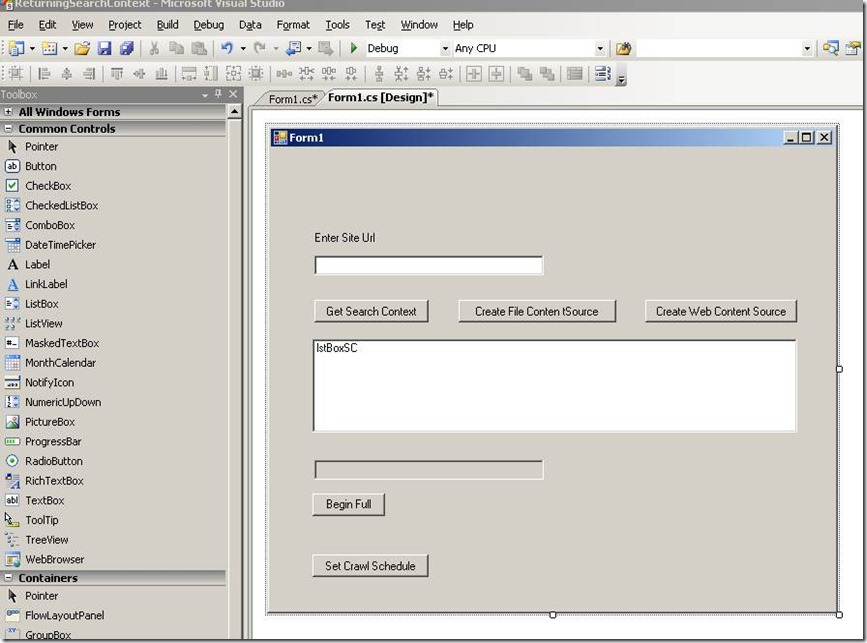
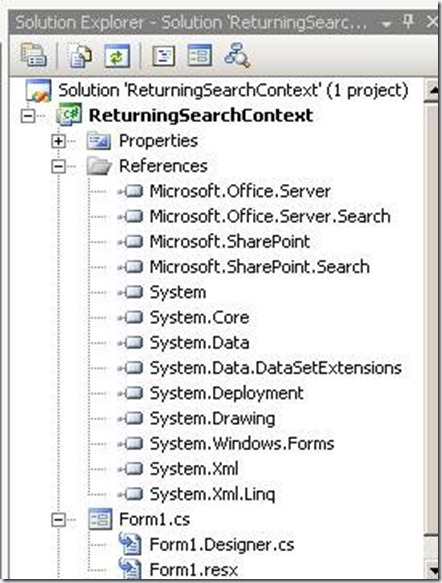
Step 2: To facilitate a walkthrough of the Code I created a Windows Form Application in C# and set References to SharePoint Dll’s in the 12 Hive necessary for Coding against the Search Object Model. We only need the following:
- Microsoft.Office.Server
- Microsoft.Office.Server.Search
However I plan to do a few more tips-and-tricks so i added
- Microsoft.SharePoint
- Microsoft.SharePoint.Search
References Added in my Windows Project.
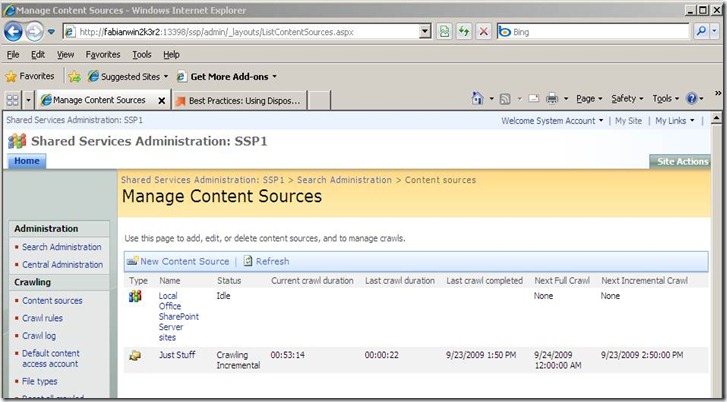
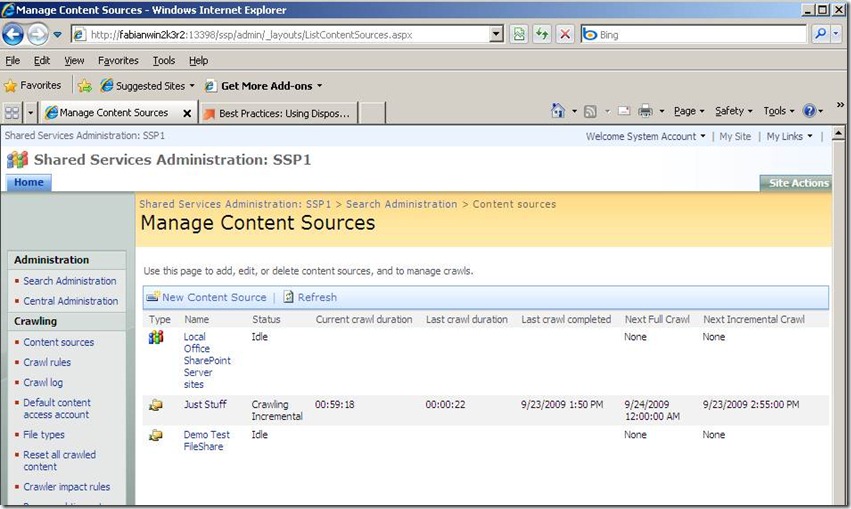
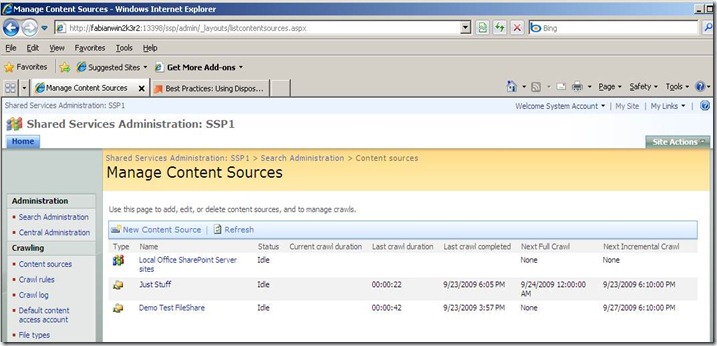
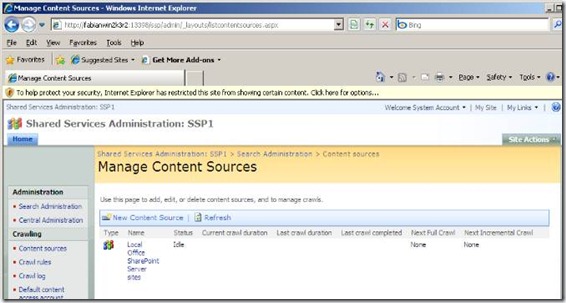
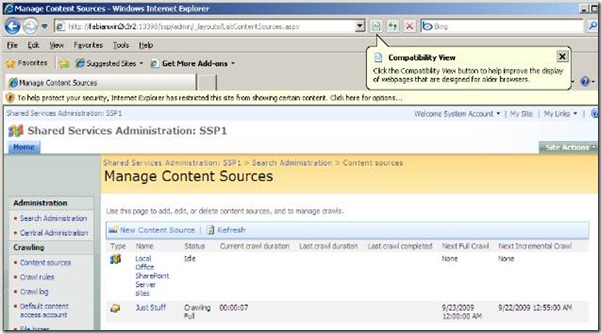
Step 3: We will verify what is in the Content Sources now and as we can see we have two currently
- Local Office SharePoint Server sites
- Just Stuff (the one we added in Part 1) via the Central Administration
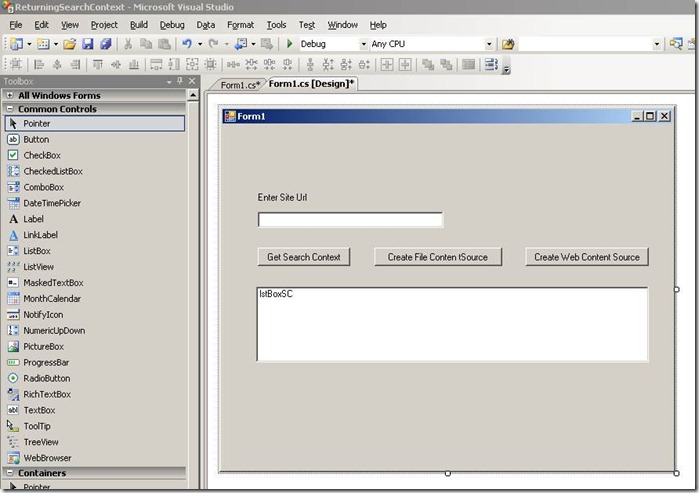
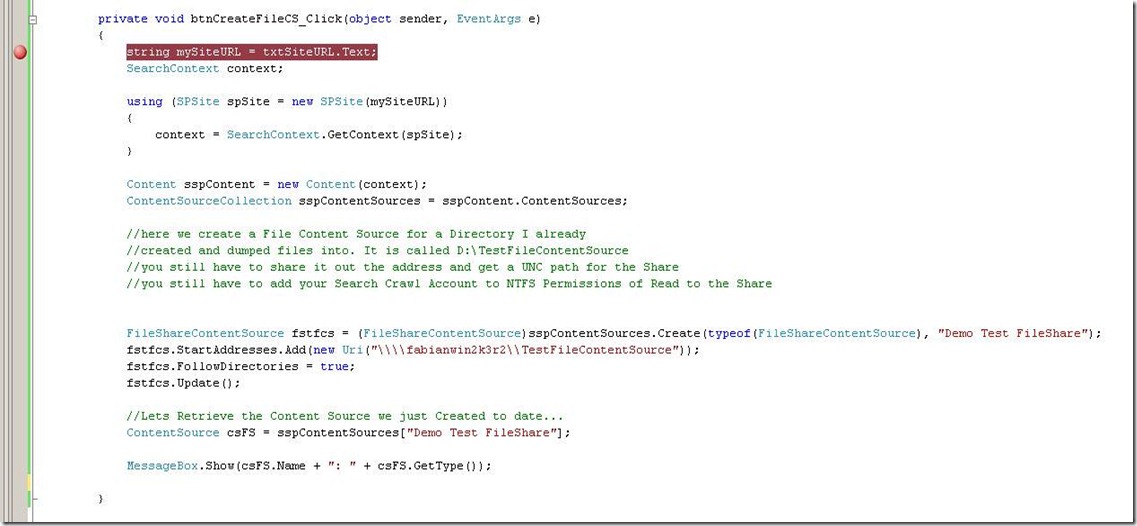
Step 4: Crack open your Visual Studio and Create a Windows Form Application. Make References to the .NET Libraries mentioned in Step 2
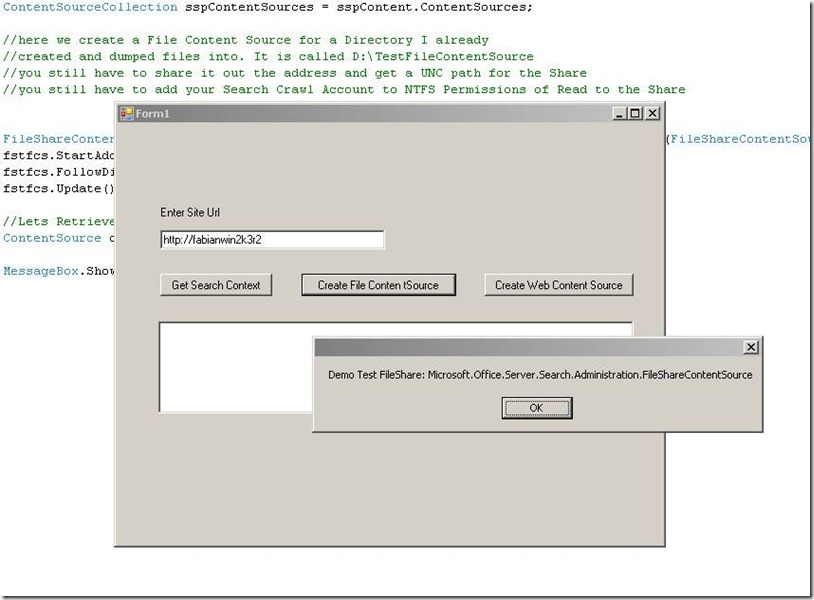
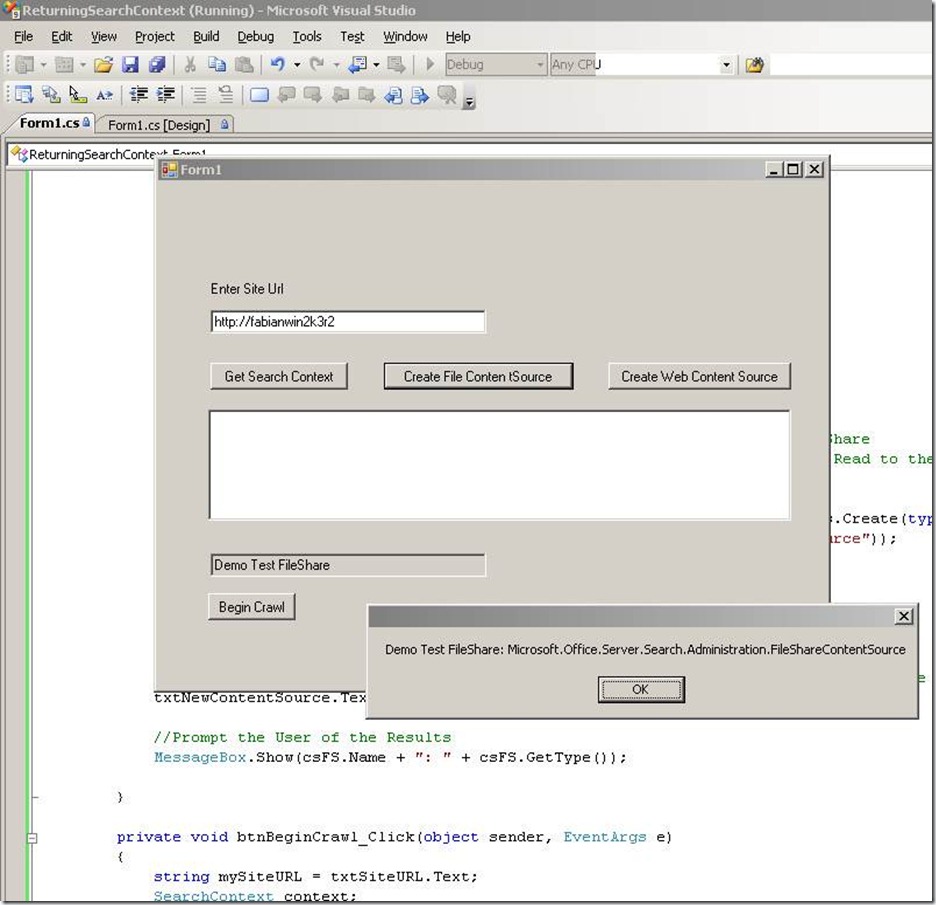
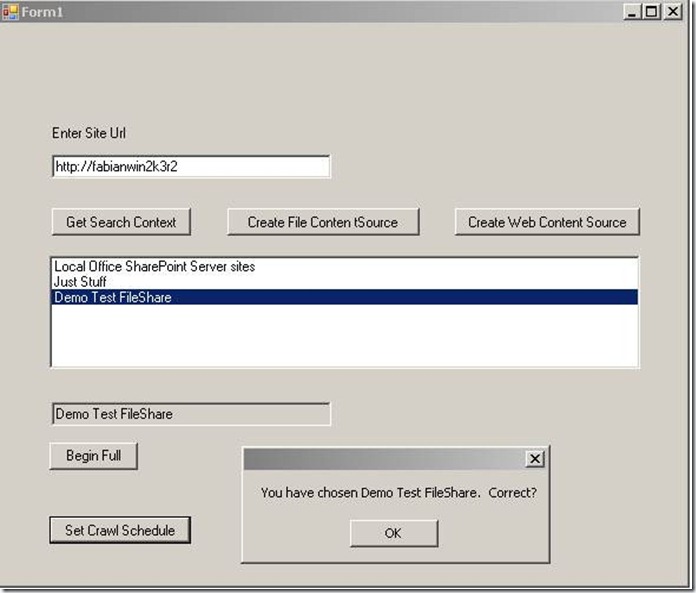
Step 5: Once you Execute the Code a Content Source is created and the Message box denotes the Name and Type. You will notice below that it is of File Type “FileShareContentSource”
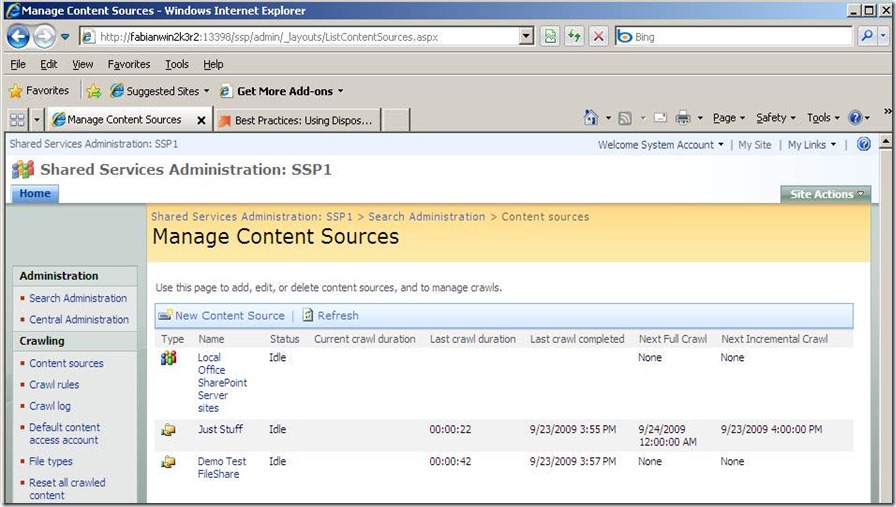
Step 6: Now we re-verify by refreshing the page and you will see “Demo Test FileShare”
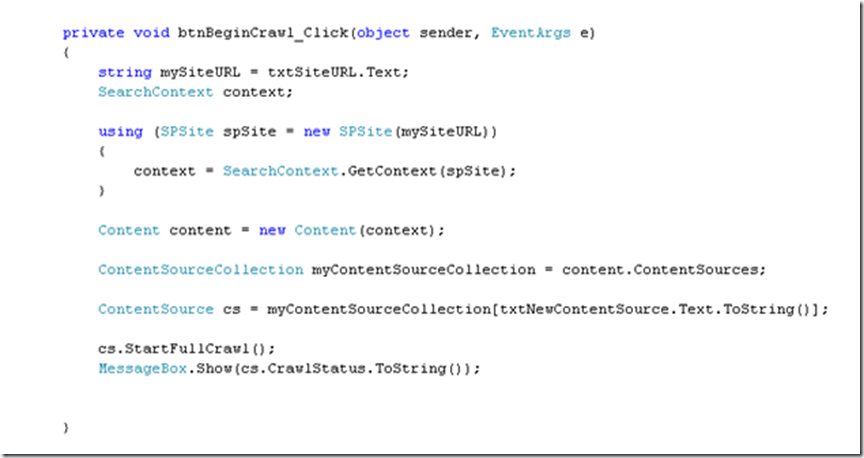
Step 7: After we complete creating the “Demo Test FileShare” Content Source. We code in a Full Crawl in the “Begin Crawl” button Click Event… see code below
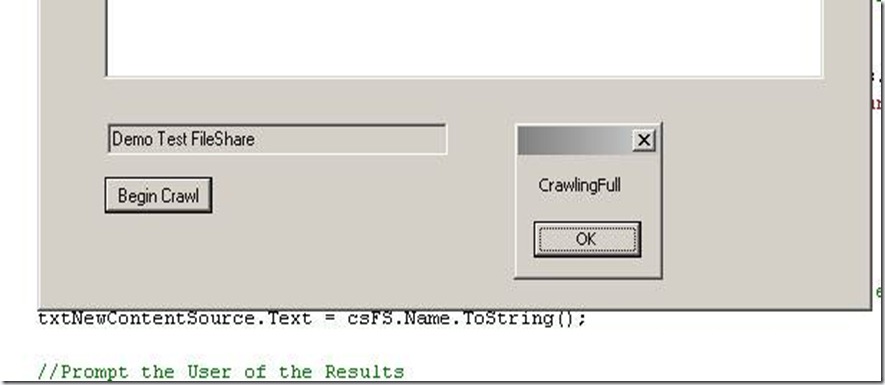
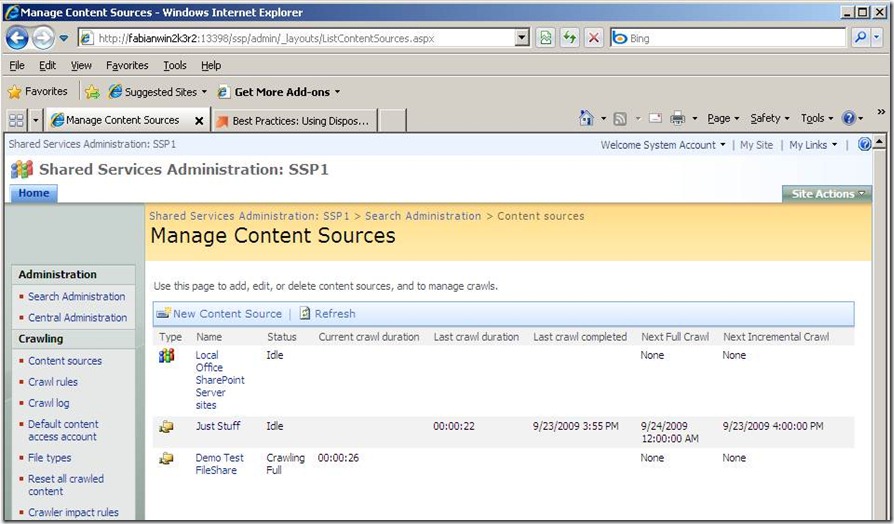
Step 8: We see from the two screen shots below the crawling has begun and the end of the crawl from our Coded Event
Step 9: Next on the list is to create a Crawl Schedule to set up a consistent crawl
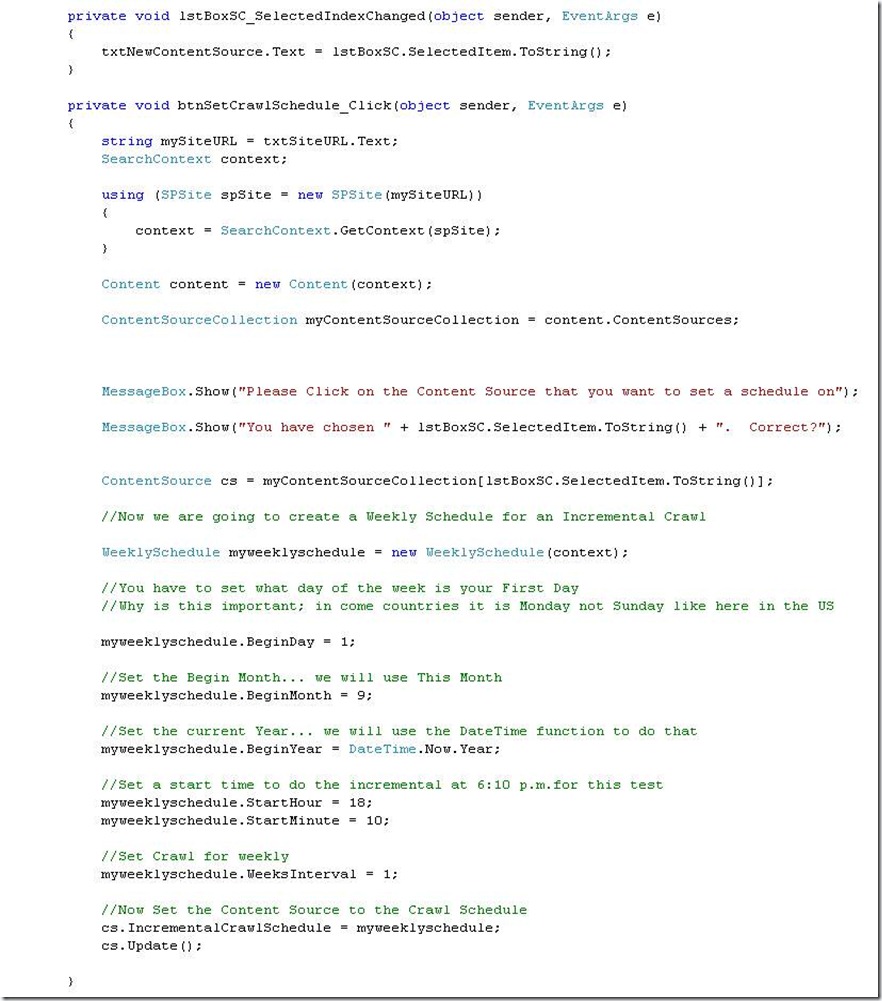
Step 10: Code used to create the Crawl Schedule. Things to point out as you will see when the crawl schedule is created is i indicated that the beginning of the week is Monday. Since today is Wednesday, the next Incremental crawl will not be till next Monday.
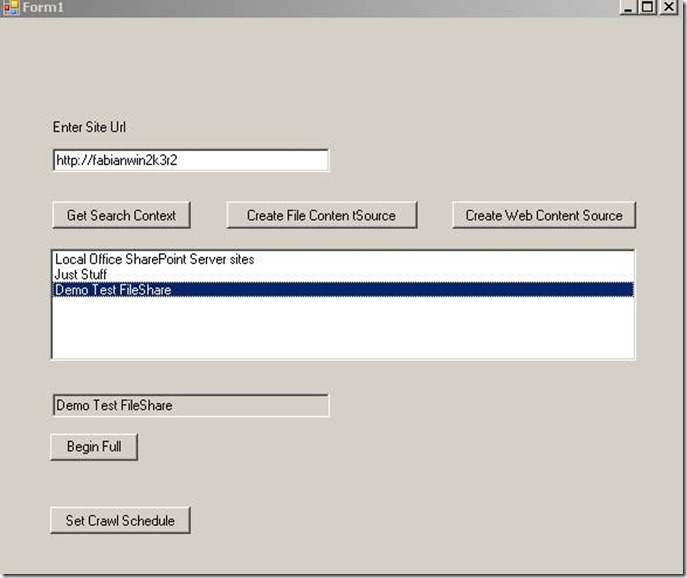
Step 11: In the code i took it a step further to re-use existing objects on the windows form. So what we have is:
- You click the Get Search Context button to iterate through the Search Context Objects (Content Sources) in the SSP
- When you click on the item in the List Box we fire off an event that we will capture and pass along to code that will create the Weekly Crawl Schedule
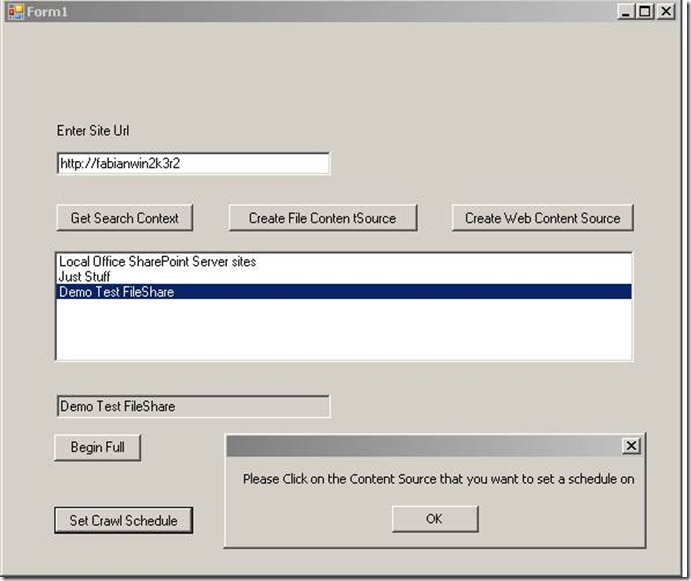
- When you click “Set Crawl Schedule” it fires the code in Step 10
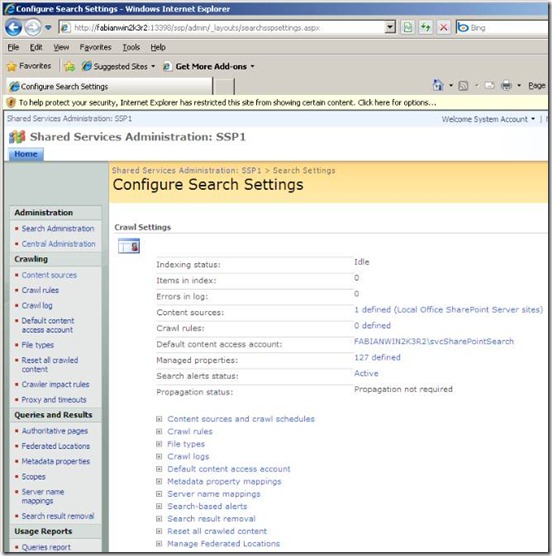
Step 12: Verify in the Search Setting Page that the Crawl Schedule is created
Have Fun with this…
How To: Create Content Sources, Search Scope and Use the MOSS Object Model for Search
Part 1 of a 5 Part Series:
Part 1: How to Setup a Content Source, Search Scope in the SSP and Consume that Scope in a Site Collection
Part 2: Coding Enterprise Search – Examining Content Sources, Scopes, etc
Part 3:
Part 4
Part 5
Scenario:
In this blog we will go about how to create a Content Source in the Shared Services Provider, we will create a File Share Content Source and a SSP Search Scope that may be consumed by Site Collection Administrators. Once we complete that we will take a look into how one could enhance their search experience by a using the MOSS Object Model and Search Objects to further customize that experience. This will be a 5 Part Series and this Part 1 will cover up to Returning a list of Content Sources from the SSP we set up in this Farm.
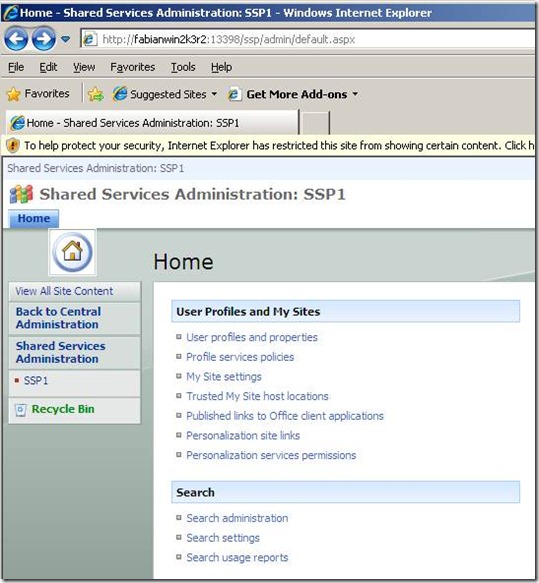
Step 1: Crack open the Central Administrator Portal and click on you Shared Service Provider (SSP) in this instance it is called SSP1
Step 2: Click on Search Settings
Step 3: Click on Content Sources and Crawl Schedule
In this instance we have the default Content Source that comes OOB which is ALL the SharePoint Sites on the Farm
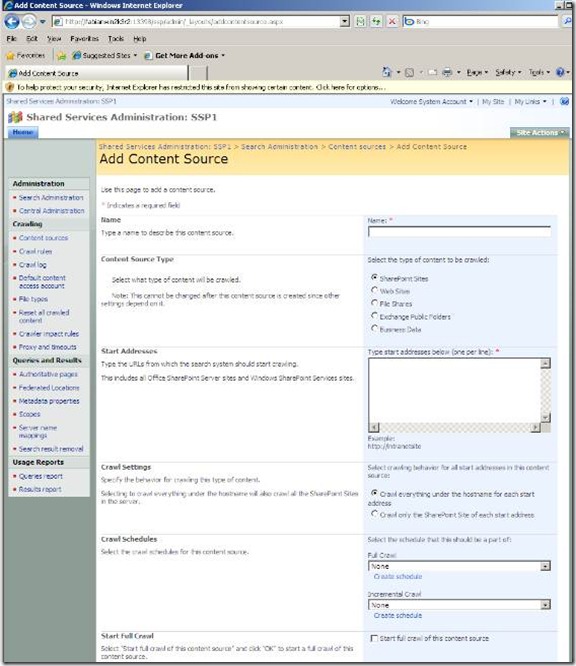
Step 4: Click “New Content Source”
You will be presented with a few options here. You may:
- create additional SharePoint Sites Content Sources
- create Web Sites Content Sources that are NOT SharePoint sites, such as Intranet Sites, Internet Sites, etc
- create File Share Content Sources;this is what we will be doing in this example. We will create a directory on the server share it out and use it as a content source. You must provide your Crawl Account read access to this directory
- create Exchange Public Folders Content Sources
- create Business Data Content Sources i.e. Line of Business (LOB) Data in the Business Data Catalog (BDC) and turning on the flag/attribute for “Making the business data searchable”
Step 5: First to do the above we need a location to Search for Step 4.3
I created a Folder called “AreaforSearchCrawl” on my hard disk. I Shared it out under the same name and ensured that the Security Permission had my Crawl Account “svcSharePointCrawl” added for “Read-Only” permission on the folder for both Security and Sharing NTFS Permission.
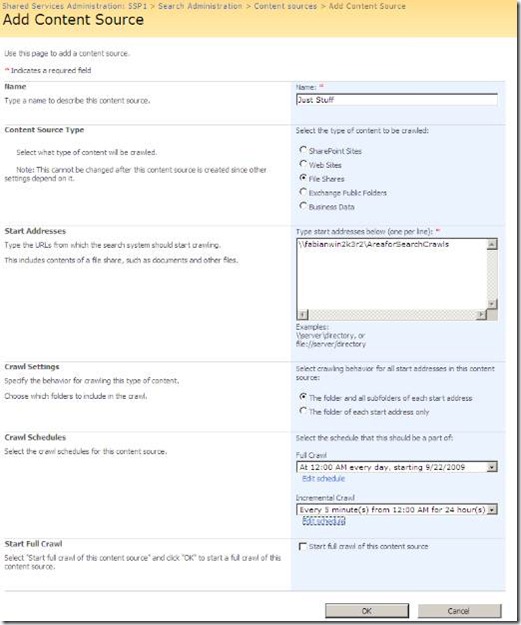
Step 6: Next we do the following:
- provide a Name for the Content Source – Just Stuff
- select what type of Content Source this is – File Share
- provide the start address for the location notice that this is a UNC path name – \\fabianw2k3r2\AreaforSearchCrawl
- and I created a Crawl Schedule for both Full and Incremental Crawls
Step 7: So now as we saw in Step 3 we have another Content Source called Just Stuff and because i selected the check box for “Start full crawl of this content source above” [i didnt screen shot that sorry], we see that the crawl is underway and we have a new Content Source called Just Stuff
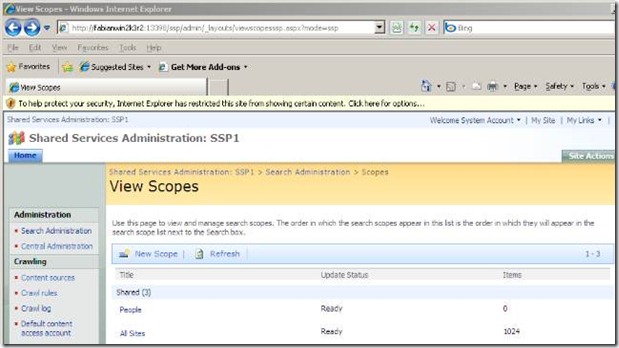
Step 8: From Search Administration click on Scopes, you will be presented with the screen below. Notice only two Scopes now (1) AllSites and (2) All People but since I have not configured my Profile Import with any Profile Source (AD, LDAP, Business Data,etc ), my People is set to 0.
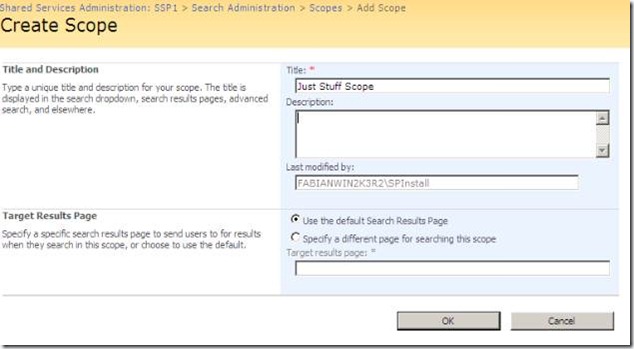
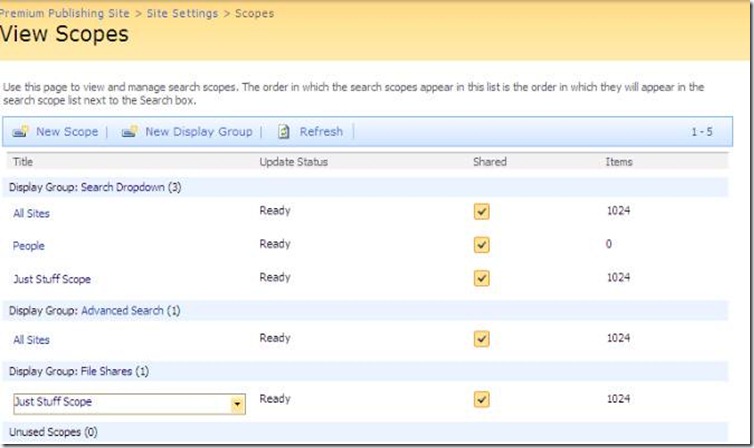
Step 9: Click “New Scope” and we will create a scope called “Just Stuff Scope” as denoted below and set the new Scope to the Content Source of the “Just Stuff” we created earlier
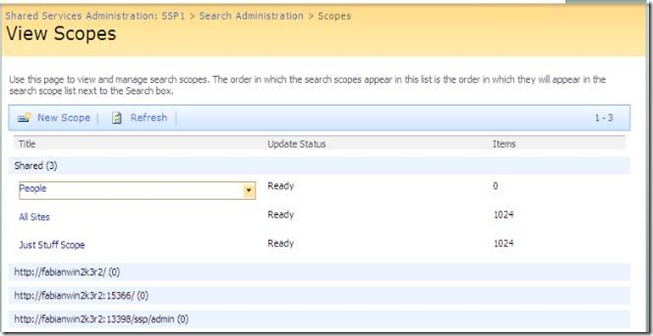
Step 10: Notice now we have three (3) Scopes below
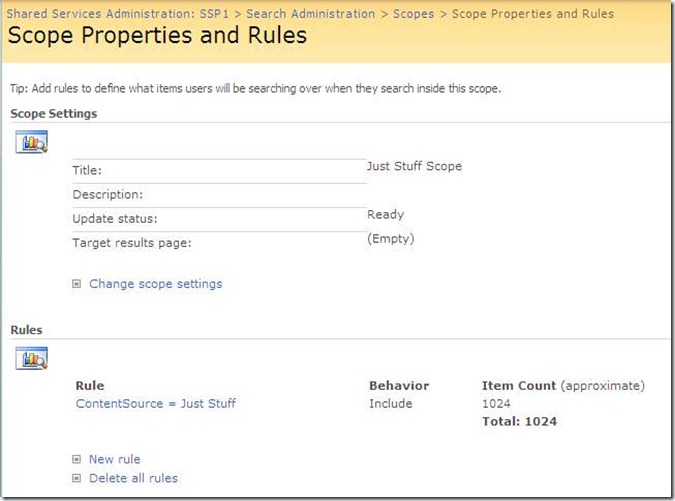
Step 11: A closer look at the Search Scope we created and notice the Rule sets the Content Source to the one we did not too long ago.
Step 12: Examining the Crawl Log we see that our crawl was successful and yielded 1157 items
Step 13: Further examination of the Crawl Log will show additional detailed information regarding exactly what was crawled and the outcome
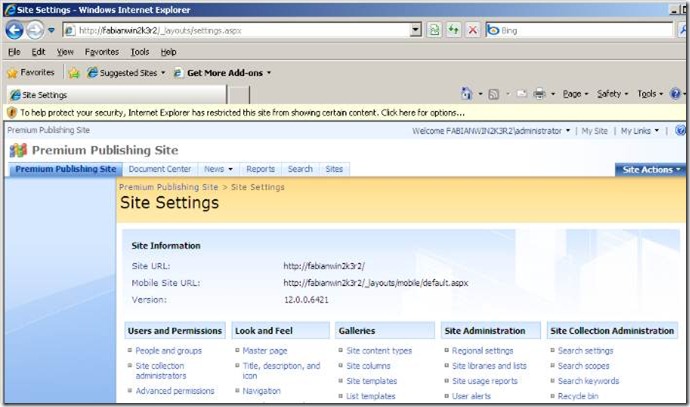
Step 14: Now we leave Central Admin (CA) and go to our Collaboration Publishing Portal and at the Top Level Site Collection we choose “Site Action”, then “Site Settings” which takes us to the screen below. Click “Search Scope” once you are there.
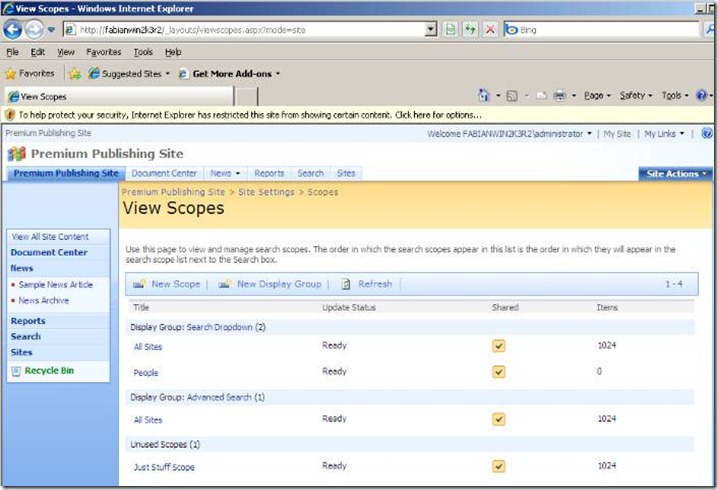
Step 15: You will notice that the Scope you created in the SSP is present but set inside the “Unused Scope” Display Group. This is because we have not yet decided where to consume that scope. We can either:
- Add it to an existing Display Group
- Create a new Display Group and Add it there.
I am going to demonstrate both options
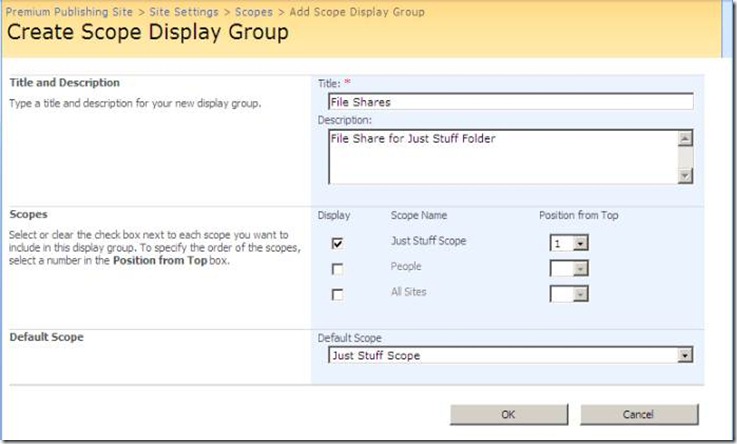
Step 16: In this step we will create a NEW Display Group and add the Just Stuff Scope to it by clicking on”New Scope” and filling out the text boxes as denoted below
Step 17: Below you will see not only that we have the new display group we created above but we also added the Search Scope to he Search Dropdown Display Group
Step 18: Once the Timer Service runs you will see that a new Scope Item called “Just Stuff Scope” is added to your options from your Search Window Pane as denoted below
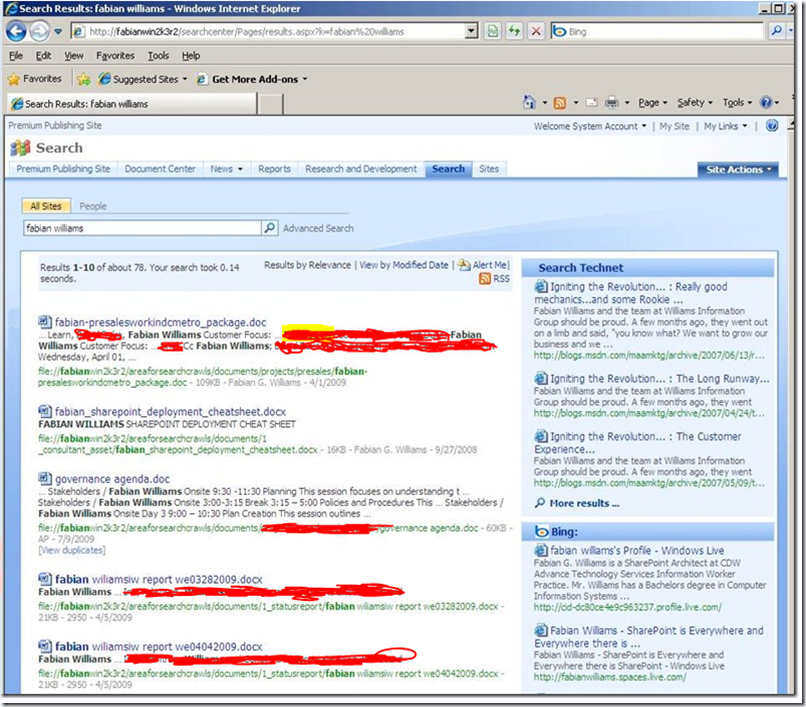
Step 19: Doing a search for “Fabian Williams” yielded the below results and notice they all come from the Content Source not the SharePoint Sites
Step Alpha: Cracking Open Visual Studio so we can use the Object Model to examine our Content Source —- TEASER —
The steps taken are below:
- I created a Standard Windows Application using C#
- Set References to the following so I can use the SharePoint Object Model [Note: these DLL’s are found in the ISAPI folder in the 12 hive]
- Microsoft.Office.SharePoint
- Microsoft.Office.Server.Search
- Microsoft.SharePoint
- Microsoft.SharePoint.Search
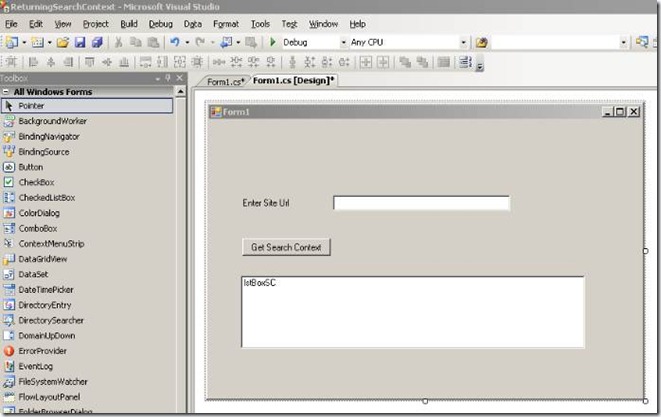
Step Bravo: Create a Generic Form
- I used a Label Control just to show what should occupy the text box
- I used a Text Box to capture the Top Level Site Collection that I want to get the SSP For
- I used a Button to execute my code
- I used a List Box to display the results
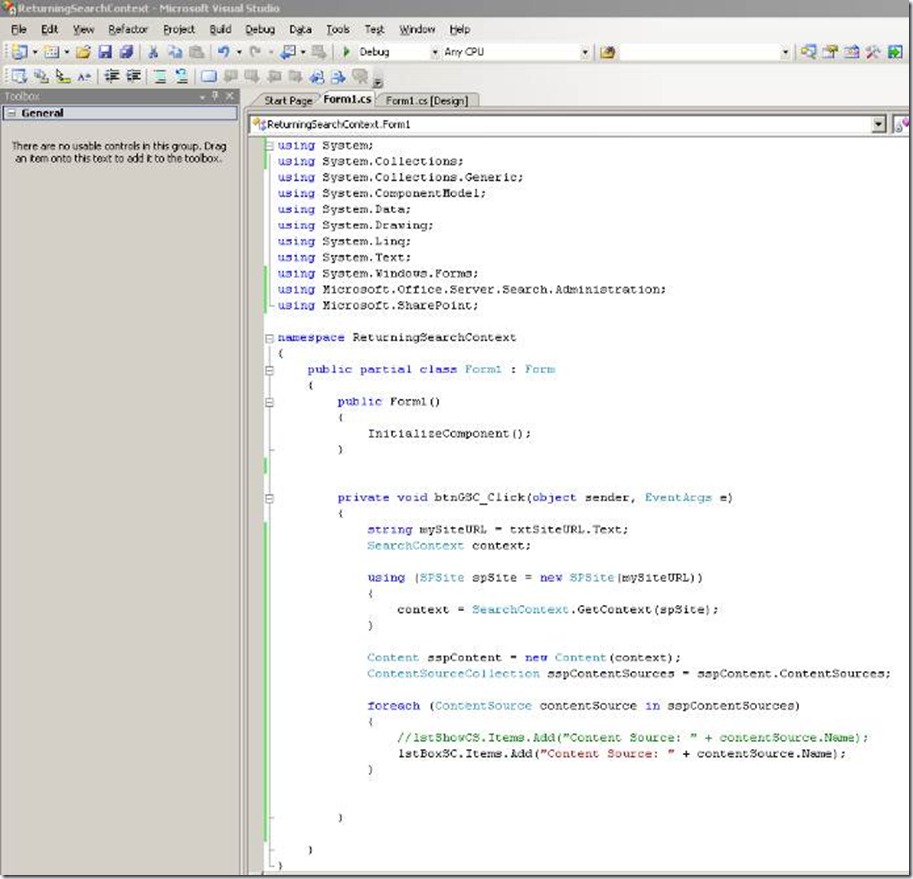
Step Charlie: Code to render the Results —- TEASER — we will go into this in Part II
Step Delta: Result from the Code —- TEASER — we will go into this in Part II
Cannot save a document or workbook to a Document Library, only to your My Documents Folder
Tested and Confirmed on the below Platform
-
Windows Server 2008 R2 x64
-
Microsoft Office SharePoint Server (MOSS) 2007 SP2
Synopsis
You have a document library and with our without Custom Site Columns, Content Types, just OOB, when you try to save a document; whether it is a Word Document, Excel Document, etc., you are unable to save to the document library nor can you even create a network shortcut to your site location. You sometimes get “Path does not exist”. This is by design….
Resolution
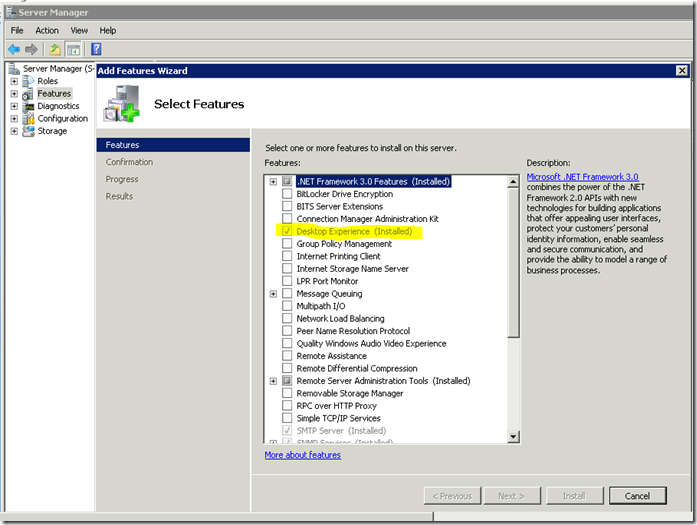
In Windows Server 2008 even R1 and certainly in R2 for x64 bit systems the WebDav protocol is built into the feature called “Desktop Experience” and you must turn it on.
Resolving SharePoint Event ID Error 6398 and 6872
Synopsis
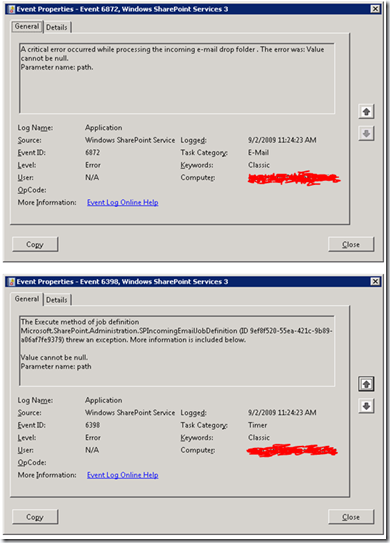
You may see the following error in your Windows Application Log after making modifications to your SharePoint Farm especially surrounding Incoming Mail Server Settings.
Resolution
This could be due in part to the following:
- Access level of these Local Groups where SMTP services is installed. The two accounts are WSS_ADMIN_WPG and WSS_WPG
- Whether or not the “Drop” folder is in the place SharePoint expects it to be in based on where your INETPUB folder is installed
The fix i have found is to
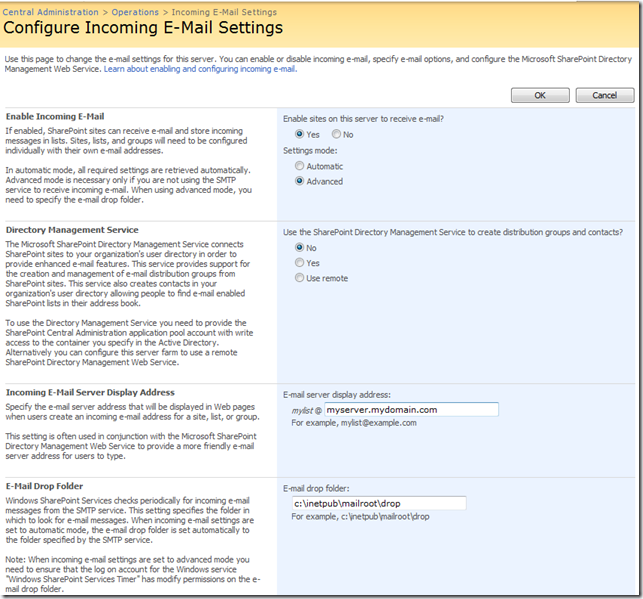
- Give WSS_ADMIN_WPG and WSS_WPG full access to the DROP folder under Mail Root under InetPub
- Select Advanced in CA under Enable Incoming Email and specify the E-Mail Drop folder explicitly
Hope this helps!
SharePoint Error Event ID: 104 – Failed to Connect to the Configuration Database
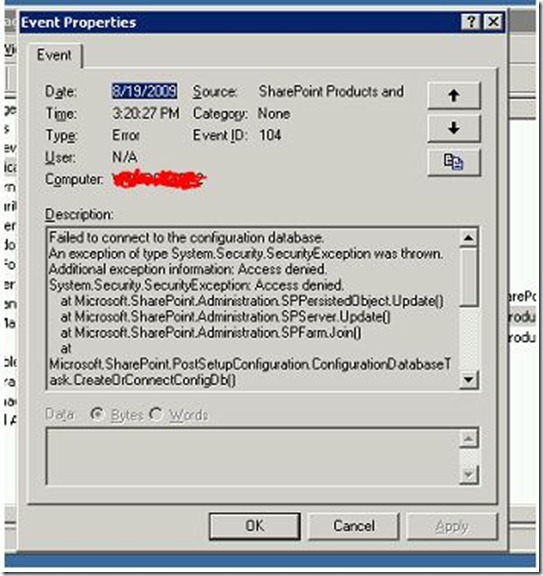
Error: When you attempt to join a member server to a Web Farm you receive the error below
Resolution: More than likely you have either WSS installed on the server trying to connect or a previous installation of WSS/MOSS with Databases still mounted
- Verify under “Add Remove Program” for WSS is not installed, In my experience there was WSS installed which was plugged into MSDE thus the Management Studio did not attach to. Go ahead and uninstall WSS and run the Products and Technology Wizard again.
A Honorable Mention from a SPTechCon Participant
On day 3 I started with “Tapping Into your Line-of-Business App with SharePoint BDC” by Fabian Williams. We went through the various parts of the application definition file, and I learned that if you set up filter descriptors in the app def file, the BDC List web part automatically gives you filter choices. We also learned that, although you should not do it, theoretically you could write custom actions (custom .net code) to write back into the database. Again, though, Fabian stressed that the BDC was meant to be a window into the LOB data, and was not for updating the LOB data.
Excerpt taken from: http://www.akgroup.com/Blogs/Lists/Posts/Post.aspx?List=184bd7d7%2D27ac%2D4790%2D98d5%2D74b3d754ee52&ID=71
by:
SPTechCon SharePoint Conference in Boston
by Susan Hernandez, June 24, 2009
I attended the SPTechCon conference in Boston from June 22 – June 24.
![clip_image006[5] clip_image006[5]](https://fabiangwilliams.files.wordpress.com/2009/09/clip_image0065_thumb.jpg?w=815&h=410)
![clip_image008[6] clip_image008[6]](https://fabiangwilliams.files.wordpress.com/2009/09/clip_image0086_thumb.jpg?w=829&h=519)
![clip_image002[5] clip_image002[5]](https://fabiangwilliams.files.wordpress.com/2009/09/clip_image0025_thumb.jpg?w=779&h=537)
![clip_image010[5] clip_image010[5]](https://fabiangwilliams.files.wordpress.com/2009/09/clip_image0105_thumb.jpg?w=698&h=494)
