SharePoint Fabian Blog-2013 in review
The WordPress.com stats helper monkeys prepared a 2013 annual report for this blog.
Here’s an excerpt:
The Louvre Museum has 8.5 million visitors per year. This blog was viewed about 100,000 times in 2013. If it were an exhibit at the Louvre Museum, it would take about 4 days for that many people to see it.
SQL Azure to EF5 to OData to BCS EL
Précis
So yesterday, I was talking with Ted Pattison as he did a Critical Path class on the Great SharePoint Adventure (GSA) and a question was asked by one of his students about using Entity Framework to connect to a Oracle Database and then make an External Content Type and External List. I suggested that you can use various Database Technologies to connect to your backend Data and serve it up. in this case I am connecting to a SQL Azure Data in this case Northwind Customers and I will be using ADO.NET Entity Framework to work with it. I will then use WCF Data Service to render this data into OData format and use that URI as a source for my External Content Type in a Visual Studio SharePoint App.
In all of this I will be targeting a SharePoint Online Instance, but this can be used for On Prem, in fact the way i do my example I would either need to have (1) set up my SPO for Hybrid Inbound or it wouldn’t work because my URI is internally hosted, I could of course (2) do a Azure Cloud Service [as i have done in previous posts] as well.
Grab the Code here: http://code.msdn.microsoft.com/SQL-Azure-to-EF5-to-OData-2b2bd362
How To
For this you will need a Visual Studio Solution with two projects. One will be for the ASP.NET project that will make the connection to the SQL Azure Data and host it, alternatively this could be a Web Role Project targeting a Cloud Service in Azure. The second project will be a SharePoint App Model Project that will create the External Content Type.
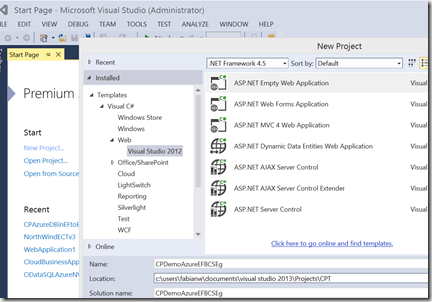
Create a ASP.NET Project
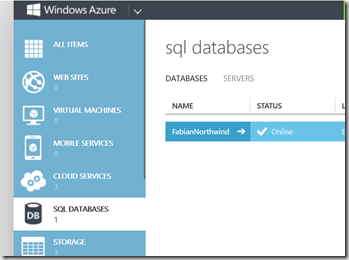
As you can see above we are creating a project of an ASP.NET Empty Web Application. So, we are also targeting a SQL Azure Database, i want to show that to you, see below
We will be targeting a Database called FabianNorthWind
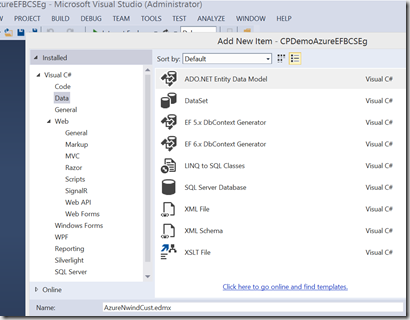
Above what you see is us adding a ADO.NET Entity Model to the project to connect to the Azure SQL Instance.
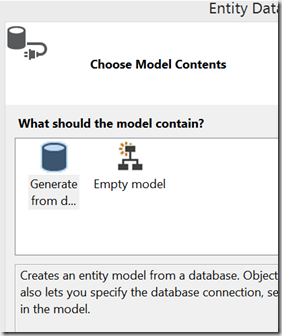
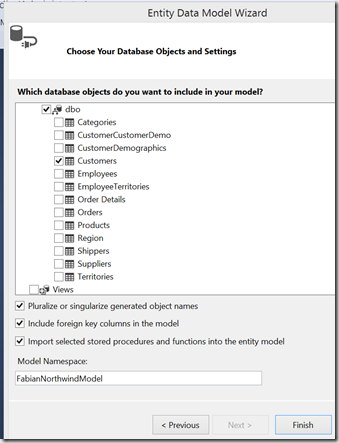
Follow the wizard through and you should see what I see here
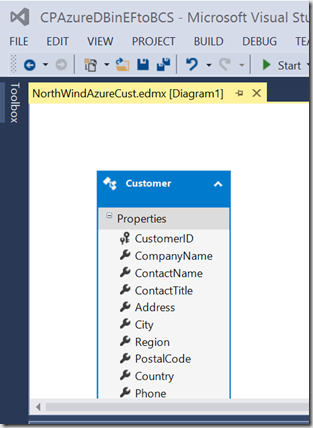
Finally you will have your EF in your project
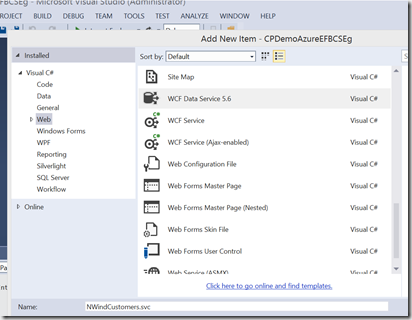
Save your project here and next we will have to add a WCF Data Service, we do this so we can have a URI to connect to that will expose the SQL Azure Data, or Oracle Data etc.
Above is our URI endpoint and it is at NWindCustomer.svc
Once you do that you will get a template helper as you see below, some of it is stubbed out for you. You will need to enter the name of your ADO.NET Entity Model as well as configure the access for the Data you want
1: //------------------------------------------------------------------------------
2: // <copyright file="WebDataService.svc.cs" company="Microsoft">
3: // Copyright (c) Microsoft Corporation. All rights reserved.
4: // </copyright>
5: //------------------------------------------------------------------------------
6: using System;
7: using System.Collections.Generic;
8: using System.Data.Services;
9: using System.Data.Services.Common;
10: using System.Linq;
11: using System.ServiceModel.Web;
12: using System.Web;
13:
14: namespace CPDemoAzureEFBCSEg
15: {
16: public class NWindCustomers : DataService< /* TODO: put your data source class name here */ >
17: {
18: // This method is called only once to initialize service-wide policies.
19: public static void InitializeService(DataServiceConfiguration config)
20: {
21: // TODO: set rules to indicate which entity sets and service operations are visible, updatable, etc.
22: // Examples:
23: // config.SetEntitySetAccessRule("MyEntityset", EntitySetRights.AllRead);
24: // config.SetServiceOperationAccessRule("MyServiceOperation", ServiceOperationRights.All);
25: config.DataServiceBehavior.MaxProtocolVersion = DataServiceProtocolVersion.V3;
26: }
27: }
28: }
As this is Demoware, I am going to use an (*) for the configuration and tell it to do “ALL” but you can be more discrete.
1: namespace CPDemoAzureEFBCSEg
2: {
3: public class NWindCustomers : DataService<FabianNorthwindEntities>
4: {
5: // This method is called only once to initialize service-wide policies.
6: public static void InitializeService(DataServiceConfiguration config)
7: {
8: // TODO: set rules to indicate which entity sets and service operations are visible, updatable, etc.
9: // Examples:
10: config.SetEntitySetAccessRule("*", EntitySetRights.All);
11: config.SetServiceOperationAccessRule("*", ServiceOperationRights.All);
12: config.DataServiceBehavior.MaxProtocolVersion = DataServiceProtocolVersion.V3;
13: }
14: }
15: }
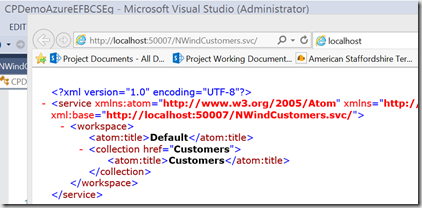
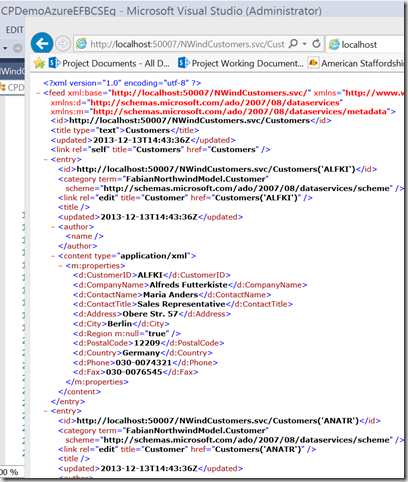
Once you have done that you can preview the .SVC file in a browser and you should see what i have below
by typing in Customers in the URI, you will get an OData result set coming back to you. Pay attention to this URI you will need it for your next project.
Create a SharePoint App Project for your ECT
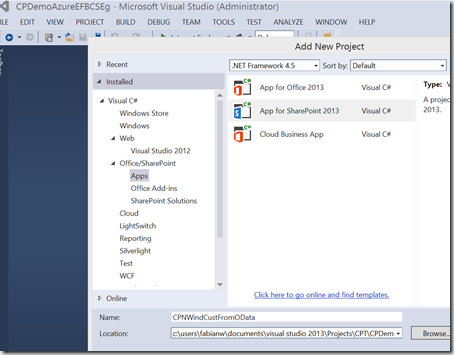
Ok, add a new project to your solution as i have below.
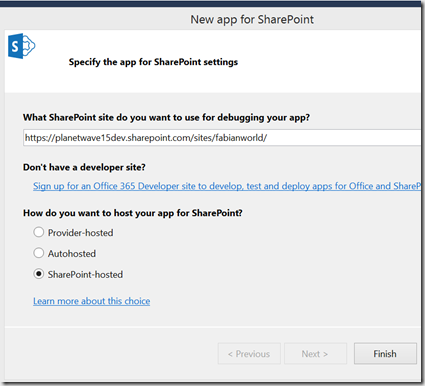
We are targeting a SPO tenant but this can be anywhere really. This is also a SharePoint Hosted App
Follow through on the wizard till your project is added.
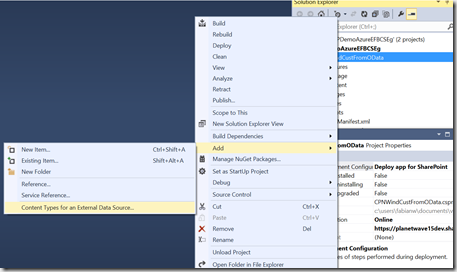
Its really easy from here on in. You add a Content Type for an External Type to the new project
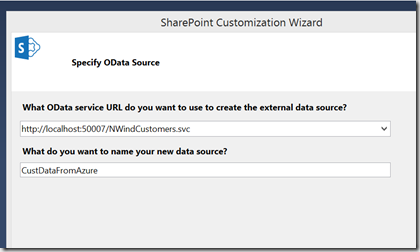
You provide the URI we have from the first project.
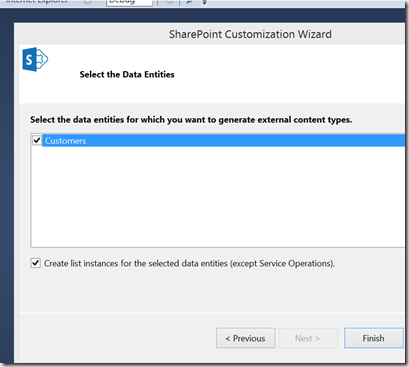
You select your Table, and leave the “check mark” for creating the List Instance so you will get your External Content Type and External List.
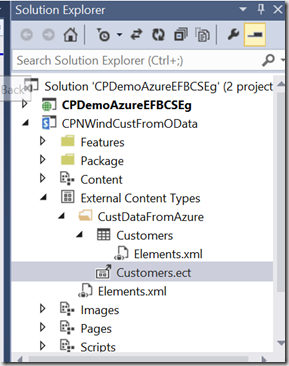
One you are done you will have an ECT and an EL as below in your project
If you open up your External Content Type you can see what I have below. At this point you can
- deploy it via visual studio
- give it to someone to upload to a farm
- deploy it manually yourself
here is the ECT below
1: <?xml version="1.0" encoding="utf-16"?>
2: <Model xmlns:xsi="http://www.w3.org/2001/XMLSchema-instance" xmlns:xsd="http://www.w3.org/2001/XMLSchema" Name="FabianNorthwindModel" xmlns="http://schemas.microsoft.com/windows/2007/BusinessDataCatalog">
3: <LobSystems>
4: <LobSystem Name="CustDataFromAzure" Type="OData">
5: <Properties>
6: <Property Name="ODataServiceMetadataUrl" Type="System.String">http://localhost:50007/NWindCustomers.svc/$metadata</Property>
7: <Property Name="ODataServiceMetadataAuthenticationMode" Type="System.String">PassThrough</Property>
8: <Property Name="ODataServicesVersion" Type="System.String">2.0</Property>
9: </Properties>
10: <AccessControlList>
11: <AccessControlEntry Principal="STS|SecurityTokenService|http://sharepoint.microsoft.com/claims/2009/08/isauthenticated|true|http://www.w3.org/2001/XMLSchema#string">
12: <Right BdcRight="Edit" />
13: <Right BdcRight="Execute" />
14: <Right BdcRight="SelectableInClients" />
15: <Right BdcRight="SetPermissions" />
16: </AccessControlEntry>
17: </AccessControlList>
18: <LobSystemInstances>
19: <LobSystemInstance Name="CustDataFromAzure">
20: <Properties>
21: <Property Name="ODataServiceUrl" Type="System.String">http://localhost:50007/NWindCustomers.svc</Property>
22: <Property Name="ODataServiceAuthenticationMode" Type="System.String">PassThrough</Property>
23: <Property Name="ODataFormat" Type="System.String">application/atom+xml</Property>
24: <Property Name="HttpHeaderSetAcceptLanguage" Type="System.Boolean">true</Property>
25: </Properties>
26: </LobSystemInstance>
27: </LobSystemInstances>
28: <Entities>
29: <Entity Name="Customers" DefaultDisplayName="Customers" Namespace="FabianNorthwindModel" Version="1.0.0.0" EstimatedInstanceCount="2000">
30: <Properties>
31: <Property Name="ExcludeFromOfflineClientForList" Type="System.String">False</Property>
32: </Properties>
33: <AccessControlList>
34: <AccessControlEntry Principal="STS|SecurityTokenService|http://sharepoint.microsoft.com/claims/2009/08/isauthenticated|true|http://www.w3.org/2001/XMLSchema#string">
35: <Right BdcRight="Edit" />
36: <Right BdcRight="Execute" />
37: <Right BdcRight="SelectableInClients" />
38: <Right BdcRight="SetPermissions" />
39: </AccessControlEntry>
40: </AccessControlList>
41: <Identifiers>
42: <Identifier Name="CustomerID" TypeName="System.String" />
43: </Identifiers>
44: <Methods>
45: <Method Name="CreateCustomer" DefaultDisplayName="Create Customer" IsStatic="false">
46: <Properties>
47: <Property Name="ODataEntityUrl" Type="System.String">/Customers</Property>
48: </Properties>
49: <AccessControlList>
50: <AccessControlEntry Principal="STS|SecurityTokenService|http://sharepoint.microsoft.com/claims/2009/08/isauthenticated|true|http://www.w3.org/2001/XMLSchema#string">
51: <Right BdcRight="Edit" />
52: <Right BdcRight="Execute" />
53: <Right BdcRight="SelectableInClients" />
54: <Right BdcRight="SetPermissions" />
55: </AccessControlEntry>
56: </AccessControlList>
57: <Parameters>
58: <Parameter Name="@CustomerID" Direction="In">
59: <TypeDescriptor Name="CustomerID" DefaultDisplayName="CustomerID" TypeName="System.String" IdentifierName="CustomerID" CreatorField="true" />
60: </Parameter>
61: <Parameter Name="@CompanyName" Direction="In">
62: <TypeDescriptor Name="CompanyName" DefaultDisplayName="CompanyName" TypeName="System.String" CreatorField="true" />
63: </Parameter>
64: <Parameter Name="@ContactName" Direction="In">
65: <TypeDescriptor Name="ContactName" DefaultDisplayName="ContactName" TypeName="System.String" CreatorField="true" />
66: </Parameter>
67: <Parameter Name="@ContactTitle" Direction="In">
68: <TypeDescriptor Name="ContactTitle" DefaultDisplayName="ContactTitle" TypeName="System.String" CreatorField="true" />
69: </Parameter>
70: <Parameter Name="@Address" Direction="In">
71: <TypeDescriptor Name="Address" DefaultDisplayName="Address" TypeName="System.String" CreatorField="true" />
72: </Parameter>
73: <Parameter Name="@City" Direction="In">
74: <TypeDescriptor Name="City" DefaultDisplayName="City" TypeName="System.String" CreatorField="true" />
75: </Parameter>
76: <Parameter Name="@Region" Direction="In">
77: <TypeDescriptor Name="Region" DefaultDisplayName="Region" TypeName="System.String" CreatorField="true" />
78: </Parameter>
79: <Parameter Name="@PostalCode" Direction="In">
80: <TypeDescriptor Name="PostalCode" DefaultDisplayName="PostalCode" TypeName="System.String" CreatorField="true" />
81: </Parameter>
82: <Parameter Name="@Country" Direction="In">
83: <TypeDescriptor Name="Country" DefaultDisplayName="Country" TypeName="System.String" CreatorField="true" />
84: </Parameter>
85: <Parameter Name="@Phone" Direction="In">
86: <TypeDescriptor Name="Phone" DefaultDisplayName="Phone" TypeName="System.String" CreatorField="true" />
87: </Parameter>
88: <Parameter Name="@Fax" Direction="In">
89: <TypeDescriptor Name="Fax" DefaultDisplayName="Fax" TypeName="System.String" CreatorField="true" />
90: </Parameter>
91: <Parameter Name="@CreateCustomer" Direction="Return">
92: <TypeDescriptor Name="CreateCustomer" DefaultDisplayName="CreateCustomer" TypeName="Microsoft.BusinessData.Runtime.DynamicType">
93: <TypeDescriptors>
94: <TypeDescriptor Name="CustomerID" DefaultDisplayName="CustomerID" TypeName="System.String" IdentifierName="CustomerID" ReadOnly="true" />
95: <TypeDescriptor Name="CompanyName" DefaultDisplayName="CompanyName" TypeName="System.String" />
96: <TypeDescriptor Name="ContactName" DefaultDisplayName="ContactName" TypeName="System.String" />
97: <TypeDescriptor Name="ContactTitle" DefaultDisplayName="ContactTitle" TypeName="System.String" />
98: <TypeDescriptor Name="Address" DefaultDisplayName="Address" TypeName="System.String" />
99: <TypeDescriptor Name="City" DefaultDisplayName="City" TypeName="System.String" />
100: <TypeDescriptor Name="Region" DefaultDisplayName="Region" TypeName="System.String" />
101: <TypeDescriptor Name="PostalCode" DefaultDisplayName="PostalCode" TypeName="System.String" />
102: <TypeDescriptor Name="Country" DefaultDisplayName="Country" TypeName="System.String" />
103: <TypeDescriptor Name="Phone" DefaultDisplayName="Phone" TypeName="System.String" />
104: <TypeDescriptor Name="Fax" DefaultDisplayName="Fax" TypeName="System.String" />
105: </TypeDescriptors>
106: </TypeDescriptor>
107: </Parameter>
108: </Parameters>
109: <MethodInstances>
110: <MethodInstance Name="CreateCustomer" Type="Creator" ReturnParameterName="@CreateCustomer" ReturnTypeDescriptorPath="CreateCustomer">
111: <AccessControlList>
112: <AccessControlEntry Principal="STS|SecurityTokenService|http://sharepoint.microsoft.com/claims/2009/08/isauthenticated|true|http://www.w3.org/2001/XMLSchema#string">
113: <Right BdcRight="Edit" />
114: <Right BdcRight="Execute" />
115: <Right BdcRight="SelectableInClients" />
116: <Right BdcRight="SetPermissions" />
117: </AccessControlEntry>
118: </AccessControlList>
119: </MethodInstance>
120: </MethodInstances>
121: </Method>
122: <Method Name="ReadSpecificCustomer" DefaultDisplayName="Read Specific Customer" IsStatic="false">
123: <Properties>
124: <Property Name="ODataEntityUrl" Type="System.String">/Customers(CustomerID='@CustomerID')</Property>
125: </Properties>
126: <AccessControlList>
127: <AccessControlEntry Principal="STS|SecurityTokenService|http://sharepoint.microsoft.com/claims/2009/08/isauthenticated|true|http://www.w3.org/2001/XMLSchema#string">
128: <Right BdcRight="Edit" />
129: <Right BdcRight="Execute" />
130: <Right BdcRight="SelectableInClients" />
131: <Right BdcRight="SetPermissions" />
132: </AccessControlEntry>
133: </AccessControlList>
134: <Parameters>
135: <Parameter Name="@CustomerID" Direction="In">
136: <TypeDescriptor Name="CustomerID" DefaultDisplayName="CustomerID" TypeName="System.String" IdentifierName="CustomerID" />
137: </Parameter>
138: <Parameter Name="@Customer" Direction="Return">
139: <TypeDescriptor Name="Customer" DefaultDisplayName="Customer" TypeName="Microsoft.BusinessData.Runtime.DynamicType">
140: <TypeDescriptors>
141: <TypeDescriptor Name="CustomerID" DefaultDisplayName="CustomerID" TypeName="System.String" IdentifierName="CustomerID" ReadOnly="true" />
142: <TypeDescriptor Name="CompanyName" DefaultDisplayName="CompanyName" TypeName="System.String">
143: <Properties>
144: <Property Name="RequiredInForms" Type="System.Boolean">true</Property>
145: </Properties>
146: </TypeDescriptor>
147: <TypeDescriptor Name="ContactName" DefaultDisplayName="ContactName" TypeName="System.String" />
148: <TypeDescriptor Name="ContactTitle" DefaultDisplayName="ContactTitle" TypeName="System.String" />
149: <TypeDescriptor Name="Address" DefaultDisplayName="Address" TypeName="System.String" />
150: <TypeDescriptor Name="City" DefaultDisplayName="City" TypeName="System.String" />
151: <TypeDescriptor Name="Region" DefaultDisplayName="Region" TypeName="System.String" />
152: <TypeDescriptor Name="PostalCode" DefaultDisplayName="PostalCode" TypeName="System.String" />
153: <TypeDescriptor Name="Country" DefaultDisplayName="Country" TypeName="System.String" />
154: <TypeDescriptor Name="Phone" DefaultDisplayName="Phone" TypeName="System.String" />
155: <TypeDescriptor Name="Fax" DefaultDisplayName="Fax" TypeName="System.String" />
156: </TypeDescriptors>
157: </TypeDescriptor>
158: </Parameter>
159: </Parameters>
160: <MethodInstances>
161: <MethodInstance Name="ReadSpecificCustomer" Type="SpecificFinder" Default="true" ReturnParameterName="@Customer" ReturnTypeDescriptorPath="Customer">
162: <AccessControlList>
163: <AccessControlEntry Principal="STS|SecurityTokenService|http://sharepoint.microsoft.com/claims/2009/08/isauthenticated|true|http://www.w3.org/2001/XMLSchema#string">
164: <Right BdcRight="Edit" />
165: <Right BdcRight="Execute" />
166: <Right BdcRight="SelectableInClients" />
167: <Right BdcRight="SetPermissions" />
168: </AccessControlEntry>
169: </AccessControlList>
170: </MethodInstance>
171: </MethodInstances>
172: </Method>
173: <Method Name="ReadAllCustomer" DefaultDisplayName="Read All Customer" IsStatic="false">
174: <Properties>
175: <Property Name="ODataEntityUrl" Type="System.String">/Customers?$top=@LimitCustomerss</Property>
176: </Properties>
177: <AccessControlList>
178: <AccessControlEntry Principal="STS|SecurityTokenService|http://sharepoint.microsoft.com/claims/2009/08/isauthenticated|true|http://www.w3.org/2001/XMLSchema#string">
179: <Right BdcRight="Edit" />
180: <Right BdcRight="Execute" />
181: <Right BdcRight="SelectableInClients" />
182: <Right BdcRight="SetPermissions" />
183: </AccessControlEntry>
184: </AccessControlList>
185: <FilterDescriptors>
186: <FilterDescriptor Name="LimitFilter" DefaultDisplayName="LimitFilter" Type="Limit" />
187: </FilterDescriptors>
188: <Parameters>
189: <Parameter Name="@LimitCustomerss" Direction="In">
190: <TypeDescriptor Name="LimitCustomerss" DefaultDisplayName="LimitCustomerss" TypeName="System.Int32" AssociatedFilter="LimitFilter">
191: <Properties>
192: <Property Name="LogicalOperatorWithPrevious" Type="System.String">None</Property>
193: <Property Name="Order" Type="System.String">0</Property>
194: </Properties>
195: <DefaultValues>
196: <DefaultValue MethodInstanceName="ReadAllCustomer" Type="System.Int32">100</DefaultValue>
197: </DefaultValues>
198: </TypeDescriptor>
199: </Parameter>
200: <Parameter Name="@Customers" Direction="Return">
201: <TypeDescriptor Name="Customers" DefaultDisplayName="Customers" TypeName="Microsoft.BusinessData.Runtime.IDynamicTypeEnumerator" IsCollection="true">
202: <TypeDescriptors>
203: <TypeDescriptor Name="Customer" DefaultDisplayName="Customer" TypeName="Microsoft.BusinessData.Runtime.DynamicType">
204: <TypeDescriptors>
205: <TypeDescriptor Name="CustomerID" DefaultDisplayName="CustomerID" TypeName="System.String" IdentifierName="CustomerID" ReadOnly="true" />
206: <TypeDescriptor Name="CompanyName" DefaultDisplayName="CompanyName" TypeName="System.String">
207: <Properties>
208: <Property Name="RequiredInForms" Type="System.Boolean">true</Property>
209: </Properties>
210: </TypeDescriptor>
211: <TypeDescriptor Name="ContactName" DefaultDisplayName="ContactName" TypeName="System.String" />
212: <TypeDescriptor Name="ContactTitle" DefaultDisplayName="ContactTitle" TypeName="System.String" />
213: <TypeDescriptor Name="Address" DefaultDisplayName="Address" TypeName="System.String" />
214: <TypeDescriptor Name="City" DefaultDisplayName="City" TypeName="System.String" />
215: <TypeDescriptor Name="Region" DefaultDisplayName="Region" TypeName="System.String" />
216: <TypeDescriptor Name="PostalCode" DefaultDisplayName="PostalCode" TypeName="System.String" />
217: <TypeDescriptor Name="Country" DefaultDisplayName="Country" TypeName="System.String" />
218: <TypeDescriptor Name="Phone" DefaultDisplayName="Phone" TypeName="System.String" />
219: <TypeDescriptor Name="Fax" DefaultDisplayName="Fax" TypeName="System.String" />
220: </TypeDescriptors>
221: </TypeDescriptor>
222: </TypeDescriptors>
223: </TypeDescriptor>
224: </Parameter>
225: </Parameters>
226: <MethodInstances>
227: <MethodInstance Name="ReadAllCustomer" Type="Finder" Default="true" ReturnParameterName="@Customers" ReturnTypeDescriptorPath="Customers">
228: <AccessControlList>
229: <AccessControlEntry Principal="STS|SecurityTokenService|http://sharepoint.microsoft.com/claims/2009/08/isauthenticated|true|http://www.w3.org/2001/XMLSchema#string">
230: <Right BdcRight="Edit" />
231: <Right BdcRight="Execute" />
232: <Right BdcRight="SelectableInClients" />
233: <Right BdcRight="SetPermissions" />
234: </AccessControlEntry>
235: </AccessControlList>
236: </MethodInstance>
237: </MethodInstances>
238: </Method>
239: <Method Name="UpdateCustomer" DefaultDisplayName="Update Customer" IsStatic="false">
240: <Properties>
241: <Property Name="ODataEntityUrl" Type="System.String">/Customers(CustomerID='@CustomerID')</Property>
242: </Properties>
243: <AccessControlList>
244: <AccessControlEntry Principal="STS|SecurityTokenService|http://sharepoint.microsoft.com/claims/2009/08/isauthenticated|true|http://www.w3.org/2001/XMLSchema#string">
245: <Right BdcRight="Edit" />
246: <Right BdcRight="Execute" />
247: <Right BdcRight="SelectableInClients" />
248: <Right BdcRight="SetPermissions" />
249: </AccessControlEntry>
250: </AccessControlList>
251: <Parameters>
252: <Parameter Name="@CustomerID" Direction="In">
253: <TypeDescriptor Name="CustomerID" DefaultDisplayName="CustomerID" TypeName="System.String" IdentifierName="CustomerID" UpdaterField="true" />
254: </Parameter>
255: <Parameter Name="@CompanyName" Direction="In">
256: <TypeDescriptor Name="CompanyName" DefaultDisplayName="CompanyName" TypeName="System.String" UpdaterField="true" />
257: </Parameter>
258: <Parameter Name="@ContactName" Direction="In">
259: <TypeDescriptor Name="ContactName" DefaultDisplayName="ContactName" TypeName="System.String" UpdaterField="true" />
260: </Parameter>
261: <Parameter Name="@ContactTitle" Direction="In">
262: <TypeDescriptor Name="ContactTitle" DefaultDisplayName="ContactTitle" TypeName="System.String" UpdaterField="true" />
263: </Parameter>
264: <Parameter Name="@Address" Direction="In">
265: <TypeDescriptor Name="Address" DefaultDisplayName="Address" TypeName="System.String" UpdaterField="true" />
266: </Parameter>
267: <Parameter Name="@City" Direction="In">
268: <TypeDescriptor Name="City" DefaultDisplayName="City" TypeName="System.String" UpdaterField="true" />
269: </Parameter>
270: <Parameter Name="@Region" Direction="In">
271: <TypeDescriptor Name="Region" DefaultDisplayName="Region" TypeName="System.String" UpdaterField="true" />
272: </Parameter>
273: <Parameter Name="@PostalCode" Direction="In">
274: <TypeDescriptor Name="PostalCode" DefaultDisplayName="PostalCode" TypeName="System.String" UpdaterField="true" />
275: </Parameter>
276: <Parameter Name="@Country" Direction="In">
277: <TypeDescriptor Name="Country" DefaultDisplayName="Country" TypeName="System.String" UpdaterField="true" />
278: </Parameter>
279: <Parameter Name="@Phone" Direction="In">
280: <TypeDescriptor Name="Phone" DefaultDisplayName="Phone" TypeName="System.String" UpdaterField="true" />
281: </Parameter>
282: <Parameter Name="@Fax" Direction="In">
283: <TypeDescriptor Name="Fax" DefaultDisplayName="Fax" TypeName="System.String" UpdaterField="true" />
284: </Parameter>
285: </Parameters>
286: <MethodInstances>
287: <MethodInstance Name="UpdateCustomer" Type="Updater">
288: <AccessControlList>
289: <AccessControlEntry Principal="STS|SecurityTokenService|http://sharepoint.microsoft.com/claims/2009/08/isauthenticated|true|http://www.w3.org/2001/XMLSchema#string">
290: <Right BdcRight="Edit" />
291: <Right BdcRight="Execute" />
292: <Right BdcRight="SelectableInClients" />
293: <Right BdcRight="SetPermissions" />
294: </AccessControlEntry>
295: </AccessControlList>
296: </MethodInstance>
297: </MethodInstances>
298: </Method>
299: <Method Name="DeleteCustomer" DefaultDisplayName="Delete Customer" IsStatic="false">
300: <Properties>
301: <Property Name="ODataEntityUrl" Type="System.String">/Customers(CustomerID='@CustomerID')</Property>
302: </Properties>
303: <AccessControlList>
304: <AccessControlEntry Principal="STS|SecurityTokenService|http://sharepoint.microsoft.com/claims/2009/08/isauthenticated|true|http://www.w3.org/2001/XMLSchema#string">
305: <Right BdcRight="Edit" />
306: <Right BdcRight="Execute" />
307: <Right BdcRight="SelectableInClients" />
308: <Right BdcRight="SetPermissions" />
309: </AccessControlEntry>
310: </AccessControlList>
311: <Parameters>
312: <Parameter Name="@CustomerID" Direction="In">
313: <TypeDescriptor Name="CustomerID" DefaultDisplayName="CustomerID" TypeName="System.String" IdentifierName="CustomerID" />
314: </Parameter>
315: </Parameters>
316: <MethodInstances>
317: <MethodInstance Name="DeleteCustomer" Type="Deleter">
318: <AccessControlList>
319: <AccessControlEntry Principal="STS|SecurityTokenService|http://sharepoint.microsoft.com/claims/2009/08/isauthenticated|true|http://www.w3.org/2001/XMLSchema#string">
320: <Right BdcRight="Edit" />
321: <Right BdcRight="Execute" />
322: <Right BdcRight="SelectableInClients" />
323: <Right BdcRight="SetPermissions" />
324: </AccessControlEntry>
325: </AccessControlList>
326: </MethodInstance>
327: </MethodInstances>
328: </Method>
329: </Methods>
330: </Entity>
331: </Entities>
332: </LobSystem>
333: </LobSystems>
334: </Model>
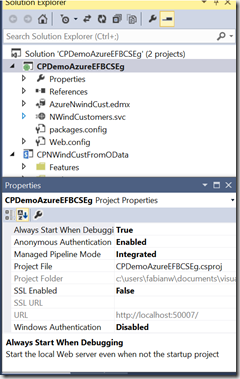
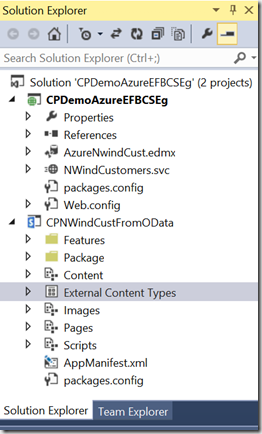
Finally your project will look as i have below and you are done
Summary
I hope this is helpful, it was rather rushed, but i promised it in a few hours turnaround.
Wrap-up on my SPSDC Workflow Session
Thanks
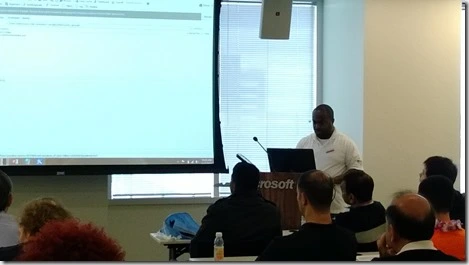
Another year and another successful even by the Organizers (Dan, Adam, Rachel) and all the Volunteers at SharePoint Saturday Washington D.C. – Reston. I was honored to be an accepted speaker and I delivered this session “The Evolution of Workflows in SharePoint 2013 – A Story about External Calls with REST & JSON”. This was truly a magnificent event with a great turn out, good mix of attendees, and they were very engaged, asked serious and deliberate questions , and didn’t even mind as yet again i go a little bit over in my Live Demos.
Appreciation
Its always great to meet face to face the folks that you interact with daily on social media in our SharePoint community, foster new relationships, maintain old ones, and Share a Pint at the end of a day where we all walk away with a bit more knowledge in this technology we all share. I was very please for all the attendees that made my session ‘standing room only’ and if any of you all have pics, please email them to me, i would really appreciate them for my blog post.
My Slide deck may be picked up here
What’s Next
Make sure to attend the inaugural #SharePoint Saturday, the one that started it all SharePoint Saturday Virginia Beach on January 11th 2014 & of course stop by my session (well after you register here) on Optimizing your SharePoint 2013 with BCS an External Data where we will discuss strategies, security and all the various models to interact with your LOB systems.
As well, I will be delivering three (3) Sessions at SharePoint Conference 2014 March 3rd through 6th 2014 (#SPC14 or @SPConf) in Vegas check out this link for my sessions.
I hope to see you there.
See oonuh latah
Wrap-up on my SharePoint BCS SPLive360 Sessions
Accolades
On October 10th 2013 i blogged Come see my three session at SPLive360 in Orlando in an effort to promote and create awareness/buzz around my delivery at the event Andrew Connell and Dan Holme put on. I have to tell you it was a fantastic event, with a slew of talented speakers, engaged and energetic audience who were involved in my session from beginning to end. I delivered 3 sessions on BCS:
- SPH14 Case Study: When Should I Use SharePoint 2013 Business Connectivity Services (BCS) and When Should I Use SharePoint 2013 Workflows to Interact with External
- SPW11 No-Code CRUD Business Connectivity Services (BCS) Solutions Using SharePoint Designer 2013
- SPW02 What’s New with SharePoint Business Connectivity Services (BCS) and OData Services
and by the third session I was able to see and count out at least 50% of the folks who attended my earlier sessions in my last session. Even with the first session being first of the day 0915 & the second and third being right after lunch, the session attendees were eager to learn and contribute their perspectives on the content delivered.
Appreciation
It is with that recognition that i would like to express thanks to the Event Co Chairs Andrew Connell and Dan Holme for accepting me to speak at this event as well as the Event Organizers SP Live 360 for putting on such a well organized and excellent event. The hotel was spectacular, the rooms and technical staff on point and always available, and overall flow was spot on.
My Slide deck was delivered to the event organizers but can also be picked up here as well.
What’s Next
If you are in the DC Metro area December 7th 2013 stop by my session (well after you register here) on Workflows using REST API, JSON and all in SharePoint Designer 2013.
As well, I will be delivering three (3) Sessions at SharePoint Conference 2014 March 3rd through 6th 2014 (#SPC14 or @SPConf) in Vegas so keep an eye on the website for times and dates.
Cheers & Irie!
See oonuh lateah
Answered: Leave request for SharePoint O365 Sample on MSDN
Précis
So, I as a cure for insomnia, decided to troll the CODE.MSDN site for questions that interested me. I found this request and figured it was something i could knock out, so i did. There was not much to go on interms of HARD requirements so i posed a question, I assumed if Im up and about, the person making the request must be up too 🙂 but alas no. So, i went ahead and did the sample as I would envision it. In fact, internally at work, we have something On Prem that is similar so this actually made it more appealing.
I can and will make this example more robust and may submit it up on the MarketPlace, I dont know, just to say that I have, but it seems something that Im sure must already be there, Ill just endeavor to make mine better 🙂
THIS CODE IS AVAILALE ON MSDN: Here
Requirements
As this is an Office 365 SharePoint Online example, you basically don’t need anything as you would for an On-Prem solution, all you need really is:
- A Office 365 SharePoint Online Site to build against
- Visual Studio [for completeness I am using 2013 but others will do]
- Your Brain & some Idle time
What this example will set out to do in this version is the following
- Permit an End User to Request Leave off Work/ Holiday/ Vacation etc.
- Send a Request for Approval to the End Users Manager/ or the person On Behalf Of
- Permit the Approver to Adjudicate the request in an Approval Workflow in SharePoint 2013
- Send a ‘Contract of Sorts” to the Requester alerting them of the decision for their acknowledgement
- Notification includes a process to Accept the decision or Appeal it
- If Approved, update a Leave/Out of Office (OOF) Calendar with the relevant information to show the person being OOF
I plan to extend this example later on to flesh out the Appeals Process, make pretty App Icon and put some more bells and whistles on it. Sexy it up so to speak 🙂
Approach
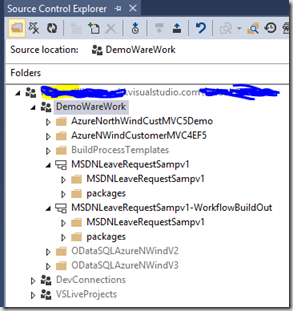
As with all my work when I set out to do a SharePoint project that involves List/Libraries, Content Types, Workflows/Event Receivers, etc, I often will create my own Site Columns, Content Types, List Definition and Instance (see post here on how to do that). Once I complete that process I typically will Branch my Project (in TFS Online) and start to Dev out the Unit of work/ Story (Agile). I created a branch for Workflows and set up folders for what I will build out now and later on
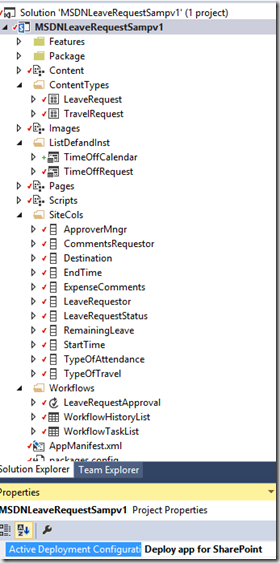
This is what my Visual Studio Solution looks like now
So, with that heavy lifting complete, lets focus on the Workflow.
Workflow Build out
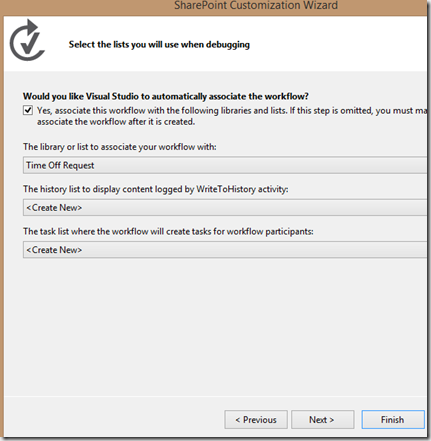
First, you add a Workflow to your project and associate it with your List, in my case I am associating it with the “TimeOffRequest” list instance. I also set the Workflow to Start on “On Item Created” and have New Task List and Workflow History List created. Basically this…
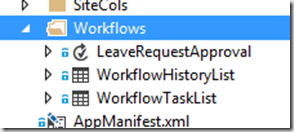
Once you do that, you will get a few assets created for you
- The Workflow itself
- A History List
- A Task List
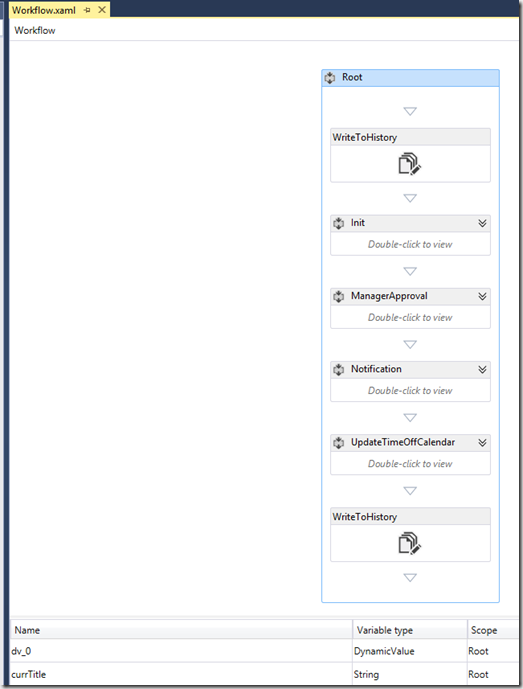
The canvas will open up and you will a blank slate with one Sequence added. What I typically do here and I learned this from Andrew Connell in all his Demos/ Preso is to change that Default Sequence to “Root” and then embed your other abstracted logic flow buckets inside that sequences as nested Sequences. I do this for the following reason
- It makes the code much more readable and manageable
- It allows you to scope your Variables etc to its own sequence
- Helps me troubleshoot if/when I get issues
So mine looks like this now
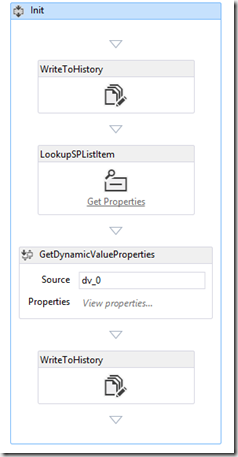
and you can drill down into each section like so
Init
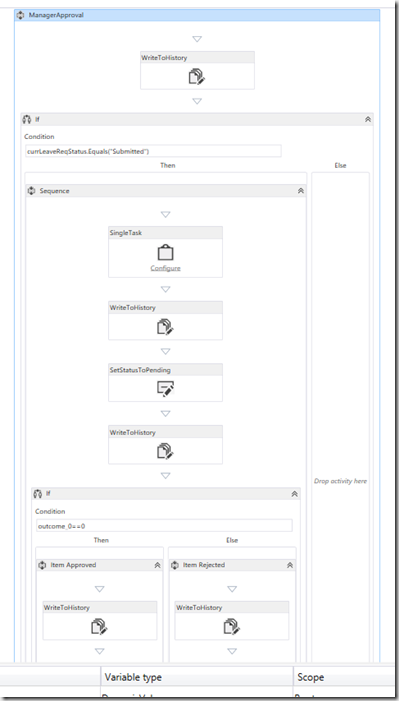
Manager Approval
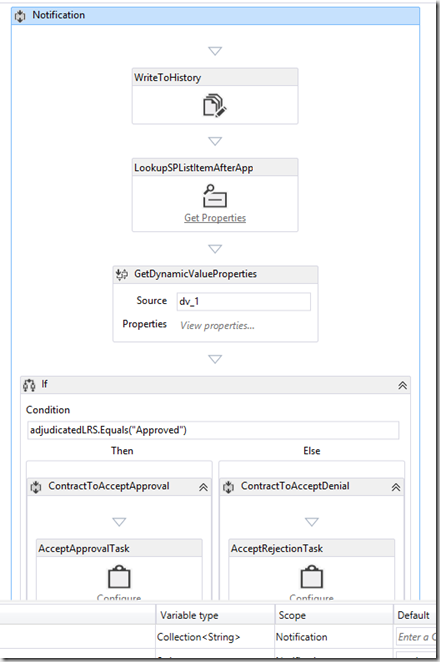
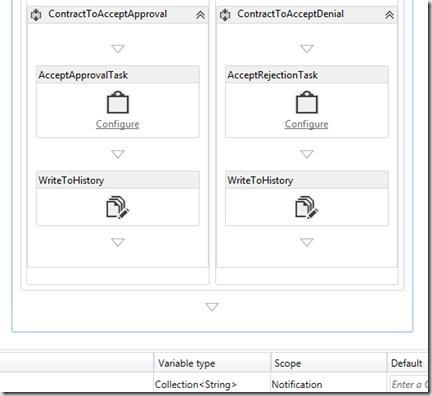
Notification
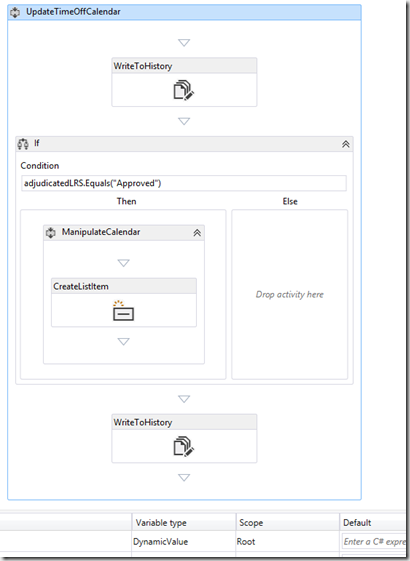
Update Time Off Calendar
Other Important items not so obvious
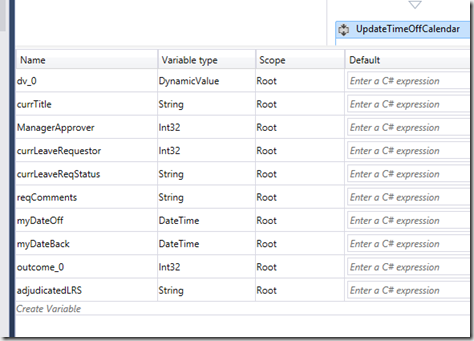
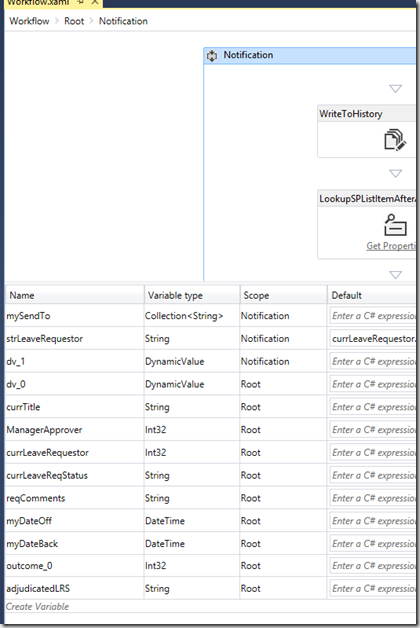
So, there are variables that are crated along the way either by an objects Return Type or Auto Loaded by Variable Declaration in SPLookupItem Object, etc
For example here is what is in scope for “Root” Sequence
here is what is inscope for “Notification”
How it Works
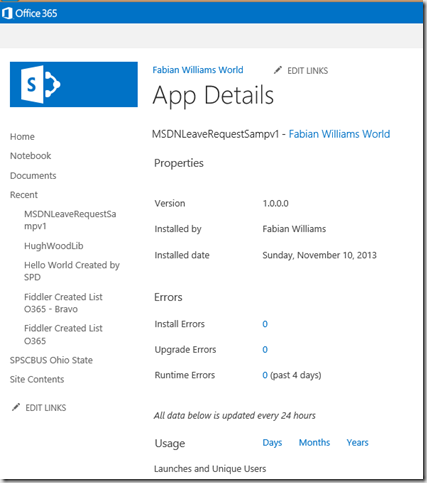
So, when you get everything working you publish it to your Office 365 SharePoint Tennant. Were I paid for this I would mock up the Default.aspx page to show links for the Time Off Request and the Calendar with an Appropriate View, but for now we will just use Different Tabs in the Browser
You will have a new App in your Site Contents like so
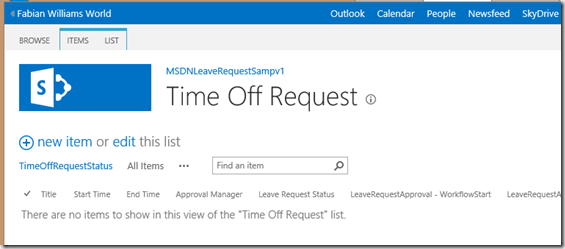
Here are the Tabs
First the TimeOffRequest
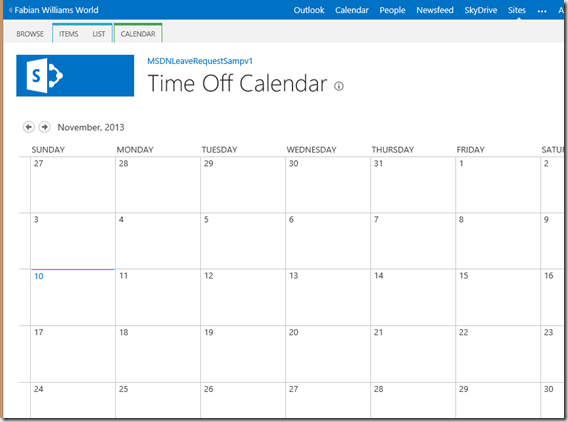
Second the TimeOffCalendar
Dev Testing
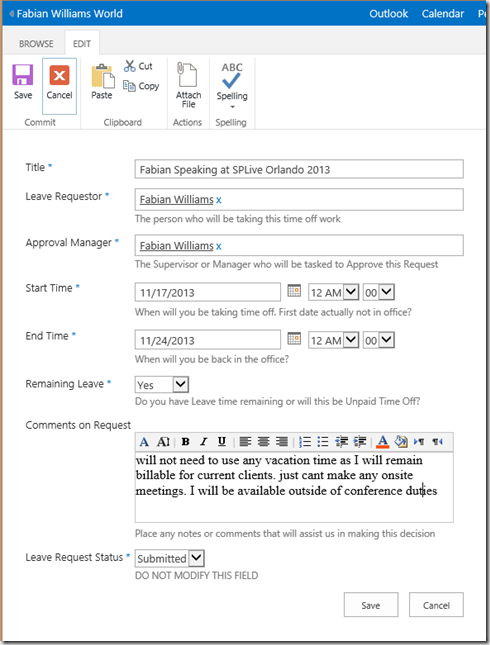
Lets put it through the paces now.
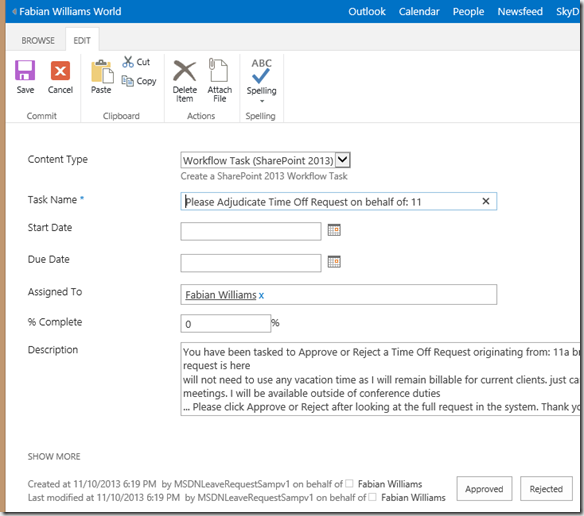
Now lets submit this Form
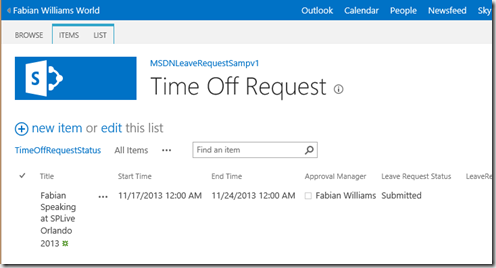
Now we have a form submitted
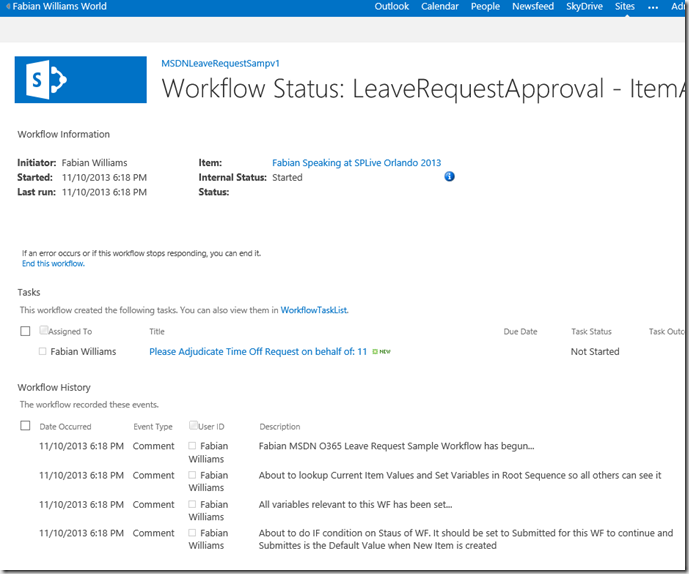
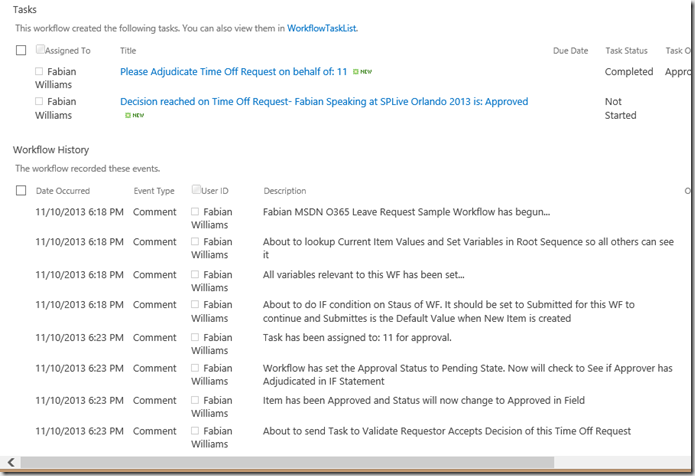
lets check the Status of the Workflow, and we can see below we have one already going
We even got an email in Outlook. for now, lets adjudicate this as Approved so it will appear in the calendar eventually
Here you can see that we have buttons to Approve and Reject and we have meaningful information in the Email Body. Finally you can see that the Workflow is running in the Context of the App Principal at the bottom, look to the left of the buttons.
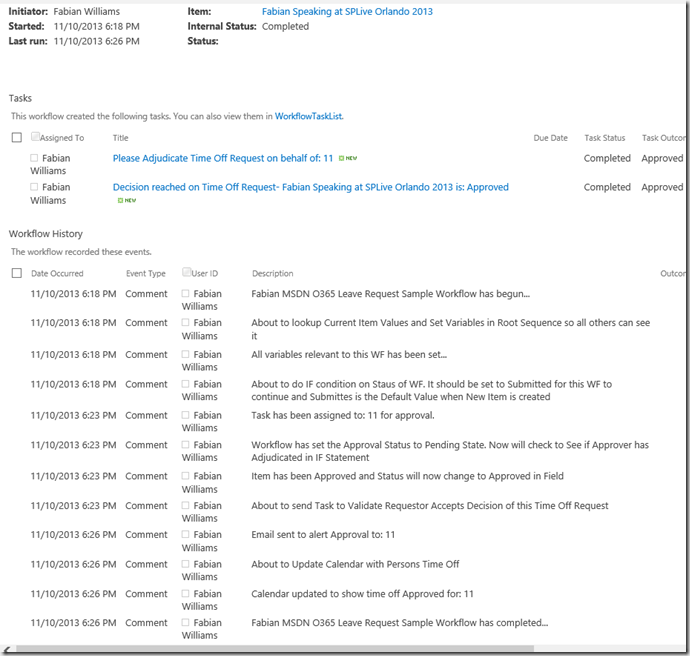
Next, and just showing the Task and History Log we can see now that a Contract has been sent back to the Requestor after the decision has been made
lets go ahead and do that, this time I wont do a screen shot as its similar to the same Approve Reject one earlier.
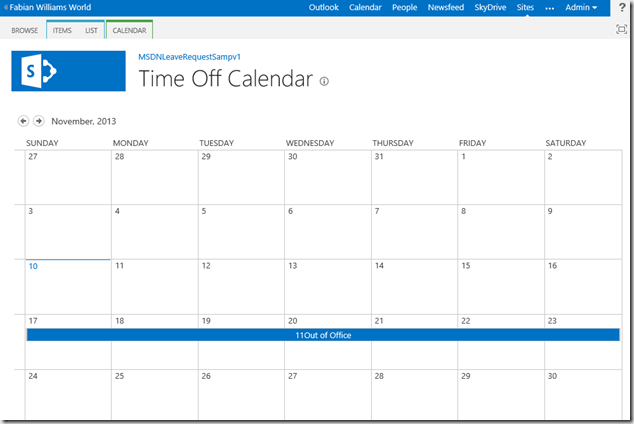
Finally you can see everything done, and the only thing we need to do is check the Calendar to see if the Item has been added.
and sure enough it is….
Summary
So, i hope this was helpful, if so, drop me a comment, share this online, etc.. hook a brotha up 🙂
Not SharePoint but cool anyway MVC5 EF6 and Azure
Précis
This post is about using Model View Controller (MVC) 5 in Visual Studio 2013 with Entity Framework 6 to do CRUD operations on a SQL Azure Database. It is definitely NOT Rocket Science but there are a few GOTCHAS to look out for and definitely a new way of doing business with MVC 5 as it relates to Controllers and Scaffolding with Entity Framework.
My code will be up at Code.MSDN.com and I will put it in Git Hub as well. I will update the post with the links when i upload them.
Create your Project
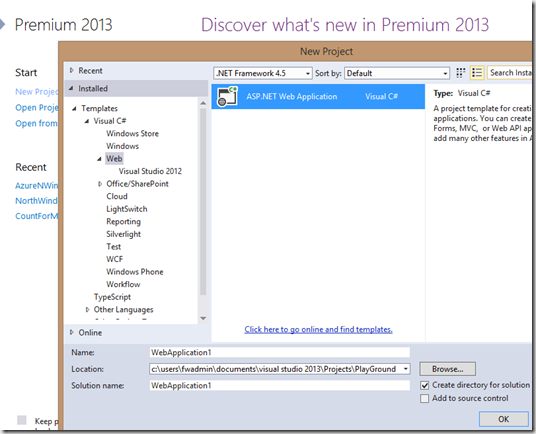
The first thing you have to do is create your project. So, Launch VS 2013 as Administrator and under the Installed Templates click Web and select the “ASP.NET Web Application”, provide a meaningful name and click OK.
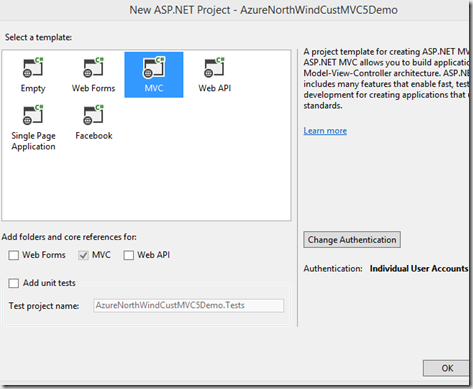
The next thing we will do is select MVC since that is what we are doing here today. As this is DEMOware we will not be doing any Unit Testing as well so unselect that if it is selected for you.
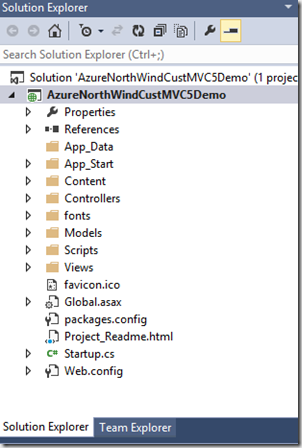
Once complete your project will look as mine does below.
and a project ReadMe that invites you to customize the Applications etc. will be there for you as well.
Create your Model
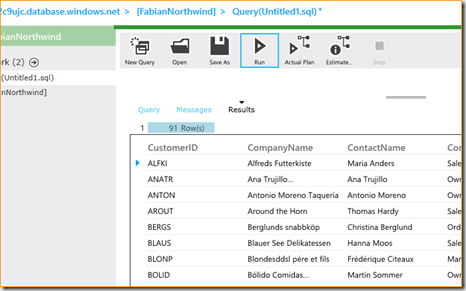
Since we are connecting to a Data Source, as in our case it is my Northwind Customers Table in SQL Azure, what we need to do is create an Object (Class) that represents that schema, so take a look at your Columns and lets add a Class file next
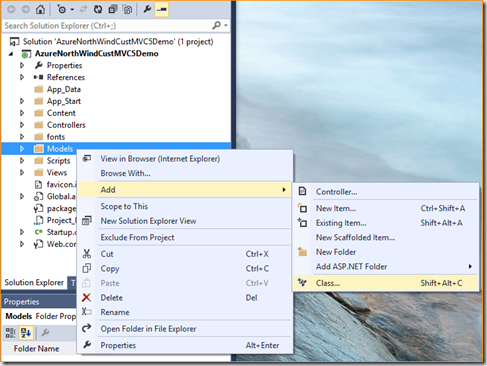
Above is the Silverlight App that ships with SQL Azure Management and you can see some of the fields we will Model. To Model the entity, you add a new Class to your Project as i have below. Right click on the Model Folder and..
Inside that Class go ahead and create the necessary auto generated properties as you can see in the code snippet below
- using System;
- using System.Collections.Generic;
- using System.Linq;
- using System.Web;
- namespace AzureNorthWindCustMVC5Demo.Models
- {
- public class Customer
- {
- public string CustomerID { get; set; }
- public string CompanyName { get; set; }
- public string ContactName { get; set; }
- public string ContactTitle { get; set; }
- public string Address { get; set; }
- public string City { get; set; }
- public string Region { get; set; }
- public string PostalCode { get; set; }
- public string Country { get; set; }
- public string Phone { get; set; }
- public string Fax { get; set; }
- }
- }
With that, you have your Model. This is a good time to Build your project so the Model will be available for the Controller which we will do next.
Create your Scaffolding and Controller
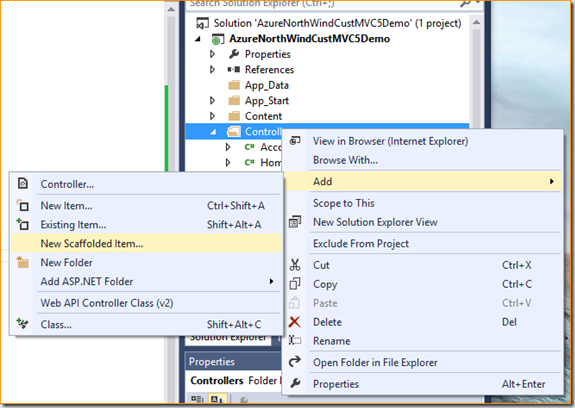
This is one place where the cool new features of MVC 5 kicks in, you can Right Click on your Controller Folder and add “New Scaffolded Item”. What does for you is literally ALL THE WORK necessary to have full CRUD capabilities back to your Data Store. It will
- Create your Context Class for your Database
- Create your Connection String in the Web.Config [which you will need to Modify anyway because by default it points local]
- Create an instance of the Context Class in your Controller so you can interact with the Database
- Create all the Views for you to
- See a List of All items returned
- See Single Item
- See Detailed Items
- Edit Items
- Delete Items
- Create a New Item
Here is how you do it, right click on the Controller Folder in your Project and do Add, New Scaffolded Item…
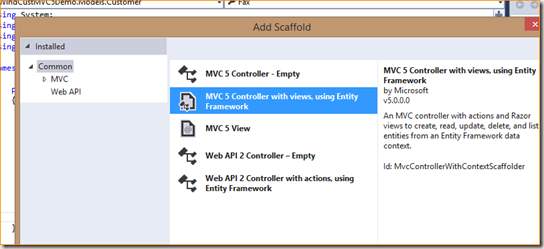
You have the option to do this manually by doing and Empty Controller but since this example is about Entity Framework 6, we will use a controller that will create all views with EF6.
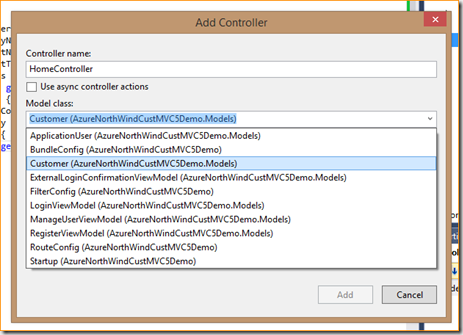
Once that is done, you can wire up the Data Connection for the Model and the Data Context. Assuming that you Build your project as i said earlier, you should see as i do a Model Class with the name you need. In my case “Customer”
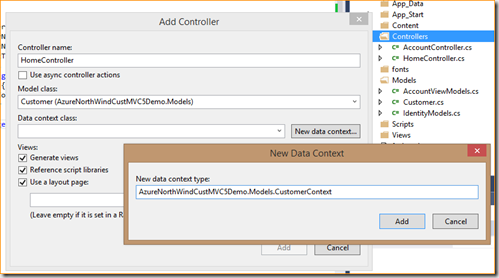
Once you have selected that you can now do “New Data Context” for it to create that Class for you as well. I named mine to be reflective of the Table i am working with. See below…
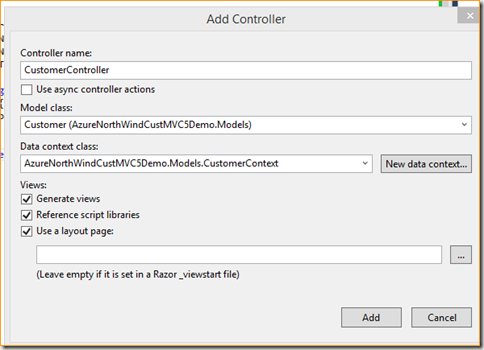
One minor change that I did. You will notice above my Controller Name “WAS” Home… but I realized that there was one already created called Home so i changed it to Customer as you can see below.
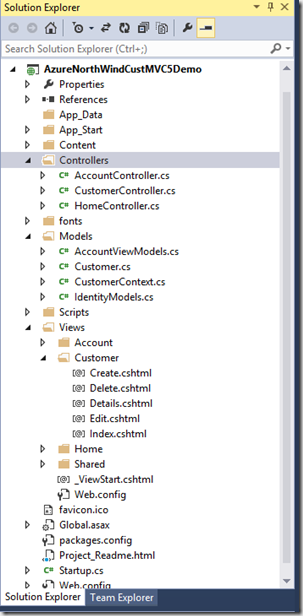
Once you click Add, you should see your project grow in leaps and bounds like mine below
GOTCHA Moment
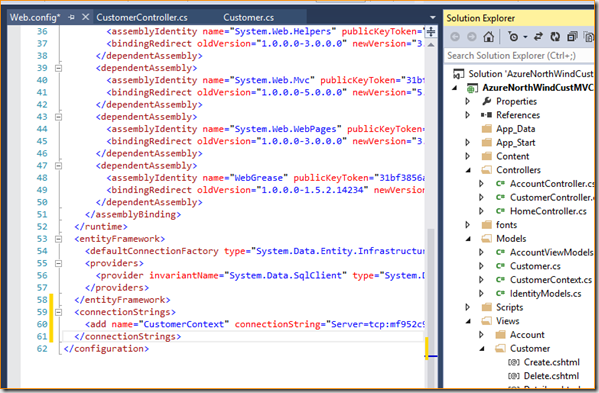
Now you may think your work is done but there are at least Two (2) more things needed to make this connect to your Azure Database. The first thing is to (1) Modify or ADD the connection string to your SQL Azure Database to the Web.Config in the root of your Project. If you dont MVC will create a NEW database for you locally in SQL Express more than likely if the Controller DOES NOT find a Connection String of its Name inside the Web.Config. That is why you will see below that the Name of MY connections string is the same name of my Context Class.
Below is a code snippet of the connection string minus my credentials.
- <entityFramework>
- <defaultConnectionFactory type="System.Data.Entity.Infrastructure.SqlConnectionFactory, EntityFramework" />
- <providers>
- <provider invariantName="System.Data.SqlClient" type="System.Data.Entity.SqlServer.SqlProviderServices, EntityFramework.SqlServer" />
- </providers>
- </entityFramework>
- <connectionStrings>
- <add name="CustomerContext" connectionString="Server=tcp:uboxhere.database.windows.net,1433;Database=FabianNorthwind;User ID=UrUserNameHere;Password=P@ssword123;Trusted_Connection=False;Encrypt=True;Connection Timeout=30" providerName="System.Data.SqlClient" />
- </connectionStrings>
- </configuration>
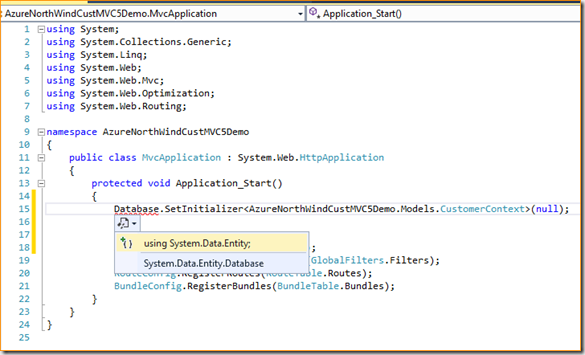
The second thing (number 2) is to Add a command to the Global.asax file which is fired upon App Launch to Initialize the Database connection I want in Azure, you will need to have a reference to the System.Data.Entity namespace as i have shown below when you do this. You will notice it is also bound to the Model Context Class.
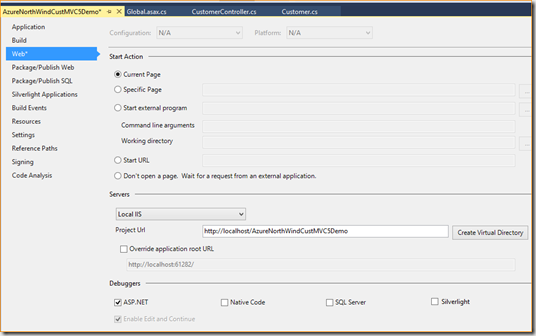
Just a little weird thing that I noticed. I did this on my Windows 8.1 box and when I tried to launch the browser to test my work, IIS Express failed with some Process number, so i changed my Build to point to my Local IIS and created a Virtual Directory as you see below.
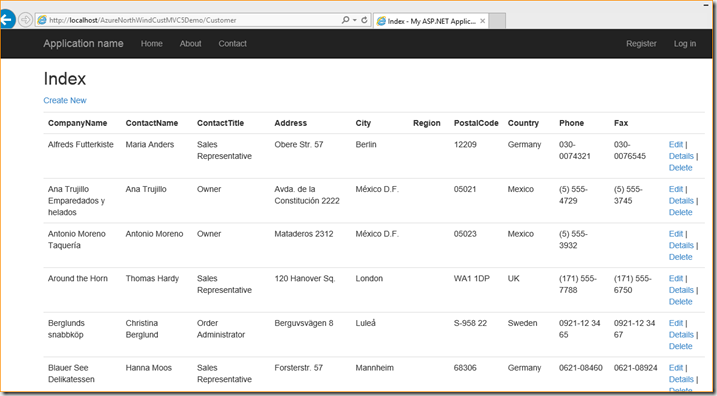
Once I did that, when I clicked F5 to test this out, it worked as expected. The circle is complete 🙂
Summary
This is really cool, i know I usually talk about SharePoint but this is equally important and you will also see a new MVC Template in SharePoint for Visual Studio 2013 in Cloud Apps, make sure you give that a try. Chaks has a good post out on it here.
My code will be up at Code.MSDN.com and I will put it in Git Hub as well. I will update the post with the links when i upload them.
For now Enjoy.. c u l8r
Weird SharePoint Service Error SPHelp Please
Scenario
Update: 10/21/2013 – I didnt bother trying to figure it out or troubleshoot it anymore, I had a HyperV ShapShot from a week earlier, i just restored it to that, and all is working.
So, I was looking at my Business Connectivity Service App in Central Admin and when I click on the Service App here
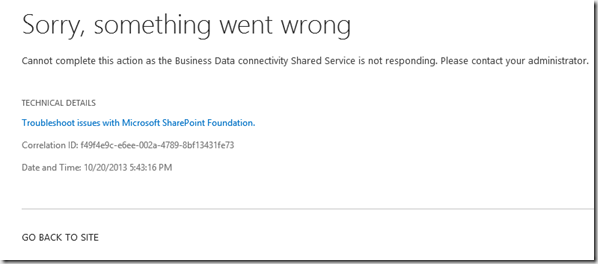
I got this error below.
taking the Correlation ID and looking in the ULS Log I saw the below of interest.
1: 10/20/2013 17:43:16.49 w3wp.exe (0x0934) 0x0DC8 SharePoint Foundation Claims Authentication af32i Unexpected SPIisWebServiceAuthorizationManager: SPIisWebServiceApplication with name 'Business Connectivity Service Application' and type 'Microsoft.SharePoint.BusinessData.SharedService.BdcServiceApplication' received request with ServiceSecurityContext whose primary identity has no valid data to check against ACL.
2: 10/20/2013 17:43:16.50 w3wp.exe (0x1DC0) 0x1474 Business Connectivity Services Business Data ajqrj Unexpected Logging unknown/unexpected client side exception: SecurityAccessDeniedException. This will cause this application server to be removed from the load balancer queue. Exception: System.ServiceModel.Security.SecurityAccessDeniedException: Access is denied. Server stack trace: at System.ServiceModel.Channels.ServiceChannel.ThrowIfFaultUnderstood(Message reply, MessageFault fault, String action, MessageVersion version, FaultConverter faultConverter) at System.ServiceModel.Channels.ServiceChannel.HandleReply(ProxyOperationRuntime operation, ProxyRpc& rpc) at System.ServiceModel.Channels.ServiceChannel.Call(String action, Boolean oneway, ProxyOperationRuntime operation, Object[] ins, Object[] outs, TimeSpan timeout) at System.ServiceModel.Channels.ServiceChannelProxy.InvokeSer... f49f4e9c-e6ee-002a-4789-8bf13431fe73
3: 10/20/2013 17:43:16.50* w3wp.exe (0x1DC0) 0x1474 Business Connectivity Services Business Data ajqrj Unexpected ...vice(IMethodCallMessage methodCall, ProxyOperationRuntime operation) at System.ServiceModel.Channels.ServiceChannelProxy.Invoke(IMessage message) Exception rethrown at [0]: at System.Runtime.Remoting.Proxies.RealProxy.HandleReturnMessage(IMessage reqMsg, IMessage retMsg) at System.Runtime.Remoting.Proxies.RealProxy.PrivateInvoke(MessageData& msgData, Int32 type) at Microsoft.SharePoint.BusinessData.SharedService.IBdcServiceApplication.GetEntitiesLikeNameAndNamespace(String wildcardedNamespace, String wildcardedName, Int32 callerCultureLcid, Boolean activeOnly, Guid partitionId) at Microsoft.SharePoint.BusinessData.SharedService.BdcServiceApplicationProxy.<>c__DisplayClassab.<GetEntitiesLikeNameAndNamespace>b__aa(IBdcServiceApplication serviceApplication) at Micr... f49f4e9c-e6ee-002a-4789-8bf13431fe73
4: 10/20/2013 17:43:16.50* w3wp.exe (0x1DC0) 0x1474 Business Connectivity Services Business Data ajqrj Unexpected ...osoft.SharePoint.BusinessData.SharedService.BdcServiceApplicationProxy.Execute[T](String operationName, UInt32 maxRunningTime, ExecuteDelegate`1 operation, Boolean performCanaryCheck, Boolean isChannelThatDelegatesIdentity) f49f4e9c-e6ee-002a-4789-8bf13431fe73
5: 10/20/2013 17:43:16.50 w3wp.exe (0x1DC0) 0x1474 Business Connectivity Services Business Data afoqa Monitorable Exception thrown in method ViewBDCApplication.InitializeEntityView. Exception type is System.ServiceModel.Security.SecurityAccessDeniedException. The error message is An error occurred. Administrators, see the server log for more information. f49f4e9c-e6ee-002a-4789-8bf13431fe73
6: 10/20/2013 17:43:16.50 w3wp.exe (0x1DC0) 0x1474 Business Connectivity Services Business Data afoqb Unexpected Inner exception 1: f49f4e9c-e6ee-002a-4789-8bf13431fe73
7: 10/20/2013 17:43:16.50 w3wp.exe (0x1DC0) 0x1474 Business Connectivity Services Business Data afoqc Unexpected System.ServiceModel.Security.SecurityAccessDeniedException: An error occurred. Administrators, see the server log for more information. at Microsoft.SharePoint.BusinessData.SharedService.BdcServiceApplicationProxy.Execute[T](String operationName, UInt32 maxRunningTime, ExecuteDelegate`1 operation, Boolean performCanaryCheck, Boolean isChannelThatDelegatesIdentity) at Microsoft.SharePoint.BusinessData.SharedService.BdcServiceApplicationProxy.GetEntitiesLikeNameAndNamespace(String wildcardedNamespace, String wildcardedName, Int32 callerCultureLcid, Boolean activeOnly, Guid partitionId) at Microsoft.SharePoint.BusinessData.Administration.EntityCollection.EnsureEntities() at Microsoft.SharePoint.BusinessData.Administration.EntityCollection.GetEnumerator() at Microsoft.Share... f49f4e9c-e6ee-002a-4789-8bf13431fe73
8: 10/20/2013 17:43:16.50* w3wp.exe (0x1DC0) 0x1474 Business Connectivity Services Business Data afoqc Unexpected ...Point.ApplicationPages.ViewBDCApplication.FillTableWithEntities(DataTable entitiesTable, IEnumerable`1 entities) at Microsoft.SharePoint.ApplicationPages.ViewBDCApplication.InitializeEntityView() f49f4e9c-e6ee-002a-4789-8bf13431fe73
Now, what I found ODD is that…
- I can still use ALL the External Content Types
- I have and ALL my External Lists are working
But I cannot administer the Service in Central Administration.
What I have looked at and Tried
I have checked the amount of RAM i have on my VM…
I have started and stopped IIS by doing an IIS RESET, Ive also even bounced the box completely
I have tried creating a new Service App of the same type, it Created correctly, but got the same Error when I clicked on it. I named it different and created a separate DB.
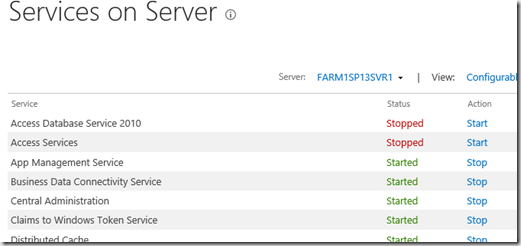
Ive gone into Services on Server and Stopped the service and then Restarted it. No dice.
Thank for any Comments and Suggestions in Advance
I really appreciate you looking at this. Ive used all my DEV Magic 🙂
Why it pays to have Smart Friends to Encourage you
Why write this blog post?
Sure its late and YES I could be rotting my brain away on the Idiot Box, but what started off as a Taunt by Ram turned out to consume my life for 2 days straight but with useful results, challenges that were overcome, and a better appreciation for not just Cloud, but the integration of Cloud and On-Prem using Windows Azure. Let me tell you what I did, and how easy it was… in the end, plus the real implications of it.
First a little history – Pre Taunt
So, as I prepare for my sessions at #SPLive in Orlando in 3 weeks, I wanted to knock out a few Demos and make sure that I could showcase just about anything anyone asked of me based on the Session Abstract/Topic. In furtherance of that, I decided to do the following, build out solutions employing
SharePoint Designer 2013
- External Content Type using a Native SQL Data Connection
- External Content Type using an On-Prem (i.e. Hosted on one of my Dev Rig VMs) Windows Communications Foundation [WCF] Data Connection – JSON enabled
- External Content Type using a .NET Assembly (built on my Visual Studio 2012, Deployed as a Farm Solution to my On-Prem SP2013) Data Connection
- Workflow using the same On-Prem WCF above in my On-Prem Farm
Visual Studio 2012
- A Locally IIS hosted WCF Service Library that exposes Northwind data from a Local SQL Server 2012 Box
- A Locally IIS hosted OData Service Endpoint that exposes Northwind data from a Local SQL Server 2012 Box
- External Content Type built as a .NET Assembly to be deployed to my ON-Prem SharePoint 2013 Farm
- External Content Type AND External List SharePoint 2013 App built as an OData Sourced Application deployed to my ON-Prem SharePoint 2013 Farm
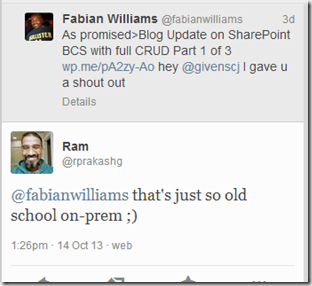
For every Instance of the WCF and the App Model External Content Type, I also targeted my Office 365 Tennant to surface the Data as well. I was pretty satisfied with myself until my good friend sent this tweet, and I know it was in jest…
but… I took it as a challenge and, I rarely back down from a challenge 🙂 so, since I have a MSDN subscription, there was “really” nothing holding me back besides my inexperience creating Azure Web Roles, which is what you need to do in order to have the requisite Data Access Points (URI) to create External Content Types and potentially Workflows.
What Next you say…
So, with a little research on Google scratch that, I mean Bing, I found a few MSDN, and TechNet blogs on how to create Web Roles, although not many of them “accurately” showed you how to use Visual Studio to DEPLOY your solution back to Azure. Anyway, it was surprisingly easy, although initially it was somewhat intimidating and i did get snagged on a GOTCHA which i will blog about later when doing a ASP.NET Web Role where it requires you to lower your version of the System.Data.Client assembly from 5.0 to 4.something in order for it work in Azure, i say that because it worked perfectly when I debugged it locally on my Visual Studio IIS. I also had to create an Azure SQL Instance and used a script I downloaded from CodePlex to restore a Northwind Database to my Azure SQL Instance and then I set up firewall rules to allow me to access it over the internet.
But with quick turn around and because i could just Refactor my original On-Prem code logic, I was able to create the following
Visual Studio 2012
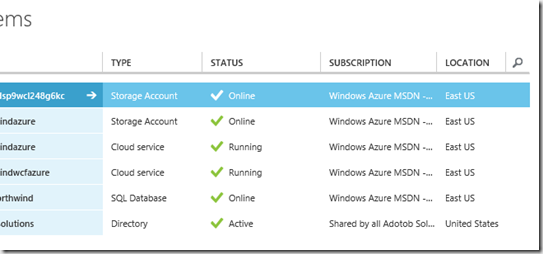
- Azure ASP.NET Web Role that published as a Cloud Service which used OData via ADO.NET Entity Framework to get a Cloud based URI that i can do CRUD operations on
- Azure WCF Web Role that published as a Cloud Service which used WCF via ADO.NET Entity Framework to get a Cloud based URI that i can do CRUD operations on as well
Now I can really Mix and Match, I can
- Use Azure (Cloud) Hosted Data via an ON-Prem WCF or OData End Point and surface that information both on my ON-Prem SharePoint or my Office 365 Instance
- Use Azure (Cloud) Hosted Data via an Azure Cloud Service WCF or OData End Point and surface that information both on my ON-Prem SharePoint or my Office 365 Instance
- Plus everything I had when I started off
The takeaway here is that with very little investments in time and effort I extended my solution to a “MODERN” approach. I had Cloud in the sentence 🙂
Other Positive Implications
So, what made this so easy for me was I signed up for TFS Online here http://tfs.visualstudio.com/en-us/tfs-welcome.aspx and EVEN WITHOUT a MSDN Subscription you can sign up for FREE and get 5 accounts in one instance.
What I think is GOLD is…
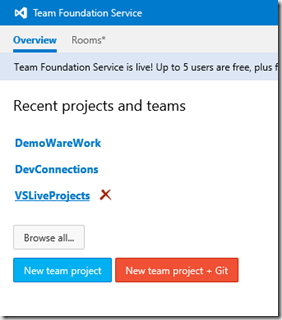
- You have a place to store all your CODE/ Work and before you ask, it supports different formats (see image below)
- Your Code/Work is accessible from Anywhere you have an Internet Connection now
- You can reliably share your Code/Work with anyone now, rather than Zipping it up and Email it
- Need Help with some of you work… Invite people as smart or smarter than you to review our code, many hands make light load 🙂
- Most beneficial of all is that you can configure Continual Integration. I know my good friend Jeremy Thake always talk about Application Lifecycle Management (ALM) and you can employ some of those techniques from Azure through TFS Online and your Visual Studio with multiple Team Member… and guess what… FOR FREE
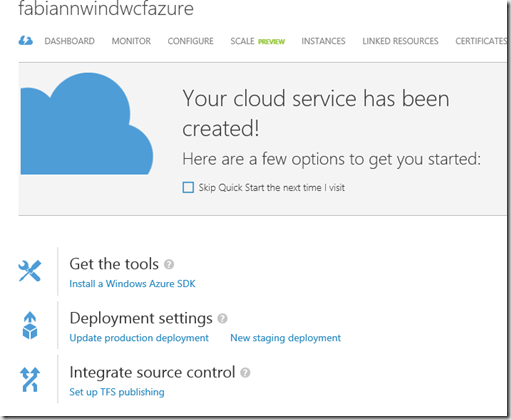
So that’s all I have to say, I guess we really Paid It Forward RAM, you encouraged me to do this, I in turn, documented my efforts and hope that someone else can take it from here.
Cheers all, have a great night. Oh yeah, VS 2013 is out now. GO get it.
Part 2 of 3-Blog Update on SharePoint BCS with full CRUD
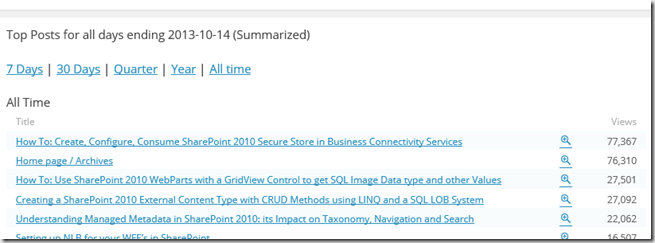
Consistently two of my most heavily viewed/visited post based on WordPress Metrics is the one highlighted below, see the image for the top 5 all
- How To: Create, Configure, Consume SharePoint 2010 Secure Store in Business Connectivity Services
- Creating a SharePoint 2010 External Content Type with CRUD Methods using LINQ and a SQL LOB System
Since I have already done this in SharePoint 2010 using Secure Store and a SQL Server Native Line of Business (LOB) System, as well as a Visual Studio 2010 .Net Assembly, I figured I can offer value by updating this post to include the following Scenarios
- BCS Full CRUD using SharePoint Designer with a Windows Communications Foundation (WCF) Data Connection [I will actually show you how to build the WCF, otherwise why even bother
 ] using the Users Identity as the Auth
 - BCS Full CRUD with Visual Studio 2012 .Net Assembly using Secure Store [I will put in Code Snippets this time rather than Images
 ]
] - BCS Full CRUD with Visual Studio 2012 OData LOB System Type SharePoint App [Yes App Model] to include the External List Instantiation
(YOU ARE HERE!)
There are tons of examples (the #1 viewed blog above uses that as an example) on how to use SharePoint Designer to do a SQL Native Connection, so i wont bother beating that horse to death, and I would like to also point out to this excellent post by my good friend Chris Givens on how he extended the third bullet point example above to include Notification and Subscriptions Alert, so i will not be doing that either.
Approach
In this Part 2 of 3 Update I am targeting a second post cited above [Creating a SharePoint 2010 External Content Type with CRUD Methods using LINQ and a SQL LOB System]; again, I am specifically leaving out the precursor activities that are needed before you begin to create the External Content Type (ECT), I will just pick up at the point of Creating the ECT and as for cases where I introduce new methodologies, I will ofcourse showcase those aspects.
In this blog, specifically I will be showing the following:
- Point you to an old post by Scott Guthrie “The Gu” post on using Linq to SQL, I am going to skip that part in this post but demonstrate in my code how I use my DataContext that is created by the Linq to SQL addition to my Project Solution in Visual Studio 2012
- I will certainly show you how to Create your BDC Entity and the full CRUD StereoTyped Methods necessary to carry out those functions
- I will illustrate the chronological steps you NEED to take, otherwise you will spend Days Troubleshooting why your crap doesn’t work 🙂 and all the Gotchas that are hidden as well
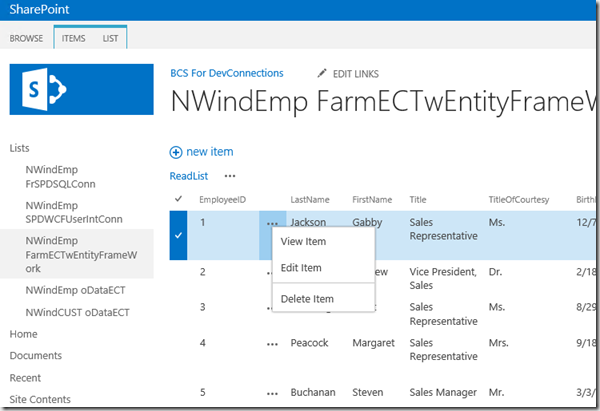
- Deploy the Solution to the Farm & Create an External List from It
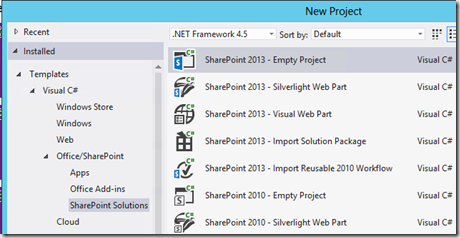
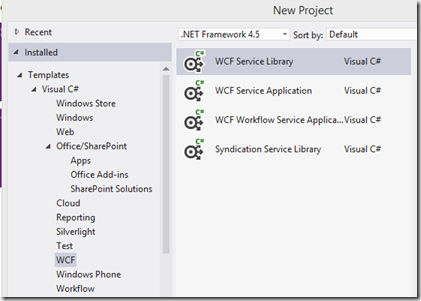
Lets Begin – Create a New Empty SharePoint 2013 Visual Studio Project
This is going to be a Farm based solution that will connect using “Linq to SQL” to our SQL Sever Database and create a DataContext class that we will use to communicate from our BCS entity to the underlying Database.
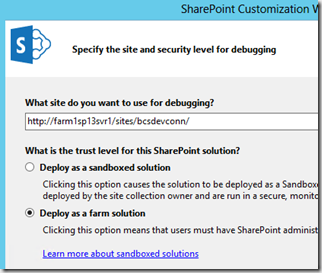
this will be a Farm Solution
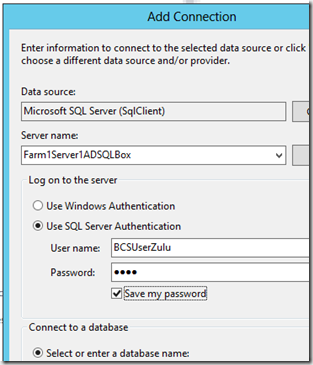
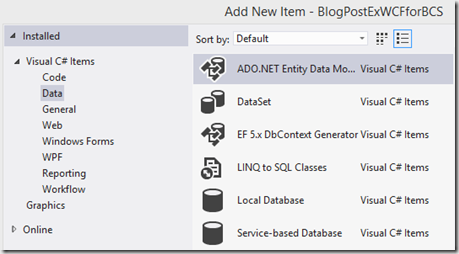
Once your project comes to life, you will need to establish a connection to your SQL Server or whatever Database you are using. You do this by going to “Tools > Connect to Database > Fill out the Add Connection Fields similar to what i have below
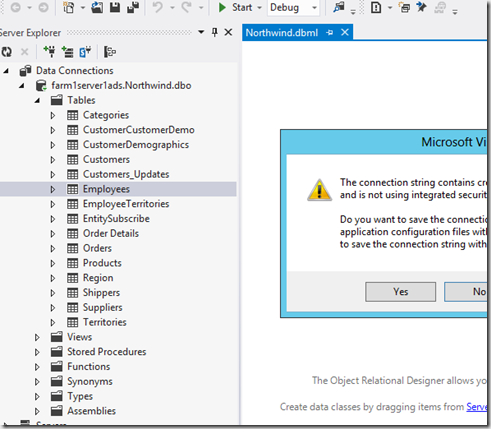
and you should end up with a ORD Designer and in your “Server Explorer” you should expand that Database Connection that is now there and drag your Table/View etc to the Object Relational Designer (ORD). Now in my case I am using SQL Auth so I will get a warning, Im ok with that, this is Demoware
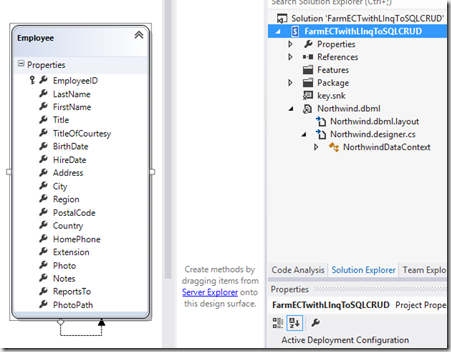
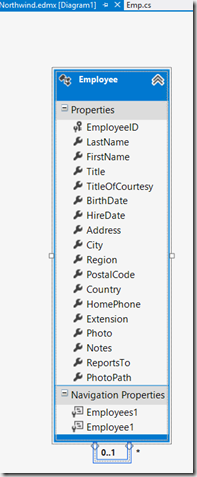
When I click YES, i get my Northwind Employee Entity in the context of the DataContext Class and my Project now looks like this below
Next we begin our work on the BCS piece. This does it for Data Access.
Create the BCS Data Model Entity
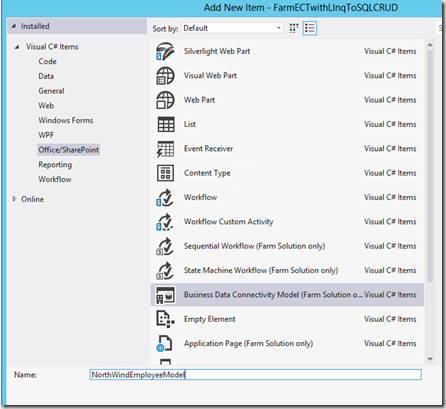
So, now you will need to add a new item to your project. you will add a BDCM as seen below Business Data Connectivity Model. Now, if you have read my part 1 you will know that I vehemently hate when Visual Studio gives me helper/sample implementations, well, this happens here after you name and add your item to your project.
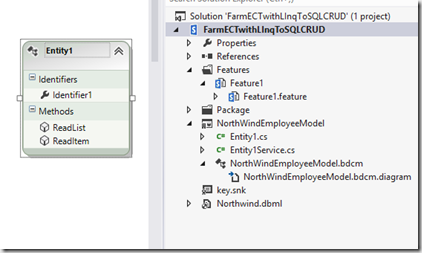
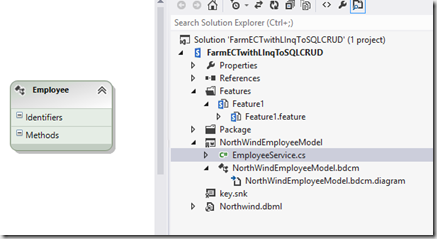
as you can see below, you get a Entity1.cs and an Entity1Servcie.cs which ties to the GUI entity you see in the designer. We will get rid of these as we did previously in out WCF part 1 blog post and create our own entity based on the NorthWindEntity we got with the Linq To SQL DataContext we created earlier. so for now just select the two files and delete them, alternatively, you can delete the item out of the designer and “I think” it deletes the file along with it, perhaps it leaves the service file, but long and short, kill em all.
What you will after you delete those is, from the toolbar, drag a new entity onto the design surface like so and rename the entity in the Properties Window to something like “Employee” you will also notice that it creates a Serivce class for you as well, this one is called [EntityName]Service.cs
Next you will add an Identifier, by right clicking on the New Employee Identity, click Add, then click Identifier. When the Identifier appears, in the Properties Window again, change the name to EmployeeID and set the Type Name to System.Int32
GOTCHA ALERT
The next piece is Arguably the place MOST people will Run-A-Muck because they will either FORGET to change the TypeName of the Specific Finder to reflect the Employee Class created by the Data Context and leave it as the ‘Generic” that it is originally set to, or they will fail to set the Identifier property in this method. The reason folks mess this up is because THIS IS THE ONLY METHOD THAT REQUIRES THIS, every method thereafter inherits from this. The next things folks mess up on is the Update Method but I will go into that in detail in a few.
END GOTCHA ALERT
Add a Specific Finder Method (Read Item)
- Click on the Employee entity in the BDC Designer
- You should see in the pane at the bottom of the Visual Studio IDE a window called “BDC Method Details”, inside there click
- Add a Method from the dropdown list and select “Create a Specific Finder Method”
- A few things will be added for you by default but what I want you to concern yourself with is under “Type Descriptor” heading in the same window you will see “Employee”, click on that then click “Edit”
This should open up the BDC Explorer and a Hierarchical View should appear of the Model. The properties window should also be open as well,
- Locate TypeName in the Properties Window, click on it, then click “CURRENT PROJECT” tab, then select Employee which should be under the DataContext Class (it should only be 1 in there anyway)
- Inside the BDC Explorer, right click on Employee, and click “Add Type Descriptor” – Later on you will repeat this for every Field in the Entity(Data Store) that you want to surface paying attention to the data type of the field
- When the new TypeDescriptor is created, in the Properties window change the name to EmployeeID and set the TypeName to Int32, also
- Click the dropdown list next to Identifier and select EmployeeID
You will then repeat Step 2 for all the Fields in your Entity, refer back to my Image above that has the Employee Entity, remember to set the TypeName to the correct Field Type (Int32, String, DateTime, etc). Once that is complete, you can either (1) Double Click or (2) Right Click and select ‘View Code’’ on the ReadItem Method that is in the Design Area. This will take you inside EmployeeService.cs or whatever name gave your entity appended with Service.cs. It will be subbed out but I want you to replace what is there with
- public static Employee ReadItem(int employeeID)
- {
- NorthWindDataContext dataContext = new NorthWindDataContext
- ("Data Source=Farm1Server1ADSQL;Initial Catalog=Northwind;uid=BCSUser1;pwd=P@ssword1");
- Employee Employee =
- (from employees in dataContext.Employees.AsEnumerable().Take(20)
- where employees.EmployeeID == employeeID
- select employees).Single();
- return Employee;
- }
Add a Finder Method (Read List)
- Click on the Employee entity in the BDC Designer
- You should see in the pane at the bottom of the Visual Studio IDE a window called “BDC Method Details”, inside there click
- Add a Method from the dropdown list and select “Create Finder Method”
Once that is complete, you can either (1) Double Click or (2) Right Click and select ‘View Code’’ on the ReadList Method that is in the Design Area. This will take you inside EmployeeService.cs or whatever name gave your entity appended with Service.cs. It will be subbed out but I want you to replace what is there with
- public static IEnumerable<Employee> ReadList()
- {
- NorthWindDataContext dataContext = new NorthWindDataContext
- ("Data Source=Farm1Server1ADSQL;Initial Catalog=Northwind;uid=BCSUser1;pwd=P@ssword1");
- IEnumerable<Employee> Employees =
- from employees in dataContext.Employees
- select employees;
- return Employees;
- }
Add a Creator Method
- Click on the Employee entity in the BDC Designer
- You should see in the pane at the bottom of the Visual Studio IDE a window called “BDC Method Details”, inside there click
- Add a Method from the dropdown list and select “Create Creator Method”
Once that is complete, you can either (1) Double Click or (2) Right Click and select ‘View Code’’ on the Create Method that is in the Design Area. This will take you inside EmployeeService.cs or whatever name gave your entity appended with Service.cs. It will be subbed out but I want you to replace what is there with
- public static Employee Create(Employee newEmployee)
- {
- NorthWindDataContext dataContext = new NorthWindDataContext
- ("Data Source=Farm1Server1ADSQL;Initial Catalog=Northwind;uid=BCSUser1;pwd=P@ssword1");
- Employee emp = new Employee();
- emp.FirstName = newEmployee.FirstName;
- emp.LastName = newEmployee.LastName;
- emp.Title = newEmployee.Title;
- emp.TitleOfCourtesy = newEmployee.TitleOfCourtesy;
- emp.BirthDate = newEmployee.BirthDate;
- emp.HireDate = newEmployee.HireDate;
- emp.Address = newEmployee.Address;
- emp.City = newEmployee.City;
- emp.Region = newEmployee.Region;
- emp.PostalCode = newEmployee.PostalCode;
- emp.Country = newEmployee.Country;
- emp.HomePhone = newEmployee.HomePhone;
- emp.Extension = newEmployee.Extension;
- emp.Notes = newEmployee.Notes;
- dataContext.Employees.InsertOnSubmit(emp);
- dataContext.SubmitChanges();
- return emp;
- }
Add a Updater Method
- Click on the Employee entity in the BDC Designer
- You should see in the pane at the bottom of the Visual Studio IDE a window called “BDC Method Details”, inside there click
- Add a Method from the dropdown list and select “Create Updater Method”
GOTCHA ALERT
Now based on YOUR particular Data Source/Store you may have a Primary Key that either (1) AutoUpdates or (2) Doesnt – If it DOES NOT Auto Update you MUST click on the Employee Type Descriptor in the BDC Method Details Window and in the Properties Window you MUST set he “Pre-Updater Field” to True
BUT!!!!
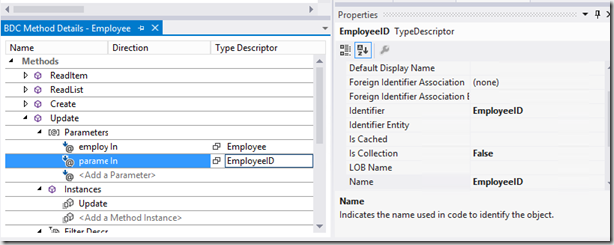
If YOUR Primary Key actually DOES Auto Increment, then what “I” have found to work for me is to Add another Type Descriptor to the Updater Method (see Image below), name it appropriately and SET its Pre-Updater property to TRUE
This means that the Updater Method will take in two Parameters now, not one as most MSDN and TechNet articles will say, but I am only using my EmployeeID Input Parameter to locate the Specific Item needing to update and the employee parameter to set the Fields of what will be committed back to the Data Source. All attempts to do it otherwise GAVE AN ERROR about the EmployeeID being a Read Only Field and needed the PreUpdate Field set to True when using an External List to Update an Item.
END GOTCHA ALERT
Once that is complete, you can either (1) Double Click or (2) Right Click and select ‘View Code’’ on the Update Method that is in the Design Area. This will take you inside EmployeeService.cs or whatever name gave your entity appended with Service.cs. It will be subbed out but I want you to replace what is there with
- public static void Update(Employee employee, int parameter)
- {
- NorthWindDataContext dataContext = new NorthWindDataContext
- ("Data Source=Farm1Server1ADSQL;Initial Catalog=Northwind;uid=BCSUser1;pwd=P@ssword1");
- var employeeToUpdate = (from employees in dataContext.Employees
- where employees.EmployeeID == parameter
- select employees).Single();
- employeeToUpdate.FirstName = employee.FirstName;
- employeeToUpdate.LastName = employee.LastName;
- employeeToUpdate.Title = employee.Title;
- employeeToUpdate.TitleOfCourtesy = employee.TitleOfCourtesy;
- employeeToUpdate.BirthDate = employee.BirthDate;
- employeeToUpdate.HireDate = employee.HireDate;
- employeeToUpdate.Address = employee.Address;
- employeeToUpdate.City = employee.City;
- employeeToUpdate.Region = employee.Region;
- employeeToUpdate.PostalCode = employee.PostalCode;
- employeeToUpdate.Country = employee.Country;
- employeeToUpdate.HomePhone = employee.HomePhone;
- employeeToUpdate.Extension = employee.Extension;
- employeeToUpdate.Notes = employee.Notes;
- dataContext.SubmitChanges();
- }
Add a Deleter Method
- Click on the Employee entity in the BDC Designer
- You should see in the pane at the bottom of the Visual Studio IDE a window called “BDC Method Details”, inside there click
- Add a Method from the dropdown list and select “Create a Deleter Method”
Once that is complete, you can either (1) Double Click or (2) Right Click and select ‘View Code’’ on the Delete Method that is in the Design Area. This will take you inside EmployeeService.cs or whatever name gave your entity appended with Service.cs. It will be subbed out but I want you to replace what is there with
- public static void Delete(int employeeID)
- {
- NorthWindDataContext dataContext = new NorthWindDataContext
- ("Data Source=Farm1Server1ADSQL;Initial Catalog=Northwind;uid=BCSUser1;pwd=P@ssword1");
- Employee Employee =
- (from employees in dataContext.Employees.AsEnumerable().Take(20)
- where employees.EmployeeID == employeeID
- select employees).Single();
- dataContext.Employees.DeleteOnSubmit(Employee);
- dataContext.SubmitChanges();
- }
All in all the full code should look like below when you put it all together.
- using System;
- using System.Collections.Generic;
- using System.Linq;
- using System.Text;
- using NorthWindEmployees;
- namespace NorthWindEmployees.NWindFarmECTEmployees
- {
- public partial class EmployeeService
- {
- public static Employee ReadItem(int employeeID)
- {
- NorthWindDataContext dataContext = new NorthWindDataContext
- ("Data Source=Farm1Server1ADSQL;Initial Catalog=Northwind;uid=BCSUser1;pwd=P@ssword1");
- Employee Employee =
- (from employees in dataContext.Employees.AsEnumerable().Take(20)
- where employees.EmployeeID == employeeID
- select employees).Single();
- return Employee;
- }
- public static IEnumerable<Employee> ReadList()
- {
- NorthWindDataContext dataContext = new NorthWindDataContext
- ("Data Source=Farm1Server1ADSQL;Initial Catalog=Northwind;uid=BCSUser1;pwd=P@ssword1");
- IEnumerable<Employee> Employees =
- from employees in dataContext.Employees
- select employees;
- return Employees;
- }
- public static Employee Create(Employee newEmployee)
- {
- NorthWindDataContext dataContext = new NorthWindDataContext
- ("Data Source=Farm1Server1ADSQL;Initial Catalog=Northwind;uid=BCSUser1;pwd=P@ssword1");
- Employee emp = new Employee();
- emp.FirstName = newEmployee.FirstName;
- emp.LastName = newEmployee.LastName;
- emp.Title = newEmployee.Title;
- emp.TitleOfCourtesy = newEmployee.TitleOfCourtesy;
- emp.BirthDate = newEmployee.BirthDate;
- emp.HireDate = newEmployee.HireDate;
- emp.Address = newEmployee.Address;
- emp.City = newEmployee.City;
- emp.Region = newEmployee.Region;
- emp.PostalCode = newEmployee.PostalCode;
- emp.Country = newEmployee.Country;
- emp.HomePhone = newEmployee.HomePhone;
- emp.Extension = newEmployee.Extension;
- emp.Notes = newEmployee.Notes;
- dataContext.Employees.InsertOnSubmit(emp);
- dataContext.SubmitChanges();
- return emp;
- }
- public static void Update(Employee employee, int parameter)
- {
- NorthWindDataContext dataContext = new NorthWindDataContext
- ("Data Source=Farm1Server1ADSQL;Initial Catalog=Northwind;uid=BCSUser1;pwd=P@ssword1");
- var employeeToUpdate = (from employees in dataContext.Employees
- where employees.EmployeeID == parameter
- select employees).Single();
- employeeToUpdate.FirstName = employee.FirstName;
- employeeToUpdate.LastName = employee.LastName;
- employeeToUpdate.Title = employee.Title;
- employeeToUpdate.TitleOfCourtesy = employee.TitleOfCourtesy;
- employeeToUpdate.BirthDate = employee.BirthDate;
- employeeToUpdate.HireDate = employee.HireDate;
- employeeToUpdate.Address = employee.Address;
- employeeToUpdate.City = employee.City;
- employeeToUpdate.Region = employee.Region;
- employeeToUpdate.PostalCode = employee.PostalCode;
- employeeToUpdate.Country = employee.Country;
- employeeToUpdate.HomePhone = employee.HomePhone;
- employeeToUpdate.Extension = employee.Extension;
- employeeToUpdate.Notes = employee.Notes;
- dataContext.SubmitChanges();
- }
- public static void Delete(int employeeID)
- {
- NorthWindDataContext dataContext = new NorthWindDataContext
- ("Data Source=Farm1Server1ADSQL;Initial Catalog=Northwind;uid=BCSUser1;pwd=P@ssword1");
- Employee Employee =
- (from employees in dataContext.Employees.AsEnumerable().Take(20)
- where employees.EmployeeID == employeeID
- select employees).Single();
- dataContext.Employees.DeleteOnSubmit(Employee);
- dataContext.SubmitChanges();
- }
- }
- }
In a nutshell you are done, and you can just “F5” to debug and test it, or just “Deploy” from here, BUT!!! you can also copy that BDCM file out. Its what was previously known as your Application Definition File or now your Model File and you can Import that INTO
- SharePoint Designer or
- Central Administration
Why would you do that? Maybe your SDLC calls for separation, and your coders need to and off here. This is just an XML file, i have a snippet below
- <?xml version="1.0" encoding="utf-8"?>
- <Model xmlns:xsi="http://www.w3.org/2001/XMLSchema-instance" xmlns:xsd="http://www.w3.org/2001/XMLSchema" xmlns="http://schemas.microsoft.com/windows/2007/BusinessDataCatalog" Name="NWindFarmECTEmployees">
- <LobSystems>
- <LobSystem Name="NWindFarmECTEmployees" Type="DotNetAssembly">
- <LobSystemInstances>
- <LobSystemInstance Name="NWindFarmECTEmployees" />
- </LobSystemInstances>
- <Entities>
- <Entity Name="Employee" Namespace="NorthWindEmployees.NWindFarmECTEmployees" Version="1.0.0.71">
- <Properties>
- <Property Name="Class" Type="System.String">NorthWindEmployees.NWindFarmECTEmployees.EmployeeService, NWindFarmECTEmployees</Property>
- </Properties>
- <Identifiers>
- <Identifier Name="EmployeeID" TypeName="System.Int32" />
- </Identifiers>
- <Methods>
- <Method Name="ReadItem">
- <Parameters>
- <Parameter Name="employee" Direction="Return">
- <TypeDescriptor Name="Employee" TypeName="NorthWindEmployees.Employee, NWindFarmECTEmployees" IsCollection="false" PreUpdaterField="false">
- <TypeDescriptors>
- <TypeDescriptor Name="EmployeeID" TypeName="System.Int32" IsCollection="false" IdentifierName="EmployeeID" />
- <TypeDescriptor Name="LastName" TypeName="System.String" />
- <TypeDescriptor Name="FirstName" TypeName="System.String" />
- <TypeDescriptor Name="Title" TypeName="System.String" />
- <TypeDescriptor Name="TitleOfCourtesy" TypeName="System.String" />
- <TypeDescriptor Name="BirthDate" TypeName="System.DateTime" IsCollection="false" />
- <TypeDescriptor Name="HireDate" TypeName="System.DateTime" IsCollection="false" />
- <TypeDescriptor Name="Address" TypeName="System.String" />
- <TypeDescriptor Name="City" TypeName="System.String" />
- <TypeDescriptor Name="Region" TypeName="System.String" />
- <TypeDescriptor Name="PostalCode" TypeName="System.String" />
- <TypeDescriptor Name="Country" TypeName="System.String" />
- <TypeDescriptor Name="HomePhone" TypeName="System.String" />
- <TypeDescriptor Name="Extension" TypeName="System.String" />
- <TypeDescriptor Name="Notes" TypeName="System.String" /></TypeDescriptors></TypeDescriptor></Parameter>
- <Parameter Name="employeeID" Direction="In">
- <TypeDescriptor Name="EmployeeID" TypeName="System.Int32" IdentifierEntityName="Employee" IdentifierEntityNamespace="NorthWindEmployees.NWindFarmECTEmployees" IdentifierName="EmployeeID" PreUpdaterField="false" /></Parameter>
- </Parameters>
- <MethodInstances>
- <MethodInstance Name="ReadItem" Type="SpecificFinder" ReturnParameterName="employee" ReturnTypeDescriptorPath="Employee" />
- </MethodInstances></Method>
- <Method Name="ReadList">
- <Parameters>
- <Parameter Name="employeeList" Direction="Return">
- <TypeDescriptor Name="EmployeeList" TypeName="System.Collections.Generic.IEnumerable`1[[NorthWindEmployees.Employee, NWindFarmECTEmployees]]" IsCollection="true">
- <TypeDescriptors>
- <TypeDescriptor Name="Employee" IsCollection="false" TypeName="NorthWindEmployees.Employee, NWindFarmECTEmployees">
- <TypeDescriptors>
- <TypeDescriptor Name="EmployeeID" IdentifierName="EmployeeID" IsCollection="false" TypeName="System.Int32" />
- <TypeDescriptor Name="LastName" TypeName="System.String" />
- <TypeDescriptor Name="FirstName" TypeName="System.String" />
- <TypeDescriptor Name="Title" TypeName="System.String" />
- <TypeDescriptor Name="TitleOfCourtesy" TypeName="System.String" />
- <TypeDescriptor Name="BirthDate" IsCollection="false" TypeName="System.DateTime" />
- <TypeDescriptor Name="HireDate" IsCollection="false" TypeName="System.DateTime" />
- <TypeDescriptor Name="Address" TypeName="System.String" />
- <TypeDescriptor Name="City" TypeName="System.String" />
- <TypeDescriptor Name="Region" TypeName="System.String" />
- <TypeDescriptor Name="PostalCode" TypeName="System.String" />
- <TypeDescriptor Name="Country" TypeName="System.String" />
- <TypeDescriptor Name="HomePhone" TypeName="System.String" />
- <TypeDescriptor Name="Extension" TypeName="System.String" />
- <TypeDescriptor Name="Notes" TypeName="System.String" /></TypeDescriptors></TypeDescriptor></TypeDescriptors></TypeDescriptor></Parameter>
- </Parameters>
- <MethodInstances>
- <MethodInstance Name="ReadList" Type="Finder" ReturnParameterName="employeeList" ReturnTypeDescriptorPath="EmployeeList" />
- </MethodInstances></Method>
- <Method Name="Create">
- <Parameters>
- <Parameter Name="returnEmployee" Direction="Return">
- <TypeDescriptor Name="ReturnEmployee" IsCollection="false" TypeName="NorthWindEmployees.Employee, NWindFarmECTEmployees">
- <TypeDescriptors>
- <TypeDescriptor Name="EmployeeID" IdentifierName="EmployeeID" IsCollection="false" TypeName="System.Int32" />
- <TypeDescriptor Name="LastName" TypeName="System.String" />
- <TypeDescriptor Name="FirstName" TypeName="System.String" />
- <TypeDescriptor Name="Title" TypeName="System.String" />
- <TypeDescriptor Name="TitleOfCourtesy" TypeName="System.String" />
- <TypeDescriptor Name="BirthDate" IsCollection="false" TypeName="System.DateTime" />
- <TypeDescriptor Name="HireDate" IsCollection="false" TypeName="System.DateTime" />
- <TypeDescriptor Name="Address" TypeName="System.String" />
- <TypeDescriptor Name="City" TypeName="System.String" />
- <TypeDescriptor Name="Region" TypeName="System.String" />
- <TypeDescriptor Name="PostalCode" TypeName="System.String" />
- <TypeDescriptor Name="Country" TypeName="System.String" />
- <TypeDescriptor Name="HomePhone" TypeName="System.String" />
- <TypeDescriptor Name="Extension" TypeName="System.String" />
- <TypeDescriptor Name="Notes" TypeName="System.String" /></TypeDescriptors></TypeDescriptor></Parameter>
- <Parameter Name="newEmployee" Direction="In">
- <TypeDescriptor Name="NewEmployee" IsCollection="false" TypeName="NorthWindEmployees.Employee, NWindFarmECTEmployees">
- <TypeDescriptors>
- <TypeDescriptor Name="EmployeeID" IdentifierName="EmployeeID" IsCollection="false" TypeName="System.Int32" CreatorField="true" />
- <TypeDescriptor Name="LastName" TypeName="System.String" CreatorField="true" />
- <TypeDescriptor Name="FirstName" TypeName="System.String" CreatorField="true" />
- <TypeDescriptor Name="Title" TypeName="System.String" CreatorField="true" />
- <TypeDescriptor Name="TitleOfCourtesy" TypeName="System.String" CreatorField="true" />
- <TypeDescriptor Name="BirthDate" IsCollection="false" TypeName="System.DateTime" CreatorField="true" />
- <TypeDescriptor Name="HireDate" IsCollection="false" TypeName="System.DateTime" CreatorField="true" />
- <TypeDescriptor Name="Address" TypeName="System.String" CreatorField="true" />
- <TypeDescriptor Name="City" TypeName="System.String" CreatorField="true" />
- <TypeDescriptor Name="Region" TypeName="System.String" CreatorField="true" />
- <TypeDescriptor Name="PostalCode" TypeName="System.String" CreatorField="true" />
- <TypeDescriptor Name="Country" TypeName="System.String" CreatorField="true" />
- <TypeDescriptor Name="HomePhone" TypeName="System.String" CreatorField="true" />
- <TypeDescriptor Name="Extension" TypeName="System.String" CreatorField="true" />
- <TypeDescriptor Name="Notes" TypeName="System.String" CreatorField="true" /></TypeDescriptors></TypeDescriptor></Parameter>
- </Parameters>
- <MethodInstances>
- <MethodInstance Name="Create" Type="Creator" ReturnParameterName="returnEmployee" ReturnTypeDescriptorPath="ReturnEmployee" />
- </MethodInstances></Method>
- <Method Name="Update">
- <Parameters>
- <Parameter Name="employee" Direction="In">
- <TypeDescriptor Name="Employee" IsCollection="false" TypeName="NorthWindEmployees.Employee, NWindFarmECTEmployees">
- <TypeDescriptors>
- <TypeDescriptor Name="EmployeeID" IdentifierName="EmployeeID" IsCollection="false" TypeName="System.Int32" UpdaterField="true" />
- <TypeDescriptor Name="LastName" TypeName="System.String" UpdaterField="true" />
- <TypeDescriptor Name="FirstName" TypeName="System.String" UpdaterField="true" />
- <TypeDescriptor Name="Title" TypeName="System.String" UpdaterField="true" />
- <TypeDescriptor Name="TitleOfCourtesy" TypeName="System.String" UpdaterField="true" />
- <TypeDescriptor Name="BirthDate" IsCollection="false" TypeName="System.DateTime" UpdaterField="true" />
- <TypeDescriptor Name="HireDate" IsCollection="false" TypeName="System.DateTime" UpdaterField="true" />
- <TypeDescriptor Name="Address" TypeName="System.String" UpdaterField="true" />
- <TypeDescriptor Name="City" TypeName="System.String" UpdaterField="true" />
- <TypeDescriptor Name="Region" TypeName="System.String" UpdaterField="true" />
- <TypeDescriptor Name="PostalCode" TypeName="System.String" UpdaterField="true" />
- <TypeDescriptor Name="Country" TypeName="System.String" UpdaterField="true" />
- <TypeDescriptor Name="HomePhone" TypeName="System.String" UpdaterField="true" />
- <TypeDescriptor Name="Extension" TypeName="System.String" UpdaterField="true" />
- <TypeDescriptor Name="Notes" TypeName="System.String" UpdaterField="true" /></TypeDescriptors></TypeDescriptor></Parameter>
- <Parameter Name="parameter" Direction="In">
- <TypeDescriptor Name="EmployeeID" TypeName="System.Int32" IsCollection="false" IdentifierName="EmployeeID" PreUpdaterField="true" /></Parameter>
- </Parameters>
- <MethodInstances>
- <MethodInstance Name="Update" Type="Updater" />
- </MethodInstances></Method>
- <Method Name="Delete">
- <Parameters>
- <Parameter Name="employeeID" Direction="In">
- <TypeDescriptor Name="EmployeeID" TypeName="System.Int32" IdentifierEntityName="Employee" IdentifierEntityNamespace="NorthWindEmployees.NWindFarmECTEmployees" IdentifierName="EmployeeID" /></Parameter>
- </Parameters>
- <MethodInstances>
- <MethodInstance Name="Delete" Type="Deleter" />
- </MethodInstances></Method>
- </Methods></Entity>
- </Entities>
- </LobSystem>
- </LobSystems>
- </Model>
For US howevever we will just Deploy it. What we expect to see then in Central Admin under the BDC Service Application is the following
- A brand new External Content Type
- A new Model and
- A new External System
As in my original post, make sure you also do the following as it relates to the ECT
- Set the Metadata Store Permissions
- Set at a Minimum the “Execute” Permissions on the ECT so that people can use it. You may consider giving the Search Account permissions if you intend to use this ECT as a Content Source in Search
The Finale
Now we create our External List and we should have FULL CRUD Capabilities. Here you can see the Methods exposed though their actions. To see and learn more come see my VS Live 360 Session that i spoke about on my blog here.
Blog Update on SharePoint BCS with full CRUD Part 1 of 3
Précis
Consistently two of my most heavily viewed/visited post based on WordPress Metrics is the one highlighted below, see the image for the top 5 all
- How To: Create, Configure, Consume SharePoint 2010 Secure Store in Business Connectivity Services
- Creating a SharePoint 2010 External Content Type with CRUD Methods using LINQ and a SQL LOB System
Since I have already done this in SharePoint 2010 using Secure Store and a SQL Server Native Line of Business (LOB) System, as well as a Visual Studio 2010 .Net Assembly, I figured I can offer value by updating this post to include the following Scenarios
- BCS Full CRUD using SharePoint Designer with a Windows Communications Foundation (WCF) Data Connection [I will actually show you how to build the WCF, otherwise why even bother :-)] using the Users Identity as the Auth (YOU ARE HERE!)
- BCS Full CRUD with Visual Studio 2012 .Net Assembly using Secure Store [I will put in Code Snippets this time rather than Images :-)]
- BCS Full CRUD with Visual Studio 2012 OData LOB System Type SharePoint App [Yes App Model] to include the External List Instantiation
There are tons of examples (the #1 viewed blog above uses that as an example) on how to use SharePoint Designer to do a SQL Native Connection, so i wont bother beating that horse to death, and I would like to also point out to this excellent post by my good friend Chris Givens on how he extended the third bullet point example above to include Notification and Subscriptions Alert, so i will not be doing that either.
Approach
As this is an update, I am specifically leaving out the precursor activities that are needed before you begin to create the External Content Type (ECT), I will just pick up at the point of Creating the ECT and as for cases where I introduce new methodologies, I will ofcourse showcase those aspects.
In this blog, specifically I will be showing the following
- Creating a WCF Source
- Basically, creating the WCF Service Library
- Moving the Service App DLL & Hosting the WCF in IIS (since automatically it is hosted in the local virtual Visual Studio IIS app)
- Using SharePoint Designer 2013 and that WCF Data Connection to do Full CRUD Operations, CRUD-Q infact
Lets Begin – Creating the WCF Service Library
My thought process for this since I am going to be exposing data in an underlying SQL Server is to use Visual Studio Entity Framework 5 to create my access to the Data Store. I will then (I don’t have to but because I want to extrapolate the Entity and manipulate it as my own object) I will create my own class(object) to represent the Northwind Employee and then create my Visual Studio Interface and then my Service Contract. If all of this sounds like gibberish to you, here is a beginners tutorial on how to create a WCF Service Library (its too involved for this post and will take away from my objective) NOW… I am not going to implement it totally the way the post describes it, as i said above, but I WILL show you the code of my
- Connecting to the Northwind Database
- My Northwind Employee Entity (Data Contract)
- Service Contract (Interface)
- Service Itself(Implementation of the Interface)
New Project & Connecting to the Database
First you will start Visual Studio as Administrator and create a new Project as such
Project > New Project > Dub CF > WCF Service Library – Then name it appropriately
Now by default you will get a Service Contract called (IService1.cs) and a Service Implementation (SErvice1.cs) – I don’t like using the OOB templates that are provided although hey say you can Rename/Refactor it; i just never trust it. So, you can go ahead and delete those, because we will create our own classes for our Data Contract, Service Contract and Service Implementation.
Once you have deleted those two files, then next we will do is add an ADO.NET Entity Data Model item to our project, name it appropriately for the Data you are modeling after and click Add.
Follow the Wizard by doing “Generate from Database”, make a new connection or select from one already there, because I am using SQL Server Authentication and I want to have this persisted in my project I also select the option for “Yes, include the sensitive data in the connection string” which is basically your Uname and PW along with Data Source and Initial Catalogue. Under Tables I am selecting my Northwind Employee Table, and following the rest of the wizard to the end. When you are done, you should have an entity as i do below as well as a “NameYouChose”.edmx file which shows you the below
Once you have done that, now I am actually going to create my own Data Contact class which abstracts from the ADO.NET Employee entity. You do that by adding a new class to your project. I am calling mine “Emp.cs” as seen below in the code snippet
- namespace NorthwindServiceLib
- {
- [DataContract]
- public class Emp
- {
- [DataMember]
- public Int32 EmployeeID;
- [DataMember]
- public string LastName;
- [DataMember]
- public string FirstName;
- [DataMember]
- public string Title;
- [DataMember]
- public string TitleOfCourtesy;
- [DataMember]
- public DateTime BirthDate;
- [DataMember]
- public DateTime HireDate;
- [DataMember]
- public string Address;
- [DataMember]
- public string City;
- [DataMember]
- public string Region;
- [DataMember]
- public string PostalCode;
- [DataMember]
- public string Country;
- [DataMember]
- public string HomePhone;
- [DataMember]
- public string Extension;
- [DataMember]
- public string Notes;
- [DataMember]
- public string ReportsTo;
- [DataMember]
- public string PhotoPath;
- }
- }
You will notice that i am decorating the class with the [DataContract] attribute and also setting the fields that i want as [DataMember] then next thing I do is create my Service Contract which as I said before is a Interface; I do that by adding another class called IEmpService.cs as seen in the code snippet below
- namespace NorthwindServiceLib
- {
- [ServiceContract]
- public interface IEmpService
- {
- [OperationContract]
- void CreateEmployee(Emp emp);
- [OperationContract]
- List<Emp> GetAllEmp();
- [OperationContract]
- List<Emp> GetSpecificEmp(Int32 empId);
- [OperationContract]
- void RemoveEmp(Int32 empId);
- [OperationContract]
- void UpdateEmp(Emp emp);
- }
- }
Here we decorate the interface with the attribute [ServiceContract] and this is the fist part where we have an eye towards what SharePoint BCS needs. As you can see above we have a the following
- Create Method called “CreateEmployee” which takes the data contract as a input parameter
- Read List Method called “GetAllEmp” which returns a list of all the Employees
- Read Item (Specific Finder) Method called “GetSpecificEmp” which takes the employee Id as an input parameter
- Delete Method called “RemoveEmp” which also takes employee Id as an input parameter
- Updater Method called “UpdateEmp” which takes the data contract as an input parameter
We also decorate these as Operation Contract what we MUST implement to use our Interface. Next we will create the service that will implment the Interface and this is done by creating another class called EmpService.cs
- namespace NorthwindServiceLib
- {
- [AspNetCompatibilityRequirements(RequirementsMode = AspNetCompatibilityRequirementsMode.Allowed)]
- public class EmpService : IEmpService
- {
- public void CreateEmployee(Emp emp)
- {
- using (var ctx = new NorthwindEntities())
- {
- List<Employee> empnew = new List<Employee>();
- Employee e = new Employee();
- e.EmployeeID = emp.EmployeeID;
- e.FirstName = emp.FirstName;
- e.LastName = emp.LastName;
- e.Title = emp.Title;
- e.TitleOfCourtesy = emp.TitleOfCourtesy;
- e.BirthDate = DateTime.Parse(emp.BirthDate.ToString());
- e.HireDate = DateTime.Parse(emp.HireDate.ToString());
- e.Address = emp.Address;
- e.City = emp.City;
- e.Region = emp.Region;
- e.PostalCode = emp.PostalCode;
- e.Country = emp.Country;
- e.HomePhone = emp.HomePhone;
- e.Extension = emp.Extension;
- e.ReportsTo = int.Parse(emp.ReportsTo);
- e.PhotoPath = emp.PhotoPath;
- e.Notes = emp.Notes;
- empnew.Add(e);
- ctx.Employees.Add(e);
- ctx.SaveChanges();
- }
- }
- public List<Emp> GetAllEmp()
- {
- using (var ctx = new NorthwindEntities())
- {
- var currEmp = (from c in ctx.Employees
- select c).ToList();
- List<Emp> emp = new List<Emp>();
- for (int i = 0; i < currEmp.Count(); i++)
- {
- {
- Emp e = new Emp();
- e.EmployeeID = currEmp.ElementAt(i).EmployeeID;
- e.FirstName = currEmp.ElementAt(i).FirstName;
- e.LastName = currEmp.ElementAt(i).LastName;
- e.Title = currEmp.ElementAt(i).Title;
- e.TitleOfCourtesy = currEmp.ElementAt(i).TitleOfCourtesy;
- e.BirthDate = DateTime.Parse(currEmp.ElementAt(i).BirthDate.ToString());
- e.HireDate = DateTime.Parse(currEmp.ElementAt(i).HireDate.ToString());
- e.Address = currEmp.ElementAt(i).Address;
- e.City = currEmp.ElementAt(i).City;
- e.Region = currEmp.ElementAt(i).Region;
- e.PostalCode = currEmp.ElementAt(i).PostalCode;
- e.Country = currEmp.ElementAt(i).Country;
- e.HomePhone = currEmp.ElementAt(i).HomePhone;
- e.Extension = currEmp.ElementAt(i).Extension;
- e.ReportsTo = currEmp.ElementAt(i).ReportsTo.ToString();
- e.PhotoPath = currEmp.ElementAt(i).PhotoPath;
- e.Notes = currEmp.ElementAt(i).Notes;
- emp.Add(e);
- }
- }
- return emp;
- }
- }
- public List<Emp> GetSpecificEmp(int empId)
- {
- using (var ctx = new NorthwindEntities())
- {
- var currEmp = (from c in ctx.Employees
- where c.EmployeeID == empId
- select c).ToList();
- List<Emp> emp = new List<Emp>();
- for (int i = 0; i < currEmp.Count(); i++)
- {
- {
- Emp e = new Emp();
- e.EmployeeID = currEmp.ElementAt(i).EmployeeID;
- e.FirstName = currEmp.ElementAt(i).FirstName;
- e.LastName = currEmp.ElementAt(i).LastName;
- e.Title = currEmp.ElementAt(i).Title;
- e.TitleOfCourtesy = currEmp.ElementAt(i).TitleOfCourtesy;
- e.BirthDate = DateTime.Parse(currEmp.ElementAt(i).BirthDate.ToString());
- e.HireDate = DateTime.Parse(currEmp.ElementAt(i).HireDate.ToString());
- e.Address = currEmp.ElementAt(i).Address;
- e.City = currEmp.ElementAt(i).City;
- e.Region = currEmp.ElementAt(i).Region;
- e.PostalCode = currEmp.ElementAt(i).PostalCode;
- e.Country = currEmp.ElementAt(i).Country;
- e.HomePhone = currEmp.ElementAt(i).HomePhone;
- e.Extension = currEmp.ElementAt(i).Extension;
- e.ReportsTo = currEmp.ElementAt(i).ReportsTo.ToString();
- e.PhotoPath = currEmp.ElementAt(i).PhotoPath;
- e.Notes = currEmp.ElementAt(i).Notes;
- emp.Add(e);
- }
- }
- return emp;
- }
- }
- public void RemoveEmp(int empId)
- {
- using (var ctx = new NorthwindEntities())
- {
- Employee empToDel = ctx.Employees.Where(d => d.EmployeeID == empId).Single();
- ctx.Employees.Remove(empToDel);
- ctx.SaveChanges();
- }
- }
- public void UpdateEmp(Emp emp)
- {
- using (var ctx = new NorthwindEntities())
- {
- var currEmp = (from c in ctx.Employees
- where c.EmployeeID == emp.EmployeeID
- select c).Single();
- currEmp.FirstName = emp.FirstName;
- currEmp.LastName = emp.LastName;
- currEmp.Title = emp.Title;
- currEmp.TitleOfCourtesy = emp.TitleOfCourtesy;
- currEmp.BirthDate = emp.BirthDate;
- currEmp.HireDate = emp.HireDate;
- currEmp.Address = emp.Address;
- currEmp.City = emp.City;
- currEmp.Region = emp.Region;
- currEmp.PostalCode = emp.PostalCode;
- currEmp.Country = emp.Country;
- currEmp.HomePhone = emp.HomePhone;
- currEmp.Extension = emp.Extension;
- currEmp.ReportsTo = int.Parse(emp.ReportsTo);
- currEmp.PhotoPath = emp.PhotoPath;
- currEmp.Notes = emp.Notes;
- ctx.SaveChanges();
- }
- }
- }
- }
Thats a heap a code I know, and there are other ways to do this, Im sure, this is just “my way”, you will notice I am employing the Using Statement to encapsulate the Context of the Data Connection then Im either Creating, Updating, Deleting and as in the case of Reading I have one that returns everything and one that returns just one.
THATS IT for the Code part of this!!!
Once all of that is done, you will NEED, YES NEED, to modify the App.config file because it still thinks that the Service Contract is tied to IService1.cs that we deleted earlier. We can also create other endpoiints, yada yada, but thats anotehr story. So here is what you need to do for your App.Config. Right click on it, and click “Edit WCF Configuration”, when you do you will need to change the Service to your EmpService by browsing to the Bin Directory and clicking the Dll & you will also need to set the Contract to IEmpService by doing the same. You will notice I have two endpoints as well, one for the Service Contract endpoint and the other is MEX for the announcement of the Service.
This GUI is just and abstract of the .config file so here is the full code for that below
- <?xml version="1.0" encoding="utf-8"?>
- <configuration>
- <configSections>
- <!– For more information on Entity Framework configuration, visit http://go.microsoft.com/fwlink/?LinkID=237468 –>
- <section name="entityFramework" type="System.Data.Entity.Internal.ConfigFile.EntityFrameworkSection, EntityFramework, Version=5.0.0.0, Culture=neutral, PublicKeyToken=b77a5c561934e089" requirePermission="false" />
- </configSections>
- <appSettings>
- <add key="aspnet:UseTaskFriendlySynchronizationContext" value="true" />
- </appSettings>
- <system.web>
- <compilation debug="true" />
- </system.web>
- <!– When deploying the service library project, the content of the config file must be added to the host's
- app.config file. System.Configuration does not support config files for libraries. –>
- <system.serviceModel>
- <services>
- <service name="NorthwindServiceLib.EmpService">
- <endpoint address="" binding="wsHttpBinding" bindingConfiguration=""
- contract="NorthwindServiceLib.IEmpService">
- <identity>
- <dns value="localhost" />
- </identity>
- </endpoint>
- <endpoint address="mex" binding="mexHttpBinding" contract="IMetadataExchange" />
- <host>
- <baseAddresses>
- <add baseAddress="http://localhost:8733/Design_Time_Addresses/NorthwindServiceLib/Service1/" />
- </baseAddresses>
- </host>
- </service>
- </services>
- <behaviors>
- <serviceBehaviors>
- <behavior>
- <!– To avoid disclosing metadata information,
- set the values below to false before deployment –>
- <serviceMetadata httpGetEnabled="True" httpsGetEnabled="True" />
- <!– To receive exception details in faults for debugging purposes,
- set the value below to true. Set to false before deployment
- to avoid disclosing exception information –>
- <serviceDebug includeExceptionDetailInFaults="False" />
- </behavior>
- </serviceBehaviors>
- </behaviors>
- </system.serviceModel>
- <connectionStrings>
- <add name="NorthwindEntities" connectionString="metadata=res://*/Northwind.csdl|res://*/Northwind.ssdl|res://*/Northwind.msl;provider=System.Data.SqlClient;provider connection string="data source=Farm1Server1ADSQL;initial catalog=Northwind;persist security info=True;user id=oDataSU1;password=P@ssword1;MultipleActiveResultSets=True;App=EntityFramework"" providerName="System.Data.EntityClient" />
- </connectionStrings>
- <entityFramework>
- <defaultConnectionFactory type="System.Data.Entity.Infrastructure.LocalDbConnectionFactory, EntityFramework">
- <parameters>
- <parameter value="v11.0" />
- </parameters>
- </defaultConnectionFactory>
- </entityFramework>
- </configuration>
Test your Work
Now that you have done all that you can certainly test your work even before it goes into IIS to be hosted outside of Visual Studio. You can do that by using a nifty tool inside your Visual Studio Command Promt called “WCFTestClient.exe” and passing it the URI of your Service, but the easiest way is just Press F5 in Visual Studio and it will do all that for you LOL, we will use the tool later on when we move it to IIS. Just for giggles sake, I will just test the GetAllEmp for this blog. IF you want to see more come see my VS Live 360 Session that i spoke about on my blog here.
As you can see above, we have the Service exposed and all the methods, and we invoked one them and we can see the results there.
Move this to IIS – Hosting this Service in IIS
Now unless you want to have to start up Visual Studio every time you need to use this WCF, what you need to do is host this in IIS or you can do TCP or NetBinding but We are all working in SharePoint for this blog so we need IIS. Its simple, just add a new Web Site Project to this Visual Studio Solution; for this we will use the WCF Service Template. This too will add a sample implementation again in the App_Code folder which includes Service1.cs and ISerivce1.cs. Delete those again & and set a reference to the WCF Service Library DLL from the first project. If you are asking why we deleted both those files again its because we will be using the files from our first project referenced in our .svc page. Your solution may look like this now.
You will also have a file called Service.svc, that we will rename to something more descriptive of our Service we are trying to expose, I name mine NWindEmployee.svc Once you have renamed it, you will need to set the Service to the Project Namespace and remove the codebehind attribute since we wont need it.
- <%@ ServiceHost Language="C#" Debug="true" Service="NorthwindServiceLib.EmpService" %>
Save your file, and now its time to modify the Web.config file this time to point to our Service Reference, this is JUST like we did for the App.config so I wont bother going into detail here, Ill just include the code snippet for the web.config
- <?xml version="1.0" encoding="utf-8"?>
- <configuration>
- <configSections>
- <!– For more information on Entity Framework configuration, visit http://go.microsoft.com/fwlink/?LinkID=237468 –>
- <section name="entityFramework" type="System.Data.Entity.Internal.ConfigFile.EntityFrameworkSection, EntityFramework, Version=5.0.0.0, Culture=neutral, PublicKeyToken=b77a5c561934e089" requirePermission="false" />
- </configSections>
- <appSettings>
- <add key="aspnet:UseTaskFriendlySynchronizationContext" value="true" />
- </appSettings>
- <system.web>
- <compilation debug="true" />
- </system.web>
- <!– When deploying the service library project, the content of the config file must be added to the host's
- app.config file. System.Configuration does not support config files for libraries. –>
- <system.serviceModel>
- <services>
- <service name="NorthwindServiceLib.EmpService">
- <endpoint address="" binding="wsHttpBinding" bindingConfiguration=""
- contract="NorthwindServiceLib.IEmpService">
- <identity>
- <dns value="localhost" />
- </identity>
- </endpoint>
- <endpoint address="mex" binding="mexHttpBinding" contract="IMetadataExchange" />
- <host>
- <baseAddresses>
- <add baseAddress="http://localhost:57757/Design_Time_Addresses/NorthwindServiceLib/Service1/" />
- </baseAddresses>
- </host>
- </service>
- </services>
- <behaviors>
- <serviceBehaviors>
- <behavior>
- <!– To avoid disclosing metadata information,
- set the values below to false before deployment –>
- <serviceMetadata httpGetEnabled="True" httpsGetEnabled="True" />
- <!– To receive exception details in faults for debugging purposes,
- set the value below to true. Set to false before deployment
- to avoid disclosing exception information –>
- <serviceDebug includeExceptionDetailInFaults="False" />
- </behavior>
- </serviceBehaviors>
- </behaviors>
- </system.serviceModel>
- <connectionStrings>
- <add name="NorthwindEntities" connectionString="metadata=res://*/Northwind.csdl|res://*/Northwind.ssdl|res://*/Northwind.msl;provider=System.Data.SqlClient;provider connection string="data source=Farm1Server1ADSQL;initial catalog=Northwind;persist security info=True;user id=oDataSU1;password=P@ssword1;MultipleActiveResultSets=True;App=EntityFramework"" providerName="System.Data.EntityClient" />
- </connectionStrings>
- <entityFramework>
- <defaultConnectionFactory type="System.Data.Entity.Infrastructure.LocalDbConnectionFactory, EntityFramework">
- <parameters>
- <parameter value="v11.0" />
- </parameters>
- </defaultConnectionFactory>
- </entityFramework>
- </configuration>
Make this available in IIS
Now you can test this guy again using the Test Client, but the hosting into IIS Is quite simple and Ill just show you that. All you have to do is either (1) Publish the site into a new Directory for PROD consumption (2) just copy and paste the folder where you want on a box running IIS and create a new Web App / Site pointing to that location and setting a FQDN and as in my case a port number where it can be consumed.
As you can see from the image above, I have a site with my FQDN port 57758 where it is located. Navigating to that site will yield
and clicking on the end point will show the WSDL
The Finale
Now we will use SharePoint Designer to Create an External Content Type (ECT) that will consume this WCF.
Open up SPD2013 and create a NEW ECT, Name it apprpriately, as Ive done here calling it BlogPostWCFExample, Next click on “External SYtems” link to discover, its the last link on imabe below
Once you have done that click Add Connecation
Then Select WCF from the Drop Down…and click OK then
As a reminder we are using User Identity but i wanted to point out we just as easlily could be using Secure Store, if we were we would use the Target App ID as seen here
but for my example you will see it is more like this
When all of that is complete you will be able to see all the methods exposed, see below
Next you can right click on them individually and create the respective Methods, this has been done many times so i wont belabor it. But once you are complete you should have an ECT like so
and you should be able to create a List like so…
Summary
So, that is it for my Part 1 of 3, I will tackle the next one later tonight or tomorrow. Cheers, hope this helps, let me know your thoughts, critiques, etc.

