How To: Create SharePoint 2013 Workflow App-Site Columns to Fully Deployed App using Visual Studio 2012
Précis
*** Feel free to skip this section unless you want background information on the genesis of this blog post***
Good day all, to appreciate this blog let me set the stage of my day. Two days ago, I put together a PowerShell Script that laid down the SQL Bits, SharePoint Bits, Configured a slew of Service Application, Configured Central Admin, as well as 4 Web Apps for sites, and also deploy Workflow Manger 1.0 and Register my Site collections, needless to say I was very pleased. To put this NEW Dev Rig to the test, decided to live up to my promise of duplicating a previous post done in SharePoint Designer, whereby I demonstrated how to use SPD 2013 to do complex workflows that could only be done in Visual Studio in SharePoint 2010. My spin on it was to do it all as a SharePoint Hosted ALL in ONE App in SharePoint 2013.
So, lets go to the end then Ill work my way back. I found out when I tested my solution in my On Prem environment that it wasn’t working as designed, by that I mean:
- My Assets Deployed
- It installed all my Site Columns
- It installed my Content Type
- It installed my List Instance
- What It didnt do
- I could only get to the App URL by using the Account I used in Visual Studio to create the Solution, even though the other account (my own named fabianwilliams account) which is also a Site Owner in the Site it was Deployed to.. returned “cannot display this page” error
- Even when I created or uploaded a document to the Library under the Content Type, There was NO workflow to fire off… “it” said “no workflow was defined for that Library, Folder, Document, or my Content Type” or something to that effect
So, that struck me as Odd, I tried it a few more times by breaking up the Provisioning of Assets piece into its own solution, and the Workflow in another, didn’t make a difference. SO, I decided to COPY MY CODE VERBATIM to my SharePoint Online Developer Tennant Account and guess what… IT WORKED THERE.
So this blog will chronicle the start from an On Prem solution and eventually copying the code to a new Visual Studio Solution targeting my SharePoint Online Account where it worked as Designed. Ill either try to figure out why it didn’t work, or since I have a PoSH script, just review the script, make changes, Kill my Farm and Redo it.
UPDATE: 5/26/2013 0953HRS – So after a few hours sleep and thinking about why it didnt work, I tried just doing a regular Workflow App in Visual Studio and It worked, so it may NOT BE my Workflow Manger, indeed, my SharePoint Designer 2013 Workflows also work. So perhaps its my App Model Service Application that is Busted!!!, Ill look into it.
Approach
This is going to be a LONG post, especially because as you now I am verbose in my blogs, and I take lots of screen shots. So you may need to do this in a few sittings lol, or maybe it will end up being like a great novel.
Solution Design
- Open Visual Studio and Create a Project using the “App for SharePoint” project template.
- Create Folders to House the following Artifacts I will be creating
- Site Columns
- Content Type
- List Definition
- Create a List/Document Library based on the Assets in #2 above
- Create a Workflow based on the Instance in #3 set to begin manually and on Item Created event
- Point the AppManifest file to the Library Instance
Get your Site Columns squared away
Whenever I deliver solutions for clients, I absolutely always, unless told otherwise, create my own Site Columns, Content Types if necessary, and List/Library Instance when I am using Visual Studio to build and deploying my solution as a WSP. I do that to ensure that my columns and other assets are UNIQUE in the environment firstly, and second, it makes my solution very portable. So, its not surprising that in my example here I will do the same.
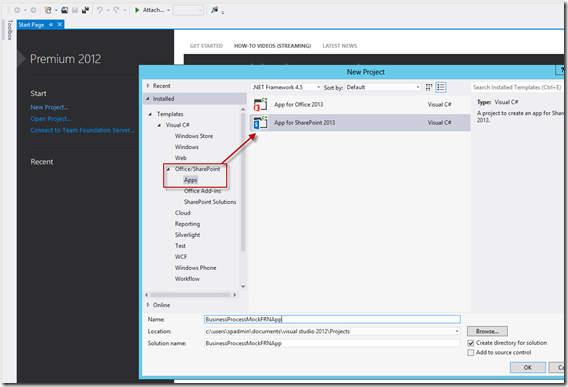
So, open up Visual Studio and Begin a SharePoint Apps “App for SharePoint 2013” project
Change your project from Auto Hosted to "SharePoint Hosted” and just validate your Connection for warm fuzzy feeling.
When you are done you should get a brand new shiny project as you see below
Create your Site Columns
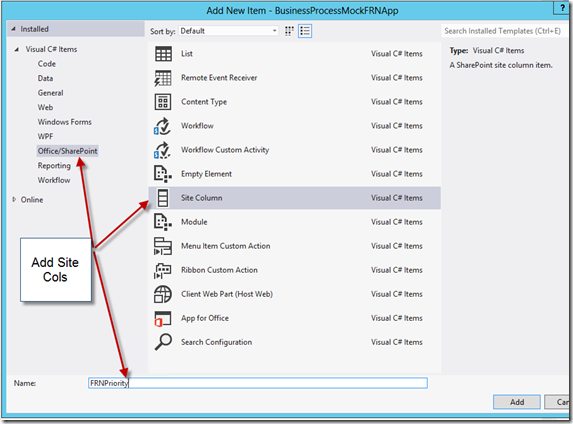
Next I will add a few site columns to aid the process, there are a few these, and what I am trying to illustrate in this blog is the different kinds of Site Columns you can create and what the defaults are, as well as a few customized options you can make.
By default when you add a Site Column it adds an Elements.xml file that will set for Text type with limited information, I added more and changed the type to person (User & UserMulti), number, Choice, for a few of them.
Here is an example of what the default added site column looks like
Here is an example of what a few Site Columns look like after I modified it for text entry. You will notice that I have additions for StaticName, Description and whether or not the Field is Sealed, meaning can you edit it in your Site Columns once the solution is deployed.
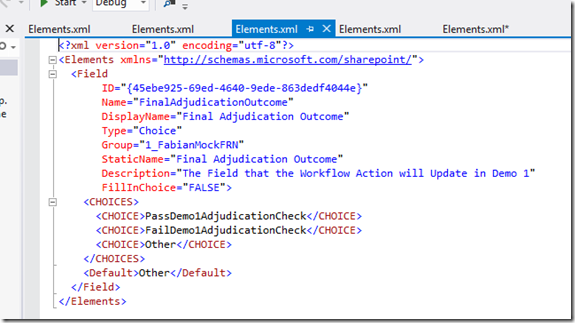
Here is one that is modified for choice column. You will notice there are options here to allow or dis-allow FillInChoice as well as the available choices and the default one if none is selected.
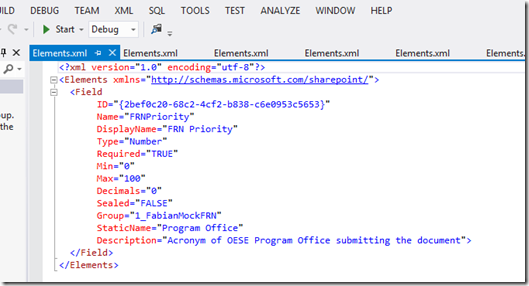
Here is for Number. Key takeaway here is the Minimum and Maximum values, Decimal option. You will notice here that the Required is set to TRUE in this one.
Here is one for People. People is a little different from the rest in that it affects display in many ways. the Type can be (1) User or (2)UserMulti depending if you want to allow for multiple user selection in a single field. This can be because you want to do Parallel or Serial Approval with a bunch of folks denoted in a single field. In addition, the ShowField option there will show Presence Information if Lync/OCS is present.
and in the end the field that the Workflow will update when i is approved or rejected is this one, another Choice Field that has some meaning for us in the end.
Create your Content Type
Next you will make a Content Type to house all these Site Columns.
Next choose the template that this content type will be based off
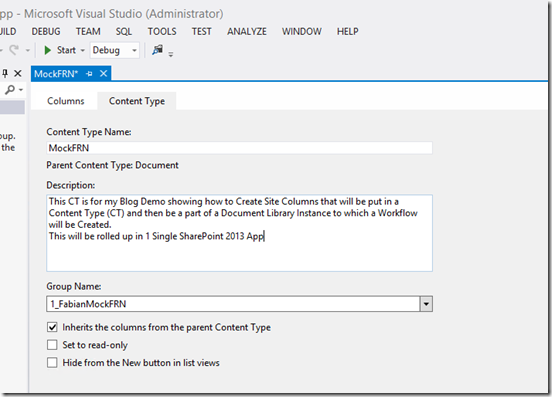
Now you get to define what this Content Type will look like, you add columns from which you previously created as well as define other parameters as you see below. By clicking on the “Content Type” tab, you can set the Name, Description and Group where the CT will be stored as well as a few more options.
Now an all important step here is how you can add “Additional” columns in to your Content Type in addition to what will be there by default based on the one you inherit from. Here is where you will select from the previously created Site Columns. The task simple, just begin typing and you will see it finding the ones you want.
Finally your finished product will look like below when you have located all the ones you want.
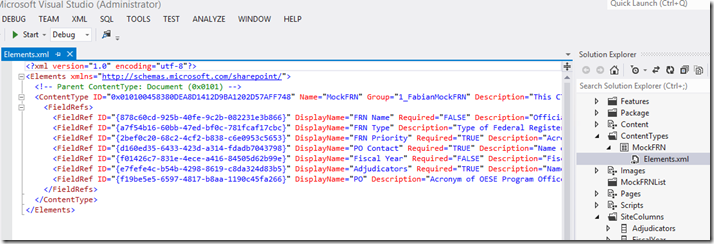
Now you may not see the significance of all the above work, and you discount it as not a ‘big deal’ but If you have EVER done this in previous version of SharePoint you will understand that you had to do this all by hand i.e. now UI Tooling, so the experience was to create all this by XML as you see below, which is still there for you behind the scenes, but now you get to do it in a tool
Create your List Definition and List Instance
Finally its time to add the last piece of our artifacts, the List Definition, see below, notice also the creation of our Site Columns and Content Types to the Right in the Project Solution
As with the Content Type there are a few configurations we need to do such as telling the Definition what kind of List/Library to inherit from. Normally I would usually do Document Set because usually I find that its NOT just one document asset they have that is a part of the Business Process Re-engineering effort but a slew of them. But for simplicity here i elect Document Library.
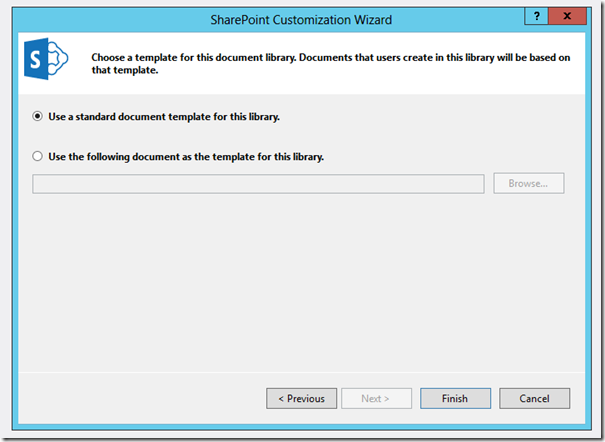
and what template to use. Now again, if you had a template that was already done that had all the information they need you can put it here. Normally, I take the “Paper Document” and make an Electronic version here OR I take the electronic version and either
(1) Strip out the Fields that I will elevate to a Site Column in the Content Type from the document or
(2) Use Word Parts such that when the Document Information Panel (DIP) asks for the Metadata information, it AUTO POPULATES the fields in the document as well. Up to you.
and we finally tell the list definition to use the content type we created earlier which of course has our site columns included. So this is quite easy right and you can see the logical flow here. By clicking on the Content Type button, you select the Content Type you earlier created and it will automatically put in the Fields that you selected.
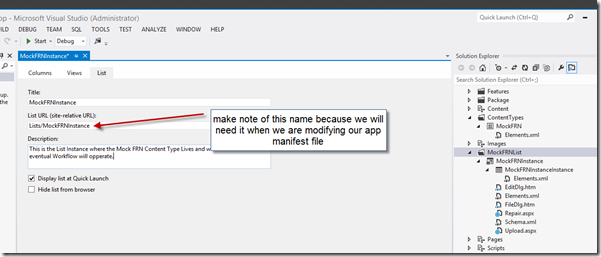
We also need to clean up our List Name and description as well as note the name of the List Instance because that will be the start page for our App Manifest so we can be taken directly to the List to add and item so the workflow can work
Now we almost to the end, we need to add a Workflow to our project and name it accordingly.
Create our Workflow – Finally huh 🙂
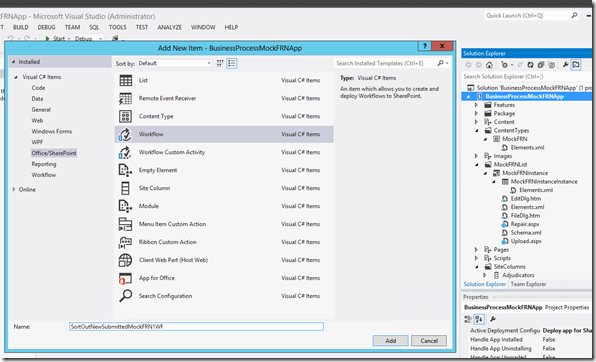
Now we add our Workflow Item to our Project.
Next again, you will need to configure a few steps such as what kind of workflow. Obviously we want a List Workflow for our project because we just spent all that time creating Site Columns, Content Types, and a List Definition to do it. So name your Workflow and be on your way.
what it will run on, that is the List instance we created earlier from our List Definition. Now the Project knows about our List Instance that we created, so we just select it from the drop down list and in this case we want NEW instances of a Workflow History List as well as its OWN new task List to use.
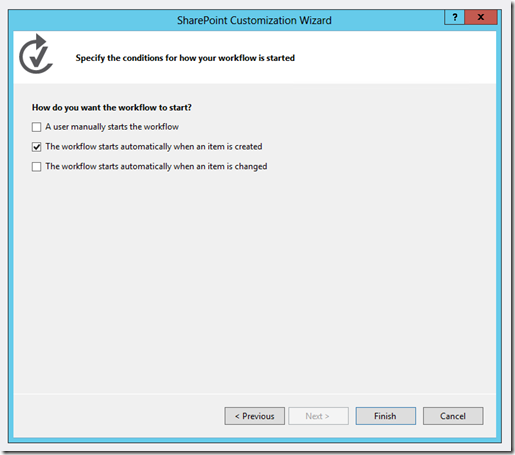
and how it will start. Now for testing purposes, I normally will have Manual as well as Item Created, but will clean that up before Production.
finally you get a solution where you get to design your workflow. I think there are enough call outs in the diagram so that you can get the picture 🙂
Next you get a few Workflow Activity items from the toolbox to design out your Workflow as below
We configure the task option either in the Project Properties window or you can click the configure link in he design surface and configure the options as you see me do below. Now in production you can certainly do business logic for alot of these options which as you see involve C# code that gets translated to XAML when you deploy your project
Here are a few more edits made to the project, things that you will see in the Outcome when testing. I am including the Logging as a mans to show you that there is nothing up my sleeves as well as it is good practice to document your workflow and give feedback to the End User/ Workflow Actor. The Logging below will show up in the Workflow History chronology.
A couple of things to call out here. You notice the “if” section and below it it has the “outcome_0 == 0” so basically, when you use a Task Activity the tooling will create for you a Variable called “outcome_0” and based on the disposition of the Task, it will be either Zero(0) or One(1) to denote the outcome. Zero means it is a Successful Approval.
Above again you will notice the UpdateItem Activity. I am saying here that if the Outcome is a successful Approval I want the Workflow to go ahead and Update the Field “FinalAdjudicationOutcome” to the choice field option you see above. I have the inverse of that applied on the Else side of the Conditional Check.
Below is just another logging to show you when the Workflow ends.
So when you are done, the resulting solution may look like the below
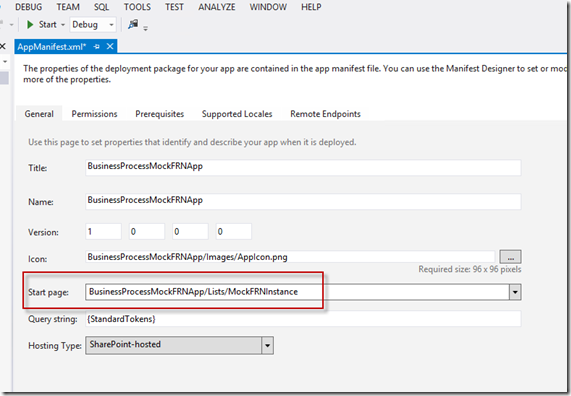
Now you remember when i said that you need to note the name of the List Instance, here is where you will use the name; you see, you want the App to begin on the List Instance you created and modify the Start Page setting
Once that is done, you go ahead and Deploy your solution to your site. The URL below shows the FQDN of the location where the App will be. This reflects the On Prem solution. As you know if you read the Precis, I think my App Model installation is busted which I found out in testing. So we are going to copy my solution to a Cloud SharePoint Instance I have.
A benefit to you the Reader
Now, this is indeed unexpected but it does show you that your Visual Studio Solution
A. Can be used on a Desktop WITHOUT SharePoint being installed AS LONG AS you are pointing to a Cloud Instance of SharePoint. Obviously, you are also not doing a Farm Solution
B. Your solution is Portable, you can move the same code between On Prem and in the Cloud as long again as it is NOT a farm solution
C. You can create a Development Environment in the Cloud, Azure Perhaps and kill it when you are done, no need to install VM’s to do SharePoint work anymore, with the same qualifiers as above
Now Deploy your solution and if you are successful you will see the below.
Testing in my On PREM environment
Once you examine the site by clicking on the URL, you can see the results of your Assets deployed inside your List Instance
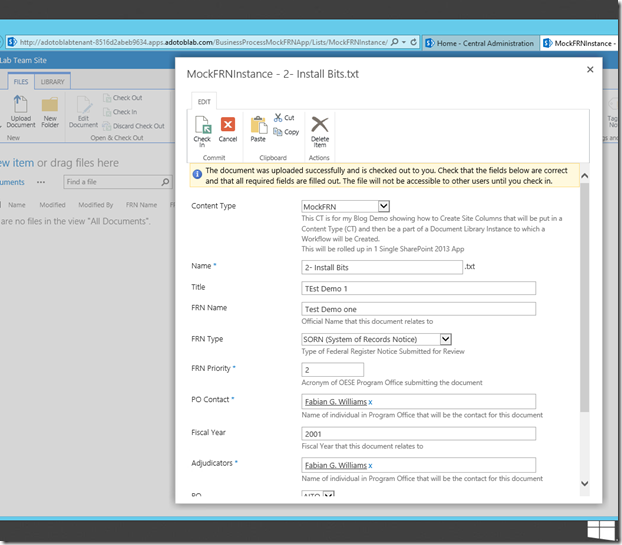
Next create a Item and fill out the Metadata fields
Here is where Testing Failed and I copied my code into a NEW VISUAL STUDIO PROJECT targeted at an Office 365 SharePoint Online Tennant
My New Visual Studio Project targeting SharePoint Online
So, I added a new Project to my Visual Studio Solution, see the callouts below
Deploying it gave success as well, see below. This time the URL targets my Office 365 SharePoint Online Instance.
Testing
The testing below occurs in Office 365 SharePoint Online after re-deploying our App targeting this environment.
Testing our Visual Studio Solution in Office 365 SharePoint Online
Now we will test again, this time in Office 365 SharePoint Online. Again we fill out the necessary Metadata fields.
This time we have our Workflow Starting as we can see bwlow
and you can see in the Workflow Status that we are set to go and the Workflow is working
next we adjudicate the Task Assigned
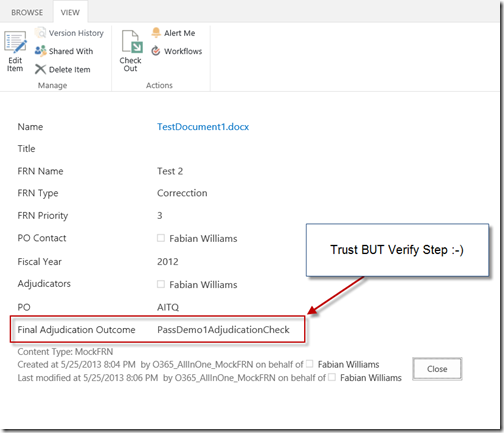
and our result is
Trust but Verify
Now, indeed, I had a few other steps in my SharePoint Designer 2013 version of this, using Stages, and we can certainly duplicate this in Visual Studio, but this blog post was long enough, and the simple truth is that you basically repeat the steps I have above and the Designer is built to show the FLOW that the workflow will take, so its “monkey with a wrench” work, the examples in this blog post shows you how to do it once, you now take that knowledge and repeat it as much as you need for a holistic solution.
Back to our workflow at hand. If you recall, if the person approved the Item, the Workflow should Update the List Item by changing the field of the “FinalAdjudicationOutcome” to what you see below, which it did. Furthermore, the images in the Testing Section shows some of the Logging we did so you can infer the path that it is taking.
Summary
So in the end, we still have our solution, our blog, and WE both learned a few things in this process. Have fun y’all. Irie.






















Really good job done!
Thanks a lot!
When you deployed to o365, was it to a standard site or a developer site? Just curious how then the app can be reused on other sites.
It was a developer site but I did run a POSH script that I found out there when using developer templates and it still didn’t work. I haven’t gone back to it since because I wanted to investigate my own implementation of Workflow Manager onPrem
I tried to create workflow by following steps mentioned by you. It worked successfully on online office 365 site. How should I get it worked on local sharepoint server site
Same process and I have outlined that in the post as well, you wont need the FedAuth or rfTa token for that one but everything else is the same.
i have follwed all the steps after all when i deployed, i got a blank site , not able to see our list and no any content also
please help
if you did not see your List/Library, check your App manifest file and make sure you point it AWAY from the default.aspx page and to your List. alternatively, you can modify the URL to point to your list itself. By default, when you deploy and app, it will always point to the default.aspx page unless you tell it otherwise in the app.manifest file.
Hi
Nice post.
I am not able to access List.
I tried,
~appWebUrl/POCList/List1POC?{StandardTokens}
~appWebUrl/POCList/List1POC
Both ways, still no luck.
I am able to access Pages/Default.aspx?{StandardTokens}
Where can i find Site Columns, Content Type and Custom List.
When i go to Developer Site i am able to see my App. But when i click that app, it is tacking to Home page.
In home page nothing is there, just my name is there.
All great questions, may I suggest as I did before in another comment. go into your app.manifest and change the location it points to which will be default.aspx to point to your list so it will be /Lists/[yourlistnamehere] and that will open up on your list. To your other question, this is an App, you don’t have these as columns or content types, they are all selfcontained in the App payload.
Thanks for your reply.
How to Add Submit button on Content type and how to start workflow thorugh submit button in custom list through app.
JavaScript code can do that with CSOM, now you have to do that research yourself. I hate JavaScript, I can do it, but its not fun. Blogging should be fun 🙂
Hi Fabian G. Williams,
Thanks for your reply.
I am trying to to extent REST API service using SharePoint Hosted App.
Is it feasible.
What i am trying to do is: I want to fire List event receivers in SharePoint Online.
Could you please provide some inputs.
Thanks in Advance.
How to make our site to support multilingual in share point 2013??
I don’t, I only work on English only Sites, but the language packs that are available
how can we call a form using content type on submit a form in custom list. please help
Wow…all I can is Wow…
I’m a Die Hard SharePoint Designer fan but am now slowly starting to learn building workflows using Visual Studio and this was the best place to start learning.
Thank you so very much for building this site. Mind if I add it as a link to my personal site at www1.christianfamily.biz?
let me know.
Thanks
Happy to be of value and Absolutely link to it all you want, just reference the author 🙂 Happy SharePointing
Thanks Fabian, I have added a link to this site on my site at https://christianfamily-public.sharepoint.com/How-To/SitePages/Home.aspx.
I gave you full credit for the development of this site.
[…] etc, I often will create my own Site Columns, Content Types, List Definition and Instance (see post here on how to do that). Once I complete that process I typically will Branch my Project (in TFS Online) and start to Dev […]